The following section provides an overview of the Admin Tool Graphical User Interface (GUI). The basic principle and all icons are explained.
In the run of this manual, we refer to the names of the GUI elements as they are explained here. In order to avoid redundancies, the icons are not always shown in each section.
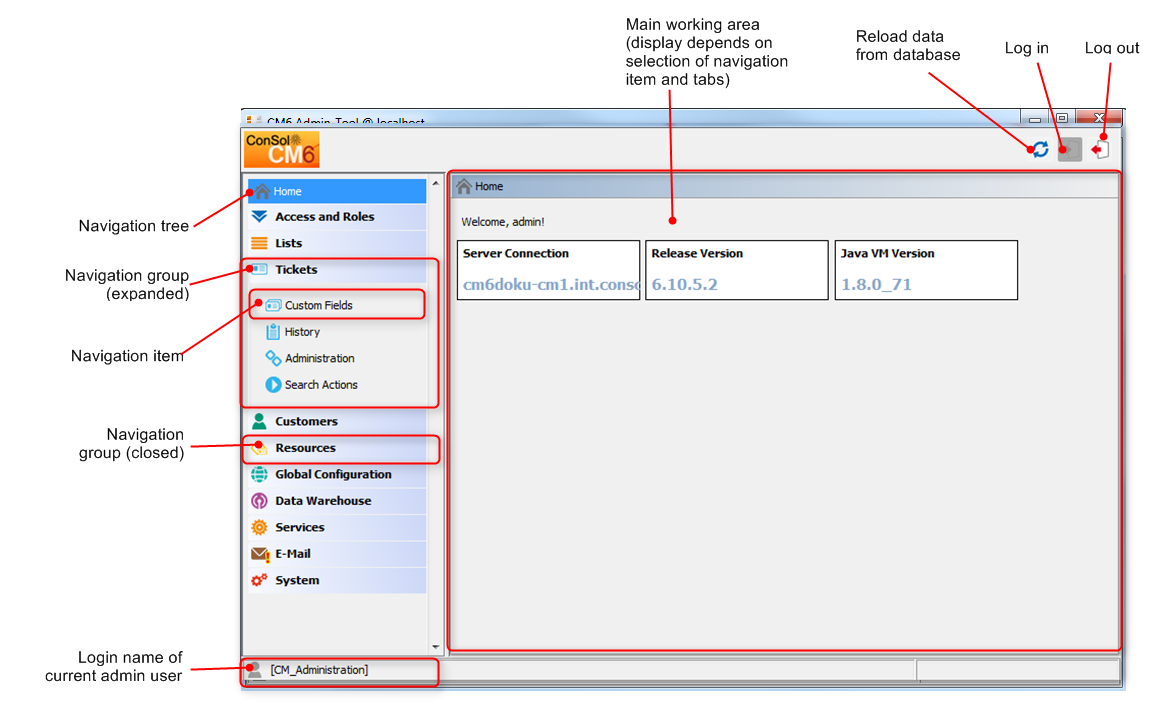
On the left-hand side, you see the navigation tree with the navigation groups. Each navigation group contains several navigation items. Click the name of a group to expand the group in the tree. Click a navigation item to open the respective tab in the working area on the left-hand side.
Figure 13: ConSol CM Admin Tool - GUI overview
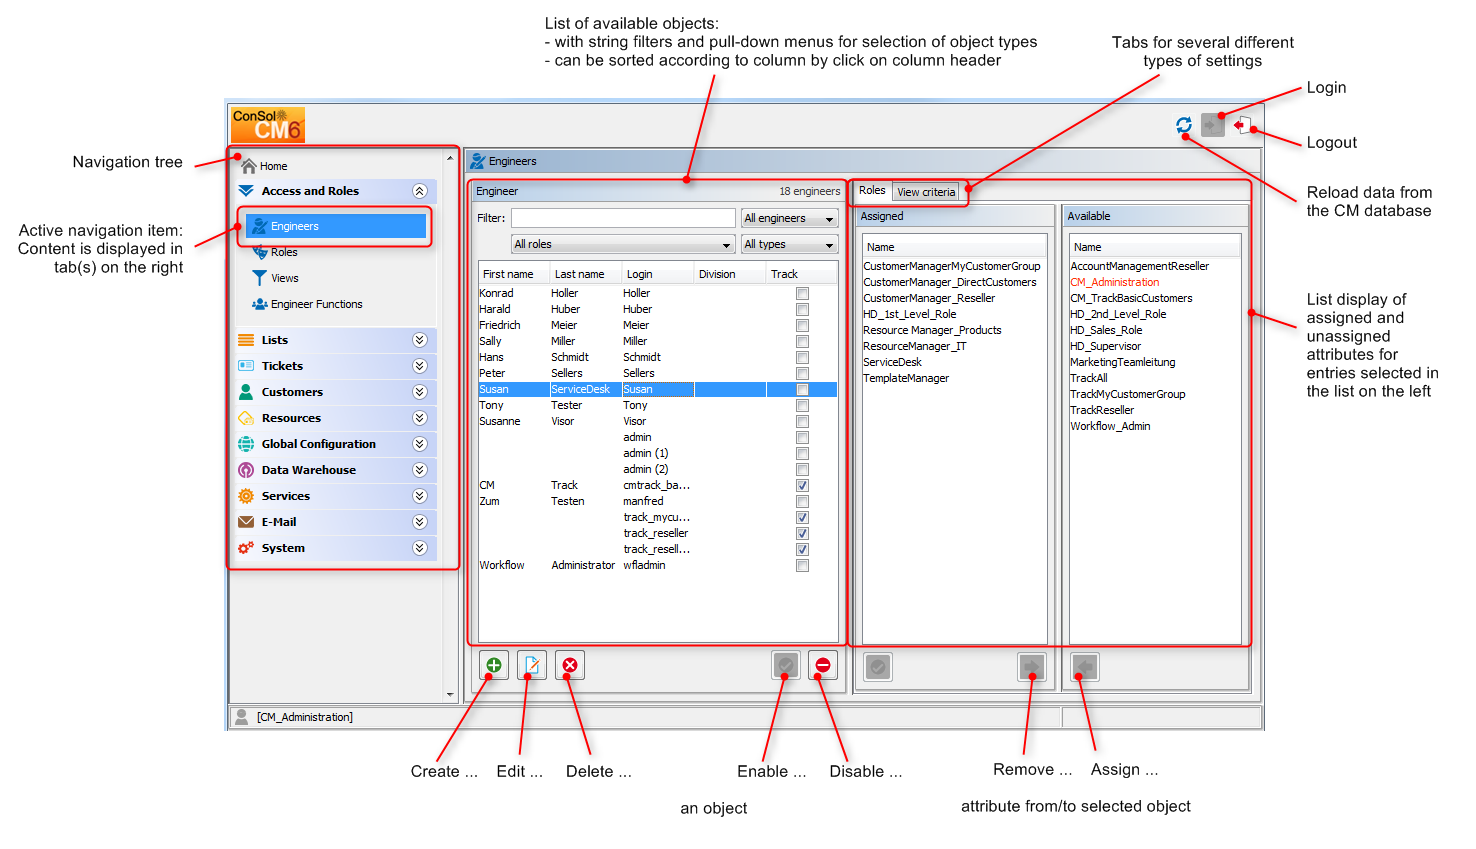
Figure 14: ConSol CM Admin Tool - GUI overview: Navigation item open
A list on the left shows the elements which can be modified. Elements can be added, edited, deleted, disabled, or enabled.
The attributes of an element are displayed on the right. You can move them from a list of available attributes to a list of assigned attributes either via double click or via clicking the Assign icon (example: available roles and assigned roles). Attributes can also be assigned via checkboxes or list boxes (not displayed here).
There are a couple of options to help you find the entries you want to edit more quickly:
Usually all changes performed in the Admin Tool are submitted immediately without the need to synchronize any data. However, if changes have been performed in another module and the Admin Tool has to use the new data, synchronization is required. This can be achieved by clicking the Refresh button in the icon bar.
One example for this is the deployment of a new workflow using the Process Designer. Before the new workflow can be assigned to a new queue, you have to synchronize the data in order to let the Admin Tool know that there is a new workflow. The Admin Tool loads all data from the database anew, including the new workflow. This new workflow can then be used for further operations, like assigning it to a new queue.
You work with the following icons when you administrate a ConSol CM system. Here, the general explanations are provided, please see the respective sections for a detailed explanation of conditions and implications of applying the functionalities in the respective context.
| Icon | Name | Meaning/Function | Examples |
|---|---|---|---|
|
|
Add / New | Add (= create) a new element of the respective type. | Add (create) a new engineer, a new view, a new script |
|
|
Edit | Edit the selected element. Usually a pop-up window is opened. | Edit an engineer, a class of text, a Custom Field Group |
|
|
Delete | Delete the selected element from the database. Cannot be restored. | Delete an engineer, a Data Object Group, a resource |
|
|
Copy | Copy the selected element | Copy a role |
|
|
Activate | (Re-) activate an element which had been deactivated before. | (Re-) activate an engineer whose account had been deactivated. |
|
|
Deactivate | Deactivate the selected element. Might be safer than deleting it. Elements which are in use cannot be deleted, so it can be an alternative to deactivate them. | Deactivate an engineer (account), e.g. when an employee takes a sabbatical. Deactivate a customer who has canceled the contract. |
|
|
Move upwards | Move an element one step upwards in a list. This might have implications for the Web Client. | Move a view two steps upwards in the list. The view will then be displayed in the view list in the Web Client at the new position. |
|
|
Move downwards | Move an element one step downwards in a list. This might have implications for the Web Client. | Move a Custom Field Group one step downwards in the list. It will then be displayed in the ticket data section, maybe in the group section, at the new position. |
|
|
Unassign | Unassign/remove an element from the selected item. | Unassign a role from the selected engineer. |
|
|
Assign | Assign an element to the selected item. |
Assign a role to an engineer. Assign a view to a role. |
|
|
Annotate (CM versions 6.10.2 and below) | Open the Annotation pop-up window |
Used for Custom Field Groups, Custom Fields, Data Object Groups, Data Object Group Fields, Resource Groups and Resource Fields |
|
|
Annotate (CM versions 6.10.3 and up) | Open the Annotation pop-up window | Used for Custom Field Groups, Custom Fields, Data Object Groups, Data Object Group Fields, Resource Groups and Resource Fields |
|
|
Localize / Internationalize | Open the pop-up window to enter the localized / internationalized names of the technical objects. The languages which have been configured in the Admin Tool are offered. | Localize the name of a Custom Field. |
|
|
Search | Open the Search GUI. | Start the ticket search. |
|
|
Select all | Marks all elements (often checkboxes), no database action is performed, only GUI helper | Mark all permissions for a role concerning queue access |
|
|
Deselect all | Deselects all elements (often checkboxes), no database action is performed, only GUI helper | Deselect all permissions for a role concerning queue access |
|
|
Start | Start the selected element (usually a service) | Start a CM service |
|
|
Stop | Stop the selected element (usually a service) | Stop a CM service |
|
|
Upload | Open the file browser to upload a file to the CM system | Upload a script |
|
|
Download / save | Save a file on the file system | Save a script as file in the file system. |
|
|
Save and close | Saves the element (usually a script) and closes the editor in edit mode. Switches to view mode. | Save a script in the script section and switch to view mode of the script. |
|
|
Close without saving | Does not save the element (usually a script) and closes the editor in edit mode. Switches to view mode. | Do not save the edited script in the script section and switch to view mode of the script. |

|
Refresh | Updates the data in the Admin Tool. | Update the data in the Admin Tool after making changes in the Process Designer. |
ConSol CM can be configured for international environments. In this way, every engineer can work with the country-specific language in the web browser. The following principles are important concerning localization / internationalization:
The CM administrator configures the languages which will be available in the entire system. This is done using the Admin Tool and is explained in section Languages.
The languages which are configured as available languages in the Admin Tool can then be applied for all terms which have been configured for the CM system, e.g., the terms for Custom Fields. Using the Process Designer, the labels for workflow activities can also be localized. This is explained in the ConSol CM Process Designer Manual. Thus, there are two different categories of terms in the Web Client:
In the Web Clients (CM Web Client and CM.Track), the labels are displayed according to the browser locale which has been set by the engineer or the customer.
Depending on the location in the Admin Tool, there are different GUI elements which are used to set localized values. However, the general principle is valid for all those locations. The general principle works as follows (explained for the example of a Custom Field).
Technical name:
Each field or object has a technical name, e.g. the Custom Field priority. This name is set when the field or object is created and should not be changed afterward because it might be used in Admin Tool or workflow scripts which would fail when the name has been modified. CM throws a warning message and blocks the action when someone tries to modify a technical field or object name. Only when the field or object is new and has not been used yet, it is possible to change the technical name.
Localized names:
For each field, field group or object a localized name can be set for each of the languages which have been configured for the CM system (using the settings in the navigation group Global Configuration, navigation item Languages).
For example, the Custom Field with the technical name priority is named HD Priority in English and HD Prioriät in German.
In the Web Clients (CM Web Client and CM.Track), the labels of the fields and objects are displayed according to the browser locale of the engineer or customer. Some variants are possible:
The localized terms for data fields are written directly into the Labels section in the Admin Tool. This applies to

Figure 15: Admin Tool: Localization of Custom Fields
In order to change the value of a field, click into the field and write the new term. Press ENTER to save the new value.
In the Web Client, the Custom Field shown in the figure above is displayed as follows (in English and German):

Figure 16: Custom Field displayed in Web Client, English browser locale

Figure 17: Custom Field displayed in Web Client, German browser locale
A great number of objects can be localized using the Localize / Internationalize (globe icon) button which opens a pop-up window with the localization configuration.

Figure 18: Admin Tool: Localization of objects, example: name of a view
In order to change the value of a field, click into the field and write the new term. Press ENTER to save the new value.
Some objects are localized using the localization table within the pop-up window which is used to edit the object.

Figure 19: Admin Tool: Localization of objects, example: name of an engineer function


