Business Calendars
Introduction
A business calendar defines working hours. This can be used, for example, to represent the business hours of the Service Desk team to avoid system escalations being fired during non-business hours.
In ConSol CM, you can define as many business calendars as your company's environment requires. In this way you can configure specific working hours for each team.
Tickets which have not been assigned to an engineer within an hour of opening the ticket are automatically moved to an escalation level. If a calendar defines working hours from 8 a.m. to 5 p.m. and a ticket arrives at 4:45 p.m., the ticket will not escalate at 5:45 p.m. but at 8:45 a.m. the next day. This time is calculated as follows: 15 minutes between ticket arrival and end of the working hours plus 45 minutes from next beginning of the working hours until the full hour given by the escalation limit is reached.
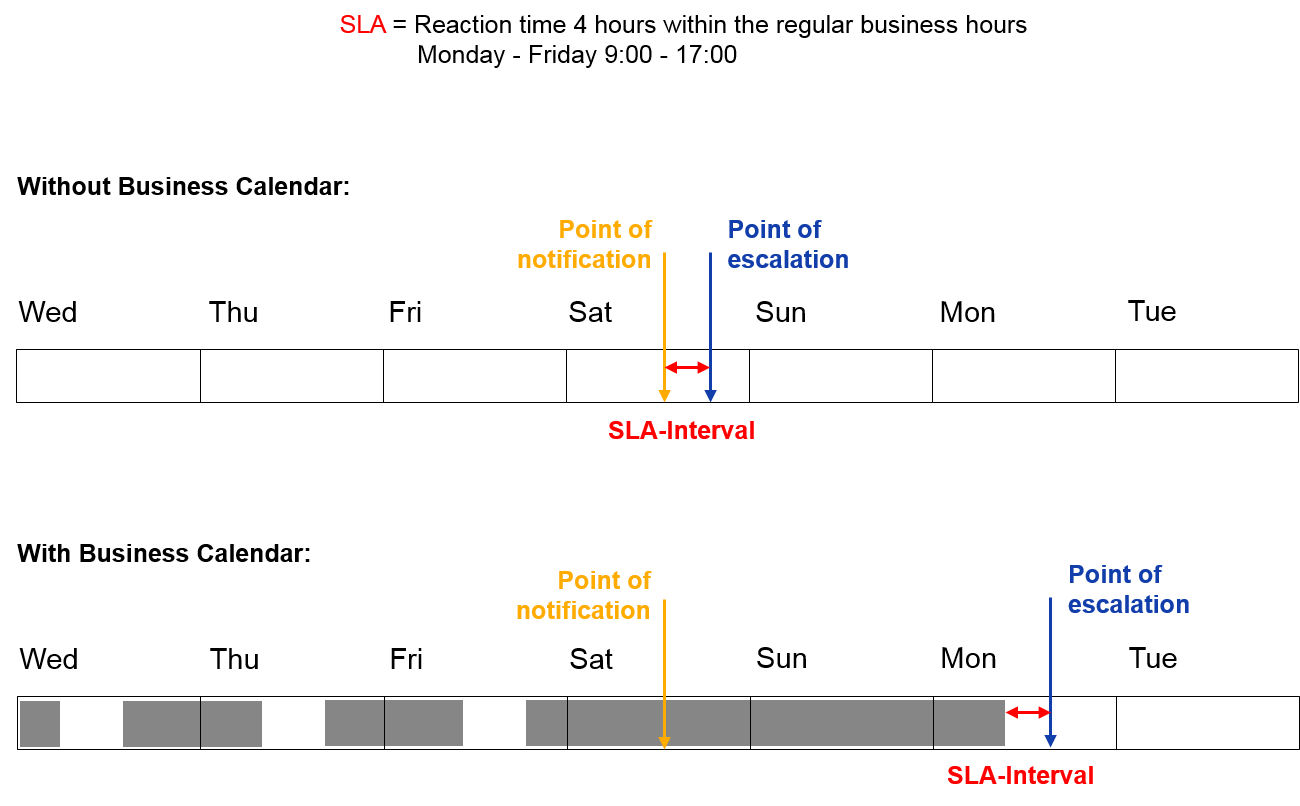
Figure 172: ConSol CM Principle - Business calendar
Aside from working hours, you can define holidays, too. On these days the automatic escalation pauses entirely. Holidays have to be defined per calendar. It is not possible to define a holiday that is valid for all existing calendars simultaneously.
If you want to work with times which are defined in a business calendar (e.g., use active time for a timer trigger in a workflow for an escalation), you have to perform three steps:
- create the business calendar with its active/inactive times (Admin Tool, see explanation below)
- assign the business calendar to all queues where it should be in operation, see section Queues (Admin Tool)
- assign the use of a calendar to every single workflow element where the calendar should be used as the basis for time calculations (Process Designer), as explained in the ConSol CM Process Designer Manual.
Configuration of Business Calendars Using the Admin Tool
In the Admin Tool, business calendars are defined via the navigation item Business Calendars in the navigation group Global Configuration.

Figure 173: ConSol CM Admin Tool - Global Configuration, Business Calendars
- List of available business calendars (1)
- Configured working hours for the selected calendar (2)
- Holidays in the selected calendar (3)
- Button to import holiday definitions from an external csv file (4)
Creating a New Calendar
Click the Add button in the left part of the page to create a new calendar.
- Name:
Enter a unique name for the calendar. - Timezone:
Choose the time zone to be used for the calendar.This field only describes to which time zone the defined hours refer. The calendar itself is valid worldwide for the respective workflow!
Example:
The ConSol CM server is located in Detroit, MI, USA. In the business calendar, Europe/Berlin is set as time zone. A time trigger which uses the business trigger would fire based on Berlin time, not Detroit time.
Click Save afterwards to create the calendar.
By clicking the Edit button, you can modify a selected calendar in the same way. Click the Delete button to delete the selected calendar.
Defining the Working Hours for a Calendar
Select a calendar on the left and click the Add button in the middle part of the page to create the days and hours for this calendar.
- Time range
Enter the time range for which the automatic workflow escalations shall be active. - Days
Select the checkboxes of the days for which the time range shall be valid. It is possible to choose individual days or all days at once (checkbox All).If the system detects an inconsistency between the time defined here and an already existing time, you will get a corresponding message.
Click Save afterwards to create this time range for the marked days.
If you want to edit the time range later, you have to do it separately for each day. Select the respective day, click the Edit button and change the time range in the window that appears. Or click the Delete button to delete the time range for a selected day. It is not possible to edit or delete the time range for multiple days at once.
Defining the Holidays for a Calendar
You can define the dates and time periods for holidays using one of two approaches:
- Defining the holidays manually.
- Importing the holidays from an Excel file.
Defining the Holidays for a Calendar Manually
Select a calendar and click the Add button in the right side of the page to create a new holiday entry.
- Name:
The name of the holiday. - From:
The date of the holiday. - To:
If it is a multi-day holiday (e.g., Christmas), you can enter the last date of the holiday here.It is not possible to define holidays that last only half a day.
Click Save afterwards to create the holiday.
If you want to edit a selected holiday entry just click the Edit button. Clicking the Delete button deletes one or more selected entries.
Importing Holidays for a Calendar from a .csv File
Holiday data can be imported from a .csv file conforming to the following format:
- First column: title/name of the holiday
- Second column: start date
- Third column: end date (use the same date as start date if it's a one-day holiday)
- Separator: comma (no comma at the end of the line)
- Slashes for the dates
Christmas,24/12/2020,26/12/2020
New Year,01/01/2020,01/01/2020
Easter,10/04/2020,13/04/2020
Please note that all dates for the holiday import must be written in the following format (as shown in the example): DD/MM/YYYY!
In the Admin Tool navigation group Global Configuration, navigation item Business Calendars, select a calendar and click the Import holidays button and enter the path to the .csv import file.
The new holidays will be imported in the holiday list of the selected business calendar.