Client configurations
Introduction to client configurations in ConSol CM
Client configurations can be used to configure the user interface of CM/Track and customer-specific REST clients. This manual describes the configuration of CM/Track.
Concepts, terms and definitions
|
Concept |
Other terms |
Definition |
|---|---|---|
|
CM/Track |
|
ConSol CM add-on, portal which allows customers to create and view their cases |
|
JSON |
JavaScript Object Notation |
Format used for client configurations in ConSol CM |
|
activity form |
ACF, Activity Control Form |
Form which is displayed when the user executes an activity. The required fields of the form need to be filled out before proceeding. |
|
default values script |
prefill script |
Script used to prefill fields with certain values for case creation |
Purpose and usage
The client configuration allows to define the following aspects for CM/Track:
- displayed components
- layout of the case page
- localization for various languages
It is possible to create several client configurations for different CM/Track instances. The mapping is done using system properties, see Mapping the client configuration to the CM/Track instance.
A client configuration consists of one or several JSON files where the settings are made. These settings override the default configuration of CM/Track. The default configuration is used for all aspects which are not configured explicitly in the JSON files, i.e. the JSON files do not have to be complete. It is sufficient to configure the deviations from the default configuration.
Available attributes for client configurations
The client configuration for CM/Track includes the following files:
- config.json
Contains the configuration of CM/Track after logging in. This includes the welcome page, the case page and the password change functionality. - localization.json
Contains the localization of the GUI texts which are displayed after logging in to CM/Track. By default, the file is available for English (localization_en.json) and German (localization_de.json). Other language variants can be added to localize CM/Track for these languages. - public.json
Contains the configuration of CM/Track before logging in. This includes the password reset functionality and localizations.
The following sections describe the available settings in each file.
config.json
This file contains the settings for displaying cases and the welcome page. The following attributes can be used in this file:
- layout | editLayout | viewLayout
Determines the order and size of the case fields. With layout, you can specify a layout for both creating a case and viewing a case. Alternatively, you can use editLayout for case creation and viewLayout for case display. - layoutOptions | editLayoutOptions |viewLayoutOptions
Determines additional settings for the field layout. Two attributes are available:- expandable
Determines which fields are displayed:- true: Case fields which are not explicitly mentioned in the JSON layout attribute but which are set to customer exposed are displayed.
- false: Only case fields which are explicitly mentioned in the JSON layout attribute are displayed.
- defaulColumnsNr
Only used if expandable is true and a case field group is not explicitly mentioned in the JSON layout attribute. Defines how many columns are used to display the fields.
With layoutOptions, the settings apply to both creating a case and viewing a case. Alternatively, you can use editLayoutOptions for case creation and viewLayoutOptions for case display.
- expandable
-
acf
Determines the order and size of the fields of activity forms.Use 3 columns in your activity form if you have tables which require lots of space.
- commentRequired
Determines if the user must enter a comment when creating a new case (true) or not (false). - historyOrder
Determines the order of the case history entries. Two values are possible: descending for displaying the newest entries first (default value) and ascending for displaying the oldest entries first. - disablePasswordChange
Determines whether the user can change his password in CM/Track (false, default value) or not (true). If this attribute is set to true, the menu item Change password is not available. - usePrefillScript
Determines whether the default values script of the queue is executed when a user creates a new case (true) or not (false), see Scripts of the type Default values. - newsConfiguration
Determines the content and appearance of the news box which can be displayed on the welcome page, see Configuring the news. - welcomePage
Determines the content and appearance of the boxes for case creation which are displayed on the welcome page, see Configuring the boxes for case creation. -
richTextEditorSettings
Determines the settings for the editor used in comments and rich text fields, see Configuring rich text fields. -
createTicketQueuesSortOrder
Determines the order of the queues in the queue selector when creating a case. The first queue is preselected on the case creation page. Specify the technical names of the queues separated by comma. The queues which are not configured in this attribute are displayed in alphabetical order by their localized names after the ones which are configured.
localization.json
The localization files, e.g., localization_en.json and localization_de.json, contain the GUI texts which are displayed in CM/Track in the respective language after logging in.
In addition, you can adapt the delimiters which are used for fixed point numbers by adding the attributes number_decimal_separator and number_group_separator with the desired delimiters to the localization file of each language.
The following example shows the attributes with the default values for English:
-
Decimal separator:
'number_decimal_separator': '.'
-
Thousands separator:
'number_group_separator': ','
public.json
The public.json file contains the configuration of CM/Track before logging in. This includes the password reset functionality on the login page and localizations.
The following attributes can be used in this file:
- disablePasswordReset:
Determines whether the user can reset his password on the login page of CM/Track (false, default value) or not (true). If this attribute is set to true, the link Forgot your password? is not displayed. - signin, i18n, en and signin, i18n, de:
Contains the GUI texts which are displayed on the login page.
Basic tasks
Working with client configurations
Each client configuration has its own tab. At the bottom of the page, you can find the actions which apply to the whole configuration. Each file within a configuration has its own editor. The actions below the editor refer to the respective file.
You can perform the following actions on client configurations:
- Create a new client configuration
Click the New configuration button, enter a name for the configuration and select a template if you want to automatically create the required files. Currently, the only available template is TrackV2 for CM/Track configurations. - Edit a client configuration
Click the Edit configuration button. You can modify the name of the configuration. - Delete a client configuration
Click the Delete configuration button. The configuration is deleted upon confirming the warning message. - Add a file to a client configuration
Click the Add file button. You can select a file from the TrackV2 template. In this case the file name is populated automatically. Otherwise you have to enter a name for the file. - Edit the name of a file
Click the Edit icon next to the file name to modify the name of this file. - Delete a file from a configuration
Click the Delete file button below the editor of the file to remove this file from the configuration. - Edit the content of a file
You can edit the content of the file in the editor displayed below the file name. Click the Save changes button below the editor to save your changes. If you modify several files you can also use the Save all files button at the bottom of the page. Click the Discard changes button below the editor to revert your changes to the respective file. See Using the JSON editor features for details about the capabilities of the editor.
Configuring the case page
The following aspects can be configured for case pages in the config.json file:
- Field layout when creating a case
- Field layout when viewing a case
- Field layout in activity forms
- Use of a default values script when creating a case
- If a comment is required to create a new case
- Order of the history entries when viewing a case
The following aspects can be configured for case pages in the localization.json file.
- GUI texts
- Delimiters for fixed-point numbers
Rules for configuring the field layout
The following section describes how to define the field layout. The general principle applies to the following attributes:
- layout
- viewLayout
- editLayout
- acf
The following rules apply:
- All case fields which should be displayed in CM/Track must be explicitly configured for usage in CM/Track using Availability via REST settings beforehand, see CM/Track.
- All lines (arrays) which contain case fields must have the same number of elements. Use the placeholder EMPTY for empty cells. Empty cells can only be added at the end of a row.
- Do not write comments in the JSON file.
- In activity forms, fields which are not configured explicitly are displayed below the configured fields.
In the below example, the case layout has two rows and three columns. The first row contains the fields module and categories. The field categories spans two columns. In the second row, there is an empty position next to the field priority.
"layout": {
"helpdesk_standard": [
["module", "categories","categories"],
["reactiontime","priority","EMPTY"]
]
},
The following example shows a configuration for an activity form called qualify with the field categories spanning two columns:
"acf" : {
"qualify": [
["impact", "severity", "EMPTY"],
["categories", "categories", "EMPTY"],
["product_table", "product_table", "product_table"]
]
}
If the field names are not unique because the activity form contains fields of several case field groups, you need to use the syntax groupName.fieldName to reference the fields.
Use 3 columns in your activity form if you have tables which require lots of space.
You can use headlines to structure the fields:
-
Set the field to Text display with the value Title.
-
Add the field to the layout attribute.
-
Make sure that the group which the field belongs to includes at least one field which has a value. Otherwise, the whole group is omitted when viewing the case.
Configuring rich text fields
Comments and rich text fields have rich text editors. They are configured in the attribute richTextEditorSettings, which contains several settings:
-
customfieldContentFileMaxSize
Indicates the maximum size of one image in the editor in megabytes. This applies to both rich text fields and the comment field. -
froalaConfig
Allows to configure the settings of the editor. By default, the editor includes the following options: bold, italics, underline, font, font size, and image. The available settings can be found on https://froala.com/wysiwyg-editor/docs/options. The scope of the settings is determined by the sub-attribute:-
mainCommentEditor: The options apply to the comment field.
-
commonRichTextFieldsEditor: The options apply to all rich text fields.
-
group.field: The options apply to the specific field indicated by its group and field name.
-
The following example shows how to use the settings:
"richTextEditorSettings": {
"customfieldContentFileMaxSize": 10,
"froalaConfig": {
"mainCommentEditor": {
"heightMin": 200,
"toolbarButtons": [[
"bold", "italic", "underline", "strikeThrough", "|",
"align", "|", "paragraphFormat", "fontFamily", "fontSize", "textColor", "backgroundColor", "-",
"subscript", "superscript", "|",
"formatOL", "formatUL", "indent", "outdent", "|",
"insertTable", "|", "specialCharacters", "insertLink", "insertImage"]]
},
"commonRichTextFieldsEditor": {
"height": "auto",
"toolbarButtons" : [
"bold", "italic", "underline", "fontFamily", "fontSize", "insertImage"
]
}
}
}
If the rich-text field has the setting Rich text display in view mode, the text used in the link and the title of the popup window can be configured in the localization.json file. Add the following keys:
'preview_show_link': '[Show content]',
'preview_dialog_title': 'Content view'
Configuring the welcome page
The welcome page is displayed after the user has logged in to CM/Track. It consists of the following elements:
- Customizable header
- Customizable welcome message
- Search field
- Colored boxes with links to create cases in the queues for which the user has the required permissions. If the number of queues is greater than four, then the fourth box contains a list with all remaining queues. Each regular box contains a Create button, which allows to create a case for this queue.
- If the news feature is configured, a box displaying news
The following files are relevant for configuring the welcome page:
- config.json
- localization.json
The following figure shows a welcome page for a user with access to two queues. Note that all queues to which the user has access are displayed on the welcome page, even if they have not been configured explicitly. Queues without a customized configuration are shown with the default settings.
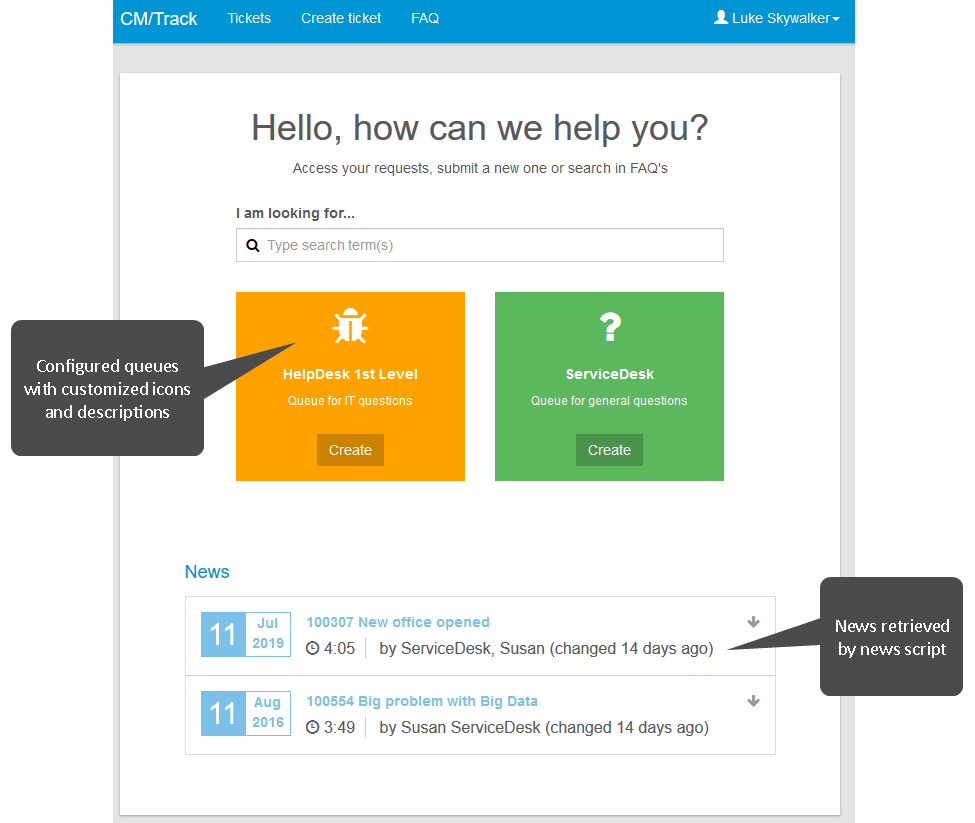
Configuring the boxes for case creation
The following example shows a configuration for the welcome page in the config.json file:
"welcomePage": {
"queuePanels": [
{
"@name": "HelpDesk_1st_Level",
"description": "custom_HD_description",
"icon": "fa-bug"
},
{
"@name": "ServiceDesk",
"description": "custom_SD_description",
"icon": "fa-question"
}
]
}
Code example 33: Example configuration of the welcome page
The following example shows the keys created for the welcome page in the localization.json file:
{
"custom_HD_description": "Queue for IT questions",
"custom_SD_description": "Queue for general questions"
}
Code example 34: Excerpt from localization_en.json showing the custom labels created for the queue description
The following parameters are available:
-
@name:
Technical name of the queue, not displayed. -
description:
Description of the queue, can either be a fixed string without localization or a key from a localization file. In the above example, custom_HD_description and custom_SD_description are keys which have to be present in the localization files. If the value of the description does not match a key in the localization files, it is treated as a string which is used as a non-localized description.If no description is provided, the description of the queue from the queue configuration in the Web Admin Suite is used.
-
icon:
Name of an icon from the FontAwesome icon set (see https://fontawesome.com/v4/cheatsheet/). Use the following syntax: fa-<name of the icon>. You can use icons from versions 4.4 and below.If no icon is provided, a folder icon is used.
If no explicit configuration is provided, the default values (description of the queue in the Web Admin Suite and a folder icon) are used. All queues for which the user has permissions to create a cases are displayed.
If more than one queue is available, the order of the queues is the order in which the queues are configured in the config.json file. The queues which are not explicitly configured are displayed at the end.
Configuring the news
The welcome page can be extended by including news. For this purpose, a script of the type News publisher (see Scripts of the type News publisher) is created on the Scripts page of the Web Admin Suite, and the display configuration of the news is added to the config.json file. The news which are returned by the script can be retrieved from several sources, for example, ticket comments or RSS feeds, or created directly in the script.
The following code shows an example of the news configuration in the config.json file. It configures the display of news items as created by the script news.groovy. Please see News widgets for a description of the other settings.
"newsConfiguration": {
"scriptName": "news.groovy",
"autoscroll": "smooth",
"title": "News",
"height": 350,
"createDate": true,
"updateDate": true,
"author": true,
"color": "#488ca1"
}
Code example 35: newsConfiguration section of config.json file
The localized title of the news section is added to the attribute newsTitle of the localization_en.json / localization_de.json file. If no localized title is specified, the default title “News” is displayed.
Configuring the password functionalities
The password functionalities are configured in the following places:
- Forgot your password? link on the login page
File: public.json
Attribute: disablePasswordReset - Change password menu item of the logged in user
File: config.json
Attribute: disablePasswordChange.
In both cases, false means that the respective item is displayed and the user can change / reset the password, and true means that the password cannot be modified. The default value is false.
Advanced tasks
Using the JSON editor features
The JSON editor has the following features:
-
Syntax highlighting
The editor uses syntax highlighting for JSON. -
Attribute snippets
Press CTRL + SPACE to insert a snippet of the desired attribute. -
Keyboard shortcuts
There are keyboard shortcuts for common operations. Examples:- Undo: CTRL + Z
- Find: CTRL + F
- Find next: CTRL + G
- Replace: Shift + CTRL + F
- Replace all: Shift + CTRL + R
-
Text highlighting
You can double-click a word or mark some text to highlight all its occurrences within the file.
Setting system properties for CM/Track
There are several system properties which need to be set for using CM/Track.
Mapping the client configuration to the CM/Track instance
Use the property cmas-restapi-core, domain.map.for.client.config.<name> to map the client configuration to one or several CM/Track instances. The property value has to be the domain without the protocol, target port (if required), and path of the respective CM/Track instance. If you want to map several CM/Track instances to the same client configuration, you can use a comma-separated list of domains.
Example:
- Name of the client configuration: trackConfig1
- Name of the property: cmas-restapi-core, domain.map.for.client.config.trackConfig1
- Value of the property: myserver:8080/track
This system property has to be added manually.
Allowing communication between ConSol CM and CM/Track
For security reasons, communication between the ConSol CM server and CM/Track needs to be enabled explicitly. This is done using the following system properties:
- cmas-restapi-core, csrf.request.filter.enabled
- cmas-restapi-core, csrf.domain.white.list
- cmas-restapi-core, csrf.domain.allow.none
Managing client configuration after updates
The template for the client configuration is added during the installation or update of ConSol CM. When you update ConSol CM to a newer version, the files of existing configurations are left as is. This means that new configuration options and localizations are not added automatically. You can add them manually after the update based on the template files.