CM/Forms
Introduction to CM/Forms
CM/Forms is a ConSol CM add-on which enables the creation of web forms. Web forms can be filled out by unregistered users, i.e. user who have not logged in or user who have not yet been created in the Web Client or CM/Track.
Concepts, terms and definitions
|
Concept |
Other terms |
Definition |
|---|---|---|
|
webhook |
|
Mechanism to allow communication between ConSol CM and external applications |
|
submission |
|
Data which was entered in the web form by a user and sent to ConSol CM by submitting the web form |
Purpose and usage
Web forms are managed in the menu item Forms of the Web Client. Administrator permissions are required to work with web forms.
A web form consists of two components: the form itself, which includes the general configuration and the form fields, and a script to process the submitted data. This can be either an integration scripts, which is used together with a webhook, or a task script, which is used when the submissions are recorded in the ConSol CM database.
Web forms can be useful in a variety of use cases:
- Registration forms
Create a web form which allows your users to register themselves for CM/Track. - Feedback forms
Collect feedback from your customers and directly associate the feedback with a case. - Application forms
Create a form where candidates can enter their data and upload a CV. - Wizards for case creation
Provide an assistant which guides the user through the process of creating a case.
Available settings for web forms
Basic form data
The basic form data are shown in the upper section of the web form:
- Name: Mandatory. The internal name for the web form.
- Public name: Optional. The public name of the web form. You can click the Generate button to fill it with a unique string consisting of random characters. If the form is published on the ConSol CM instance, the public name is part of the URL used to access the web form.
- Publish type: Mandatory. Determines how the web form is made available. See Publishing a web form. Possible values are:
- NONE: Client requests to the form are not possible.
- CM: The form is published on the ConSol CM instance. The URL is: <CM server>/cm-client/cf/<public name>. It can be used in an iFrame.
- OWN: The form is published in its own instance. It is necessary to have an external client application which serves the form. The use of an iFrame is not possible.
- FULL: The form is published on the ConSol CM instance, and can be also published on its own instance at the same time. This is the combination of the publish types CM and OWN.
- Condition script: Optional. The name of the condition script (script of the type Web form condition). The script checks if the form can be used by the client. It is executed for GET and POST requests. The script has to return the response “200” for the form to be displayed. The following variables are available in the script:
- remoteIp: IP address of the client requesting the form
- formName: name of the form
- formPublicName: public name of the form
- Persist submits: Optional. Select this option if the data which is submitted using the web form should be stored in the ConSol CM database table cmas_custom_form_submission. This allows to track the user submissions and to process submissions in a batch, e.g., using a task. See Data processing.
- Webhook: Optional. The webhook which is notified when a user submits a form. See Data processing. There are two options:
- ConSol CM webhook: Enter the name of the webhook.
- External webhook: Enter the complete URL.
- Version: Mandatory. The version of the web form. Click the Increment button to increment the version. The version can be used if significant changes are made after first publishing the form. The version is saved in the submission, so that processing scripts can handle changes to the form.
- Form active: Optional. Select this checkbox if the web form should be active, i.e., it can be used according to the selected publish type.
Form design
The lower section contains the designed form. The form.io library is used for designing the form. The available form components are displayed on the left and the form is displayed on the right.
The Form type setting determines the basic structure of the form:
- Form
Use this option if the web form should have one page. - Wizard
Use this option if the web form should have several pages.
You can drag-and-drop the desired components to the form on the right side. The configuration dialog for the component is opened automatically, see Fine-tuning a web form.
You can find more information in the official documentation of the form.io library (see Form Components, Layout Components and Data Components).
Data processing
There are two options for processing the data submitted in the web form:
- Webhook
Precondition: A webhook is configured for the web form.- The submitted data is sent to ConSol CM using the webhook.
- The integration script of the webhook processes the data.
- The data is saved in the ConSol CM database, e.g., in a case or contact.
You need to enter the name of the webhook in the Webhook field of the basic data, see Basic form data.
If the web form is published on the same instance as ConSol CM (publish type CM), the IP of the ConSol CM instance has to be allowed by the webhook. The webhook needs to be secured by IP address. The use of secret tokens is not possible for CM/Forms. See Webhooks for further information on how to create a webhook.
- Database
- The submitted data is saved directly to the ConSol CM database in the table cmas_custom_form_submission.
- The data is processed at a later time, for example, using a task script which is executed periodically.
You need to enable the checkbox Persist submits in the basic data, see Basic form data, and create the task script for processing the data, see Creating a task script.
The following figure illustrates data processing using a webhook (blue data flow) and persisting submits (yellow data flow).
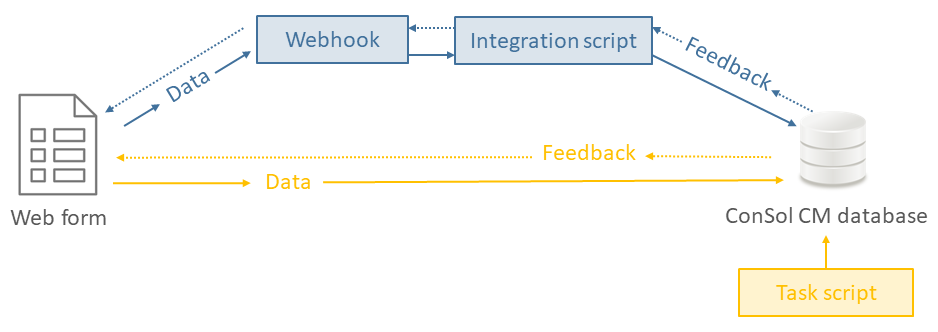
Figure 29: Data processing for web forms
It is possible to both persist submits and use the webhook for one web form. The acceptance of the submission depends on the selected option:
- Persist submits + webhook
The submission is accepted if the webhook returns 200. Otherwise, the submitting user sees an error message. Nevertheless, the submission is saved to the database even if the webhook returns an error. - Only webhook
The submission is accepted if the webhook returns 200. Otherwise, the submitting user receives an error message. - Only persist submits
The submission is accepted if the data is saved to the database.
If submits are only persisted, the web form is not notified about the result of the processing performed by the task script, i.e., the user who submitted the web form will not know if his request could be processed successfully.
Publishing a web form
Depending on the selected publish type, see field Publish type in the Basic form data, and the desired usage of the web form, there are different options for making the web form available.
Common use cases are:
- Publish type CM, internal usage within the company
- Publish type CM, web form served from an URL provided by ConSol CM, external access possible
- Publish type CM, web form embedded in a website using an iFrame, external access possible
- Publish type OWN, web form served from a custom-made application, external access possible
The following figure shows a typical setup for the third use case:
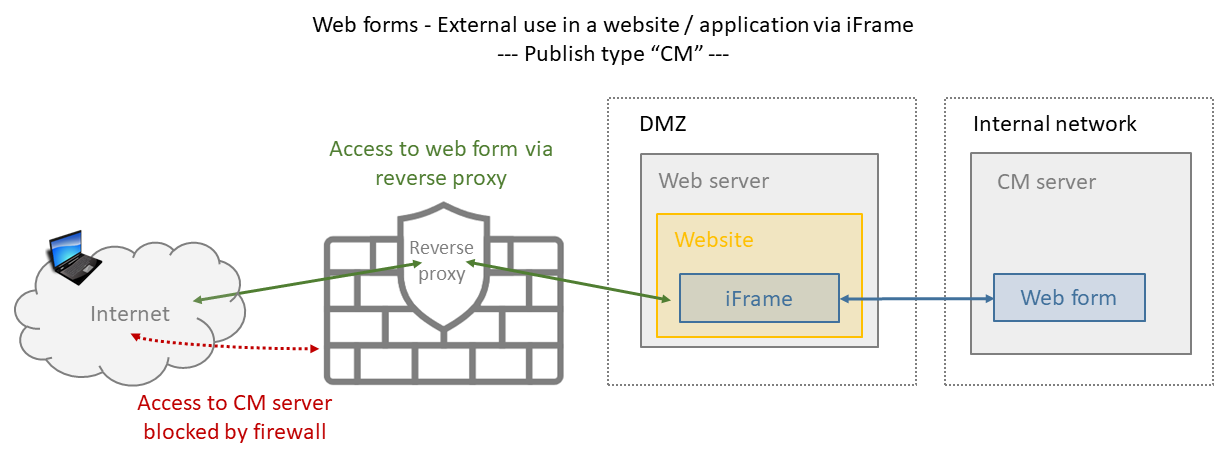
Figure 30: Publishing a web form for external access embedded in a website
Note regarding publish type OWN
A custom-built application is required to serve web forms if the publish type is OWN. This application is not part of the ConSol CM distribution.
Please see Operating ConSol CM behind a proxy (e.g., Apache HTTPD) of the ConSol CM Setup Manual for information about the required proxy settings.
Basic tasks
You can perform the following actions on web forms:
-
Create a new web form
Click the Create new custom form button above the table with the web forms and make the required settings, see Available settings for web forms.If the new web form is similar to an existing web form, you can create a copy of the web form by selecting the Clone option in the form’s context menu. You need to provide a unique name for the web form.
The following steps are required to create a new web form:
-
Fill out the basic form data, see Basic form data.
-
Design the form, see Form design.
-
Decide how the form data should be processed in ConSol CM, see Data processing.
-
Decide how the form should be published, see Publishing a web form.
Depending on the publish type, you might need to create a webhook, see Creating a webhook.
-
-
Edit a web form
Select the Edit option in the context menu of the web form and update the form as desired, see Available settings for web forms. If the web form has already been published, the changes become effective immediately. -
Enable a web form
Select the Enable option in the context menu of the web form to enable the form. Web forms need to be enabled and published to be used. -
Disable a web form
Select the Disable option in the context menu of the web form to disable the form. Disabled web forms cannot be filled in. -
Delete a web form
You can delete a web form by selecting the Delete option in the context menu of the web form.
Advanced tasks
Fine-tuning a web form
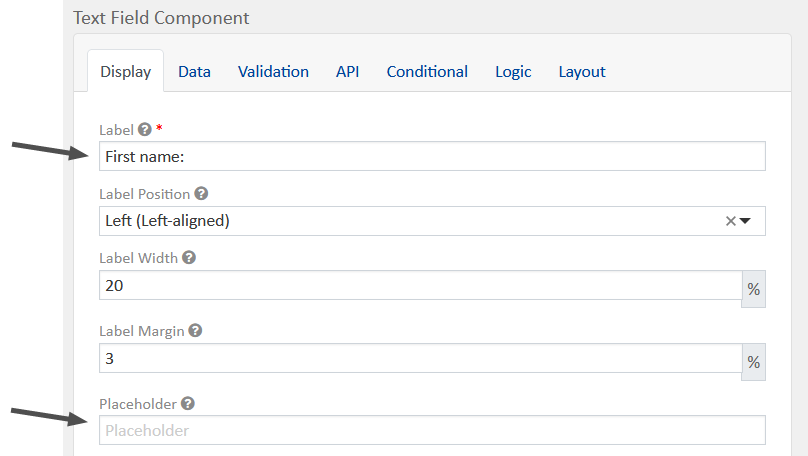
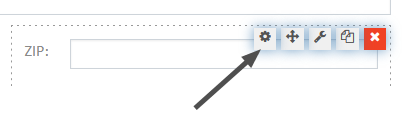
There is a large number of settings you can use for a form field. You can configure the field either directly when creating it, or afterwards by clicking the Edit icon:
There are several aspects which you usually need to consider when designing a web form:
-
Labels and placeholders:
Set the label and placeholder: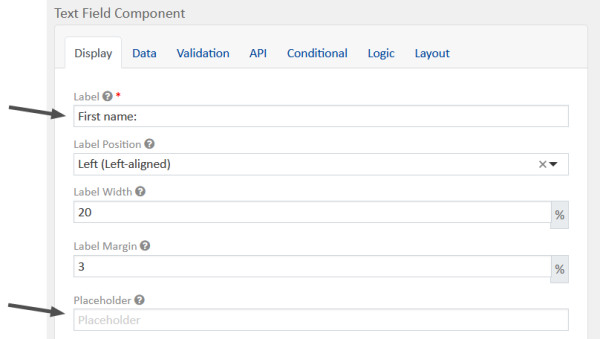
-
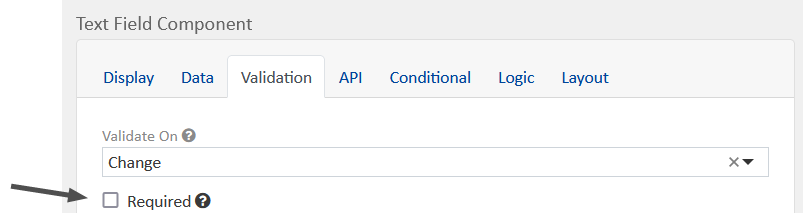
Required fields:
Set required fields from the data model to required fields in the web form.
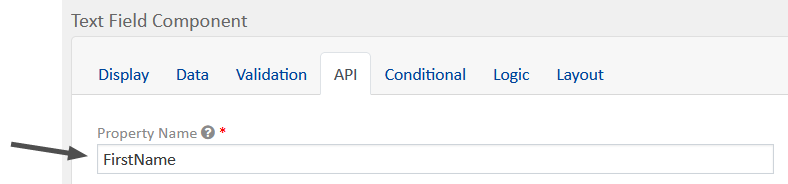
-
API keys:
You need to use the API key to reference the submitted values in the script which processes the form data.
-
Assignment of the CM/Track user profile:
If you use a web form to allow the users to register for CM/Track on their own, the CM/Track user profile needs to be assigned to the created contact automatically.