CM/Phone
Introduction to CM/Phone
CM/Phone is a ConSol CM add-on which allows to integrate a telephone system using the TAPI 3 protocol, which is available on Windows operating systems. If CM/Phone is active, the users can initiate phone calls directly from the Web Client by clicking a phone number. When a customer calls, the users see the call on their screen and can choose to open the contact page or create a new case in the Web Client.
CM/Phone has to be licensed separately. Each client where CM/Phone is installed and active consumes one license of the type REST, see License.
Technical background of CM/Phone
The following figure illustrates how CM/Phone integrates with the telephone system and ConSol CM.
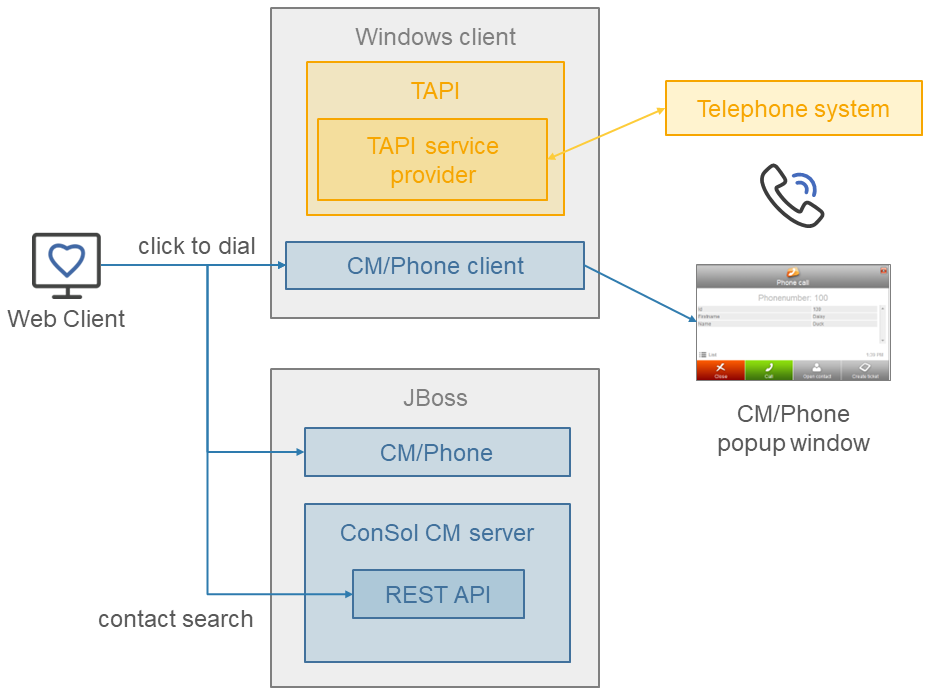
The information shown in the pop-up window opened by CM/Phone is based on HTML template files which are located in the CM/Phone folder of the ConSol CM server. The templates are loaded by the CM/Phone client application during startup. You can customize them if needed, see ConSol CM Setup Manual.
Incoming Calls
The CM/Phone client monitors the telephone handset (i.e., the selected TAPI device, address or line) for incoming calls. When an incoming call is registered, a pop-up window with the phone number of the caller is shown and a contact with this phone number is searched in ConSol CM. If one matching contact is found, its name is shown. If there are several matching contacts, the user can select the desired one from a list.
The users need view permissions to the customer group of the contact to see its information.
The following features are available if a matching contact has been found:
-
Open the contact page
-
Create a case for the contact
The following features are available if no matching contact has been found:
-
Create a contact
-
Create a case for the newly created contact
When a new contact is created, the caller’s phone number is prefilled in the first contact field with the Phone number setting.
For missed calls, there is an option to call back.
Outgoing Calls
The users can start an outgoing call directly by clicking a phone number in a contact field with the setting Phone number. The CM/Phone application is started automatically by the browser and the phone number is passed to the telephone system as a command line parameter. The CM/Phone application creates an outgoing call via TAPI and quits immediately.
Usually the prefix phone: is set before the number for outgoing calls for interaction with TAPI. If required, you can configure another prefix (e.g. tel:) in the Windows Registry.
Installing CM/Phone on the client computers
The users who want to use the CTI features provided by CM/Phone need to install the CM/Phone application on their computer. The installation file can be downloaded from the user profile in the Web Client.
Administrator permissions are required for the installation because an entry for CM/Phone needs to be written to the Windows registry. Before installing a new CM/Phone version, the users need to manually uninstall the previous version.
When opening CM/Phone for the first time, the users need to select the TAPI line to be used, enter the URL of the ConSol CM system and provide their user name and password. These settings can be changed later in the Settings option of the CM/Phone icon in the task bar.
Configuring CM/Phone
You need to perform several steps in the Web Admin Suite to configure CM/Phone:
-
Configure the contact fields for the phone numbers
Mandatory. Go to the Contact fields page, select the data field which should contain the phone number and go to the Settings tab.-
Set Phone number to true to display the phone number as a dialable link in the Web Client for outgoing calls.
-
Set Indexed for search to true to allow to search for the contact by the phone number for incoming calls.
-
-
Define the display name of the contacts in CM/Phone
Optional, only if a display name which differs from the default one is needed. Go to the Contact models page, select the Person or Company object of the contact model and go to the Templates section.-
Create a template for displaying the name of the contact whose phone number matches an incoming call, and select it in the CM/Phone contact details field.
-
Create a template for displaying the names of the contacts in the contact list shown when several contacts match the phone number of an incoming call, and select it in the CM/Phone contact list field.
-
-
Configure the phone number format for each customer group
Optional, only needed if the phone numbers entered in the Web Client which should be used for outgoing calls are not fully qualified, i.e. they are not complete phone numbers with country and local prefix. Go to the Customer groups page, open the CM/Phone tab of the customer group and provide the required settings (see CM/Phone settings for customer groups). The pattern is used do complete phone numbers which are provided without prefixes, such as internal number used when calling inside the company.Example configuration: Country prefix = 49, Area prefix = 211, Company prefix = 339903. Regardless, if the user enters 12, 33990312 or 21133990312 in the phone field in the Web Client, the call will always be made to the full canonical number 4921133990312.
The pattern is not applied if the phone number entered in the Web Client starts with + or 0. Therefore, you can always override it by entering a fully qualified phone number.
-
Configure the prefixes for the phone numbers
Mandatory. Go to the System properties page and add the following properties which contain the prefixes to be used for making calls.-
cmas-core-server, local.country.prefix: Integer. The international country code to be used for making calls, e.g. 49 for Germany. The default value is 49.
-
cmas-core-server, internal.line.access.prefix: Integer. The prefix used by the company’s telephony system to make calls to numbers outside the company, e.g. 0 or 9. The default value is 0.
-
cmas-core-server, external.line.access.prefix: Integer. The general prefix to dial before an area code to get a long-distance connection in the country, e.g. 0 in Germany. The default value is 0.
-