Document templates (CM/Doc)
Introduction to document templates in ConSol CM
CM/Doc is a ConSol CM add-on for using document templates. Document templates allow to create documents directly in the process, for example invoices, contracts or orders. These documents are attached to cases and can be sent by email to contacts.
Document templates help to keep documents consistent regarding wording and layout, and increase the productivity of the users who do not have to type as much text.
Concepts, terms and definitions
|
Concept |
Other terms |
Definition |
|---|---|---|
|
document template |
|
Microsoft Office or OpenOffice file used as a template for CM/Doc. |
|
merge field |
mail merge field |
Variable inserted in a Microsoft Office or OpenOffice document |
Purpose and usage
Document templates facilitate the work of the Web Client users by providing them with drafts for documents. The documents can include variables which are filled with data from the case from which the document is created. Variables can retrieve case data, data of the case’s contact or assignee, and data of the current user.
Document templates are saved on the Document templates page of the Web Client. This page is only available if CM/Doc is enabled for the system. CM/Doc supports Microsoft Word and OpenOffice documents.
The user can select a document template in the Document tab of the case history. The document is then opened in Microsoft Word or OpenOffice automatically and the variables are replaced by the respective data from the case. The user can edit the document as desired. When he saves it, the document is automatically attached to the case and can be added, for example, as an attachment to an email.
If needed, documents can be converted to PDF files in order to make sure that no further changes can be made, see Using document templates in scripts.
Available settings for document templates
General settings
The following settings are available for document templates:
-
Name
Mandatory. The name of the template. -
Group
Mandatory. The group which the template belongs to. This setting is useful to organize your templates and locate them more easily, both in the template administration and in the template selector in the case history. -
Language
Mandatory. The language of the template. -
Queues
Mandatory. The queues for which the template should be available. -
Data object
Optional. The contact object, i.e. person or company definition, which determines the availability of the template, see Selecting the data object. -
Document template
Mandatory. Upload the file that should serve as a template from the file system. Formats: .doc, .docx or odt.For existing templates, the upload field is called Update document template and the current template can be downloaded from the link in the field Download document template.
Selecting the data object
The data object determines the availability of the document template. Document templates are only available in cases whose main contact belongs to a customer group which uses the data model of this data object. Therefore, you can use the same template for two customer groups which use the same data model, but you need to create dedicated templates if the two customer groups use different data models.
The data object must be compatible with the queue selected for the document template, i.e. the data object must be used in one of the customer groups assigned to the queue.
Only select a data object at the company level if Companies can be the main contact of a case is set for the contact data model. See Contact models for details about data models.
The available contact objects are shown in the following syntax:
- name of the data object (name of the data model)
Only data objects which are assigned to at least one customer group are displayed. In addition, the current user needs at least view permissions to at least one customer group which uses the data model.
If you leave the Data object field empty, the document template is available for all customer groups, but there might be runtime errors if the required fields are not found when the template is loaded. In this case, the Web Client shows a message that field content is missing and the affected fields are empty.
Availability of document templates in cases
The availability of a document template depends on two aspects:
- Queue of the case
The template is only available for cases in the selected queues. - Main contact of the case
The template is only available in cases whose main contact is based on the selected data object, see Selecting the data object.
Both conditions must be fulfilled for the document template to be available. If CM/Doc is enabled, but no document templates are available for the given case, the template selector displayed after clicking the Document tab is empty.
Basic tasks
Activating and configuring CM/Doc
You need to perform the following steps to activate and configure CM/Doc on the ConSol CM server:
-
Set the system property cmweb-server-adapter, cmoffice.enabled to true.
-
Determine the saving strategy in the system property cmweb-server-adapter, cmoffice.strict.versioning.enabled:
- true (default value)
A new document is attached to the case with each save operation in Microsoft Word or OpenOffice. This option creates a history of all changes to the document but might lead to a great number of attachments, which might increase the case size considerably. - false
A new document is attached to the case after the first save operation in Microsoft Word or OpenOffice. Further save operations overwrite this attachment as long as the document is not closed in Microsoft Word or OpenOffice. This option limits the number of attachments and hence the case size, so that it does not matter how often the users click the Save button in Microsoft Word or OpenOffice.
- true (default value)
Using CM/Doc on client computers
Please proceed as follows to install CM/Doc on a client computer:
-
Make sure that the computer meets the following requirements:
- Microsoft Windows operating system
- Locally installed CM/Doc application
- Locally installed Microsoft Word / OpenOffice
Detailed information about the supported Microsoft Word and OpenOffice versions can be found in the current System Requirements.
-
Make sure that CM/Doc is enabled in the user profile (section General settings, option Document generation via CM/Doc). By default, CM/Doc is enabled.
-
Download the CM/Doc application from the Downloads section of the user profile.
Using CM/Doc with OpenOffice
If CM/Doc is used with OpenOffice, the users have to set the path to the OpenOffice installation within the CM/Doc application. They have to perform the following steps:
- Right-click the icon of the CM/Doc application in the system tray.
- Go to Preferences -> Open Office.
- Select the OpenOffice executable in the file browser.
Using CM/Doc with Microsoft Edge and Microsoft Internet Explorer
If you use CM/Doc with Microsoft Internet Explorer or Microsoft Edge, some additional installation steps are required. For both browsers:
- Go to Internet Options -> Security in Microsoft Internet Explorer.
- Select Local Intranet. Click Sites. Click Advanced.
- Enter the URL of the ConSol CM server and add it to the websites belonging to the local intranet zone.
If you use Microsoft Edge, you need to execute the following command as an administrator:
CheckNetIsolation LoopbackExempt -a -n="Microsoft.MicrosoftEdge_8wekyb3d8bbwe"
Using CM/Doc with HTTPS
If HTTPS is used, the users need to trust the URL configured for CM/Doc (see cmweb-server-adapter, cmoffice.websocket.port) in their browsers. The prompt to trust CM/Doc is displayed automatically in the default browser. If the users use the Web Client in another browser, they need to manually add the certificate as trusted in this browser. The corresponding URL can be copied from the window which is opened when clicking Preferences -> Web Browser in the context menu of the CM/Doc application in the system tray.
For Microsoft Internet Explorer, the certificate generated by CM/Doc (file public.crt in C:\Users\<your user name>\AppData\Local\cmdoc\security) also needs to be imported manually to the Trusted Root Certificate Authorities certificate store. Go to Internet options -> Content -> Certificates -> Trusted Root Certificate Authorities to import the file.
Managing document templates
The document templates are managed in the Template library section of the Document templates page. You need to have the Manage templates permission or administrator permissions to manage document templates, see Global permissions.
Best practice
Set up a specific role for the users in charge of the text and document templates. Create a role with the permission Manage templates only and assign it to the users who create or edit templates.
-
Create a new template
Fill the data in the form displayed in the upper section of the page, see General settings. You can find details about writing the document which you need to upload in Creating the document. Click OK to save the template. -
Edit a template
Click the name of the template in the Template library section. The upper section of the page is filled with the settings of the selected template. You can modify the settings (see General settings) or upload a new document which the template should be based on (see Creating the document). Click OK to save the template. -
Download the document of a template
You can download the document which a template is based on by clicking the link in the Document template column of the respective template. Alternatively, you can select the template and click the link in the Download document template field in the upper section of the page. This can be useful if you want to create a similar template, e.g. for another contact data model. -
Delete a template
Click the X icon in the Delete column of the respective template to delete this template.
Creating the document
The document which you need to upload as a document template must be created in Microsoft Word or OpenOffice with the following formats:
-
Microsoft Word: doc, docx
-
OpenOffice: odt
Do not use the template format of the word processor (.dot or .ott files).
The first step is to create a document with the required content in Microsoft Office or OpenOffice. You can then add variables, which will be filled with case, contact or user data from the current case, to the document. This is done using the merge fields feature of the respective application.
Steps in ConSol CM:
-
Select a case which contains the required fields in the Document Mailmerge Fields section. The available fields are displayed in a table with the following columns:
- Key:
The name of the field, which is used when adding a merge field to the document. - Group:
The name of the case or contact field group which the field belongs to. Empty for user data and basic case data. - Field:
The name of the case or contact field. Empty for user data and basic case data. - Value:
The value of this field in the selected case.
- Key:
-
Copy the name of the variable from the Key column. The key indicates the type of field:
- Key starting with engineer:
Fields of the currently logged in user, i.e. the user who uses the document template - Key starting with ticket_engineer:
Fields of the assignee, i.e. the user who is assigned to the case. - Key starting with ticket:
Case fields and basic case data, e.g. the case subject. - Key starting with ticket_queue_fields_contacts_member or ticket_queue_fields_contacts_member_customer:
Person fields of the case’s main contact (every field can be referenced in both ways) - Key starting with ticket_queue_fields_contacts_member_companyRef:
Company fields of the case’s main contact.
- Key starting with engineer:
Steps in Microsoft Word:
- Go to the menu entry Insert -> Quick parts -> Field.
- Select MergeField.
- Copy and paste the key of the MailMerge field from the Web Client into the field Field name below Field properties (see following figure).
- Click the OK button to insert the field into the document at the current cursor position.
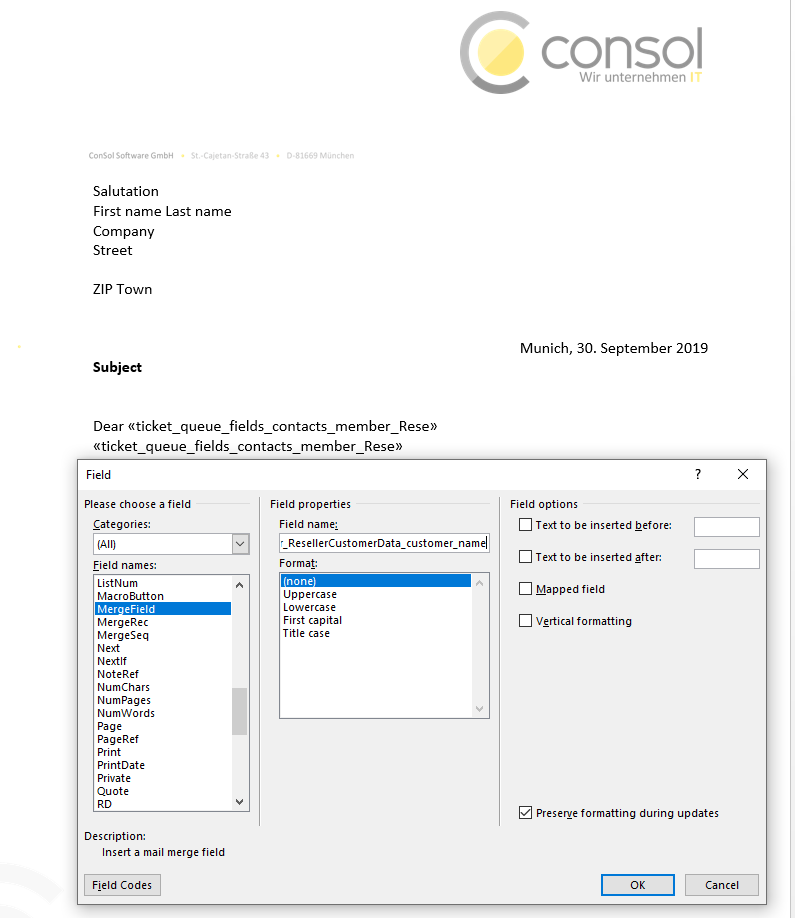
Figure 11: Microsoft Word - Insert MergeField into document
Steps in OpenOffice:
- Go to the menu entry Insert -> Fields -> Other.
- In the Fields dialog, select the tab Variables.
- Select User Field as a Type and Text as a Format.
- Enter the field name (from the Key column in the Document MailMerge fields section) in the Name field below the Type.
- Add a useful Value for recognizing the field in the document.
- Click the green checkmark to the right of the field Value, so that the field is shown under Selection in the middle, and make sure it is selected there.
- Click the Insert button to insert the field into the document at the current cursor position.
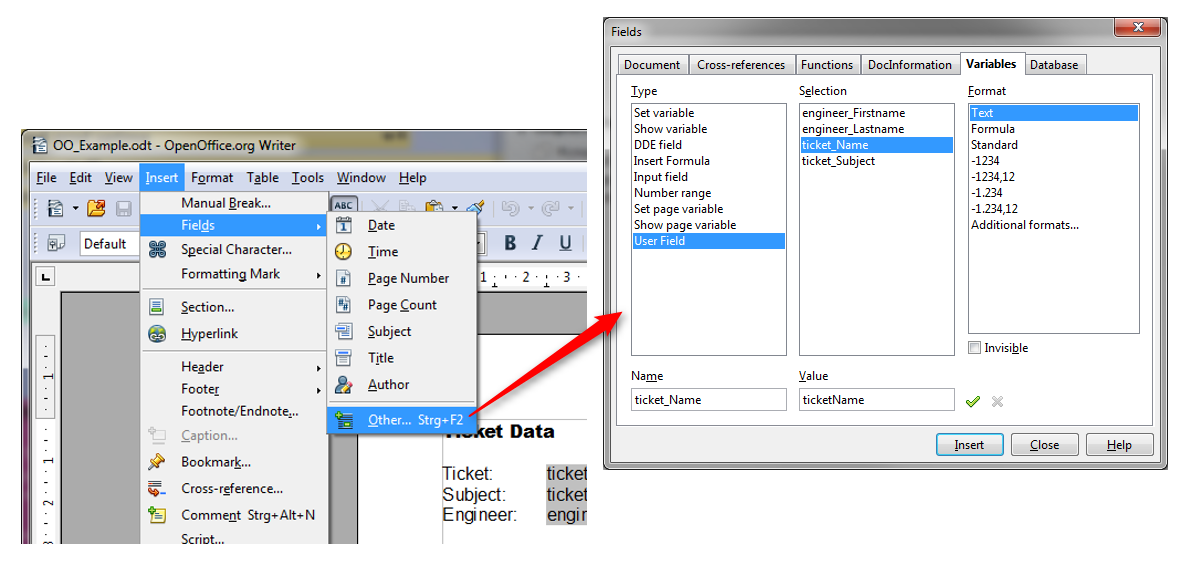
Figure 12: Creating a document template using OpenOffice
Advanced tasks
Using document templates in scripts
You can use document templates in automatic actions to attach a document, which is based on a certain template, to a case, contact or resource. It is also possible to generate a PDF document from a template or to create a document from scratch.
This is done using methods of the class ContentFileTemplateService:
-
generateWordDocumentByTemplate to generate a DOCX document from a CM/Doc template
-
generateWordDocumentFromXHTML to generate a DOCX document from XHTML input
-
generatePDFDocumentFromXHTML to generate a PDF document from XHTML input
-
generatePDFDocumentFromWord to generate a PDF document from a DOCX document
-
generatePDFDocumentViaOpenOffice to generate a PDF file from DOCX, PPTX or XSLX files using OpenOffice or LibreOffice
The LibreOffice application must be installed on the ConSol CM server. If LibreOffice is not installed in the default directory, e.g. C:\Program Files\ for Windows, you need to add the installation path to the Java options of the application server:
-DofficeHome=C:\LibreOffice
If you attach a DOXC document generated from a document template to a case, the merge fields are filled with the data from the respective case and case contact.
The following example shows a workflow script which attaches four documents to the current case. The file extension is added automatically, so you only need to provide a file name. If you create a document from a template, the name of the template is used as a file name.
Ticket ticket = workflowApi.ticket;
String html = "<html><header></header><body><h1>H1Text</h1><p>Text</p></body></html>";
ContentFile docxContentFile;
ContentFile pdfContentFile;
// generating docx from office template (template with testDocx name must be prepared before)
String templateName = "testDocxFromTemplate";
docxContentFile = contentFileTemplateService.generateWordDocumentByTemplate(templateName, ticket);
addContentFileAsAttachmentEntry(ticket, docxContentFile);
// generating pdf from docx
pdfContentFile = contentFileTemplateService.generatePDFDocumentFromWord(docxContentFile);
addContentFileAsAttachmentEntry(ticket, pdfContentFile);
// generating docx from XHTML
String fileName = "testDocxFromXhtml";
docxContentFile = contentFileTemplateService.generateWordDocumentFromXHTML(fileName, html);
addContentFileAsAttachmentEntry(ticket, docxContentFile);
// generating pdf from XHTML
fileName = "testPdfFromXhtml";
pdfContentFile = contentFileTemplateService.generatePDFDocumentFromXHTML(fileName, html);
addContentFileAsAttachmentEntry(ticket, pdfContentFile);
def addContentFileAsAttachmentEntry(Ticket pTicket, ContentFile pContentFile) {
AttachmentEntry attachmentEntry = new AttachmentEntry();
attachmentEntry.setFile(pContentFile);
attachmentEntry.setDescription(pContentFile.getName());
attachmentEntry.setMimeType(pContentFile.getMimeType());
ticketContentService.createContentEntry(pTicket, attachmentEntry);
}