Webhooks
Introduction to webhooks in ConSol CM
Webhooks allow easy integration of ConSol CM with external applications, as shopping applications, social media platforms, chat tools, or customer-built applications. The applications can send data to ConSol CM using HTTP GET or POST requests. ConSol CM processes the received data and returns a response to the requesting application.
Concepts, terms and definitions
|
Concept |
Other terms |
Definition |
|---|---|---|
|
webhook |
|
Mechanism to allow communication between ConSol CM and external applications |
|
security provider |
|
Mechanism to check if the data received by the webhook comes from an authorized application |
|
content type |
|
Format of the data sent using HTTP requests |
Purpose and usage
Webhooks enable ConSol CM to communicate with external applications using HTTP GET or POST requests. The ConSol CM webhook module provides services for these integrations. You can integrate several applications at the same time. In addition, webhooks are used for web forms (see CM/Forms).
Webhooks can be used to execute a single action or to transfer information. The basic steps for using webhooks are:
- The external application sends an HTTP request to the webhook service in ConSol CM.
- The request is processed by the webhook. The functionalities of the service are implemented in a script.
- The response is sent back to the requesting application which processes the response.
The following figure illustrates the interaction between the external application and ConSol CM using a POST request:
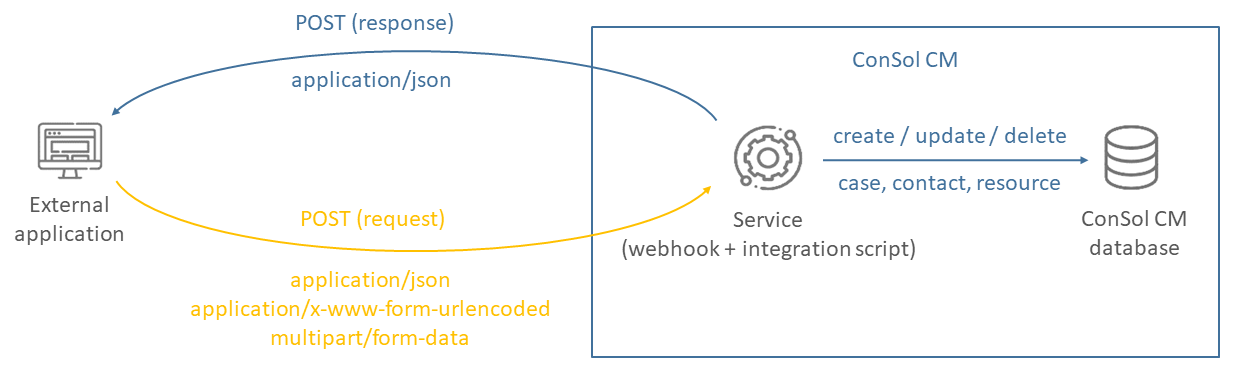
Figure 29: Webhooks in ConSol CM
Usage examples:
- Update data in ConSol CM based on master data managed in an ERP system.
- Use web forms for creating cases and adding content.
- Send emails with approval links.
Available settings for webhooks
Basic settings
The name of the webhook is the name of the integration script without its extension. The URL is also based on the name and cannot be changed. You can make the following basic settings:
-
Method: Mandatory. Choose between GET and POST to define the type of request.
-
Description: Optional. Free text field for internal documentation of the webhook.
The section Usage examples shows the CURL commands which you can use to call the webhook. The example is based on the URL of the endpoint, the selected request type and the security.
Supported content types
The HTTP requests which are sent by the requesting application can have the following content types:
- application/json (only POST requests)
- application/x-www-form-urlencoded (GET and POST requests)
- multipart/form-data (only POST requests)
The response which is returned to the requesting application always has the content type application/json. It can contain custom-defined objects of the following types:
- httpStatusCode
- httpHeaders
- body
Security providers
There are three security providers for webhooks:
- API token: Select the checkbox Enabled to enable API tokens as a security provider.
- IP-based security
- Select the checkbox Enabled to enable IP-based filtering as a security provider.
- Enter the IP addresses in CIDR notation in the field below, see Valid range of IP addresses.
- Secret token security
- Select the checkbox Enabled to enable secret tokens as a security provider.
- Select the checkbox HMAC to use a secure hash for message authentication. Only supported for the content types application/json and application/x-www-form-urlencoded.
- Enter the name of the HTML header for the shared secret. The default value is “SECRET_TOKEN”.
- Enter the secret tokens in the field below. You can enter one token per line, see Secret tokens.
If both IP-based filtering and secret tokens are configured, they are checked in the following order:
- First the IP address is checked. If it is in the permitted range, the request can proceed.
- If the IP address is not in the required range, the secret token is checked subsequently. If it is correct, the request can proceed as well.
- If neither of the two criteria is met, the request is rejected with an authorization failed message.
You can use API tokens alone or together with IP-based filtering and secret tokens.
There is no other mandatory access validation beyond the security providers, specifically no login-based authentication, as for users, which imposes additional access restrictions. The interface has full system access, so securing it additionally with a proxy is mandatory for real-life usage.
It is highly recommended to use HTTPS as a communication protocol for transferring data using a ConSol CM webhook.
API tokens
API tokens are generated by script. They are saved in the database together with the name of the webhook, their validity, the number of allowed submits and custom-defined context information. Requests are made in the syntax <webhook URL>?token=<TOKEN>. First, the token validity is checked, and then the integration script processes the request.
Valid range of IP addresses
The IP-based filter uses a list of IP address ranges defined in the CIDR notation (Classless Inter-Domain Routing). A valid entry in this notation is an IP address followed by a slash separating it from a number of bits defining the subnet mask. The example 10.20.30.40/24 stands for the IP address 10.20.30.40 and its subnet mask 255.255.255.0. The address list for service configuration allows multiple IP ranges in this notation with each range entry on a separate line.
Secret tokens
The checkbox HMAC activates the validation of the request by a mandatory hash based on the token. The HMAC (Hash-based Message Authentication Code) value is derived from the unencrypted payload and the secret token. This code is transferred in the header of the request and decrypted by the server using the secret token. The only hashing algorithm supported by ConSol CM in this case is SHA-1. MD5 is not supported.
A corresponding hashing of the response is currently not supported.
The input field Header allows to define the HTTP header field name which shall be used to transfer the shared secret token. The value defaults to SECRET_TOKEN, but it is recommended to change this value. A non-standard name can mean a security improvement.
The script can access the used token in the headers map of the HTTP request, which contains a field named as defined in the webhook configuration under Headers.
The service behavior is completely based on the implementation of the corresponding script, i.e., the security based on the provided tokens has to be implemented and is not system-immanent!
Creating a webhook
The following steps are necessary to create a webhook:
-
Write a script of the type Integration to implement the logic of the webhook. This script has to process the data received from the external application and send a response to the application. See Writing the integration script.
-
Configure the webhook by defining a security provider which checks the requests. This can be an API token, a range of valid IP addresses or a secret token, see Configuring the webhook and Security providers.
-
Enable the webhook once it is properly configured and should start receiving requests.
The service URL which receives the requests is:
https://<CM server address>/intg/<script name>/service
The base URL is saved in the system property cmas-core-server, url.webhooks.
Writing the integration script
You need to create a script of the type Integration to process the data received from the external application and send a response to the application. This can be done either by clicking the New webhook button on the Webhooks page, or by clicking the New script button on the Scripts page and selecting the type Integration. The name of this script is the name of the service, which is part of the URL to access the interface. Therefore, the script name must not contain the extension .groovy.
Example:
- Script name: myWebHook
- Service URL: https://<CM server address>/intg/myWebHook/service
The script is executed in an administrative context for processing a request, so that it has full system access.
The integration script consists of two parts:
- Process the request, see Processing the received data.
- Generate the response, see Creating the response
Processing the received data
The first step for processing the received data is determining the content type of the payload. Either you already know which content type is used by the requesting application or you check the content type within the script:
- application/json
The payload is a String object in JSON format. - application/x-www-form-urlencoded
The payload is a MultiValueMap object. - multipart/form-data
The payload is a MultipartData object.
Once the content type has been determined, you can process the data to create or update objects in ConSol CM.
Creating the response
Scripts of type Integration must return an object of the class IntgServiceResponse, which can include the following information:
- httpStatusCode
Optional. Defines the HTTP status code. If not provided, the following supported default status codes are used:- 200 (OK)
- 401 (Unauthorized)
One or more security provider is enabled, but the data provided by the client did not match the expected data (e.g., wrong token or IP address) - 404 (Not Found)
A script for a webhook with the given name could not be found / webhook is disabled / no security provider is enabled for the webhook - 405 (Method Not Allowed)
Any HTTP method other than POST or GET - 500 (Internal Server Error)
Any problems / exceptions on the server side (ConSol CM)
- httpHeaders
Optional. Defines the response header. Only required if you want to define a specific httpHeader, i.e., one which is not part of the supported standard headers. - body
Optional. Defines the content of the response. If not provided, the response is empty. This is the object which can contain a JSON statement, see Coding examples.
Permissions
The webhook script is executed with administrator privileges. This means that all operations performed in the script are executed with these permissions. If this is not desired, the script can include the credentials of another user and some code to downgrade the session to the user’s privileges. The method executeWithUserPermissions of the class SecurityTemplate is used for this purpose.
The following code example shows the usage of this method in a script. The session is downgraded to the permissions of the user identified by the login and password included in the JSON payload. Then, a customer search for the customer with the ID “12345” is performed with these permissions.
import com.consol.cmas.common.security.template.SecurityCallbackWithoutResult;
import com.consol.cmas.common.security.template.SecurityTemplate;
import groovy.json.JsonSlurper
def jsonSlurper = new JsonSlurper()
def message = jsonSlurper.parseText(payload);
SecurityTemplate.executeWithUserPermissions(message.login, message.password, new SecurityCallbackWithoutResult() {
@Override
public void doInSecurityContextWithoutResult() {
unitService.getById(12345)
}
});
Code example 42: Example of downgrading the session to a user’s privileges
The characters " $ : and \, which might be contained in the passwords, must be escaped with a backslash.
Configuring the webhook
You can configure the webhook in the details panel of the Webhooks page. You need to define at least one security provider for the webhook. Once the webhook should start receiving requests, you need to enable it by clicking the Activate icon.
Testing the service
A simple way of testing your service is using a REST plugin in your browser:
- Set the required content type in the header, e.g. application/json.
- Enter the request content in the body using the syntax required by the content type, e.g. {"ticket": "100200"} to retrieve a case using JSON.
- Send a POST request to the service URL: https://<CM server address>/intg/<script name>/service
The response is returned as JSON. If the case is found, the response contains the case information defined in the script. Otherwise, the defined error message is returned.
Alternatively, you can also use CURL to test the service:
# Linux:
curl -X POST https://myserver.consol.de:8080/intg/myWebHook/service //
-H 'content-type: application/json' //
-d '{"ticket": "100200"}'
# Windows (note the different quoting/escaping for the -d option):
curl -X POST https://myserver.consol.de:8080/intg/myWebHook/service //
-H "content-type: application/json" //
-d "{\"ticket\": \"100200\"}"
The request payload in this example is the value of the -d option.
The following example shows the response generated by the script and returned to the requesting application:
{
"status" : "OK" ,
"ticket" : "100200" ,
"subject" : "New Ticket for Resource 3" ,
"engineer" : "Susan ServiceDesk"
}
Coding examples
The following example shows the implementation of a service named myWebHook. The script is called myWebHook.groovy and is stored on the Scripts page of the Web Admin Suite. It returns a JSON object with case number, subject, and assigned user as a response on a request with the case number.
import com.consol.cmas.common.service.intg.IntgServiceResponse
import groovy.json.JsonSlurper
import groovy.json.JsonOutput
import com.consol.cmas.common.service.TicketService
def jsonSlurper = new JsonSlurper()
def message = jsonSlurper.parseText(payload)
def ticketname
def ticketsubject
def engineername
def OK = false
if (message.ticket) {
ticket = ticketService.getByName(message.ticket)
if (ticket) {
ticketname = message.ticket
ticketsubject = ticket?.getSubject()
if (ticket.engineer) {
engineername = ticket.engineer.getFirstname() + " " + ticket.engineer.getLastname()
}
OK = true
}
}
def response = new IntgServiceResponse()
if (OK) {
response.httpStatusCode = 200
response.body = JsonOutput.toJson([ticket: ticketname, subject: ticketsubject, engineer: engineername]) // optional
} else {
response.httpStatusCode = 404
response.httpHeaders = ['Content-Language':'en', 'Warning':'Required oject not found']
}
return response
Code example 43: Example script which implements a webhook service
The following example shows how to use a GET request with token in an email to approve a case. You need to perform the following steps:
-
Create a link to the webhook endpoint in a script, e.g. the activity script which generates the email with the approval link. You can use the method linkTo.webhookWithToken to generate a link with token. The example code generates a link with a token which is valid for 1 day and contains context information consisting of two parameters:
linkTo.webhookWithToken('MyWebhook', 1, [param1: val2, param: 'val2'] )
The generated URL is http://localhost:8080/intg/MyWebhook/service?token=713f707f-6dd2-4247-bf70-7f6dd2f2476d
-
Process the submitted information in the webhook integration script. You can access the parameters as follows:
log.info context.param1
You need to set the system property cmas-core-server, url.webhooks for the linkTo method to work.