Page customization
Introduction to page customization in ConSol CM
The page customization allows administrators to fine-tune the appearance and behavior of the Web Client.
Concepts, terms and definitions
|
Concept |
Other terms |
Definition |
|---|---|---|
|
page customization |
|
ConSol CM feature which allows to modify the appearance or behavior of certain Web Client elements. |
|
page element |
|
Component of a Web Client page which can be configured in the page customization. |
|
type |
|
Upper level of the page customization which refers to a page element. |
|
scope |
|
Lower level of the page customization which refers to a page element as used on a specific page. |
Purpose and usage
You can use the page customization to modify the appearance and behavior of certain Web Client pages or page elements. Common modifications are:
- Define which sections of a case, contact or resource should be expanded or collapsed by default.
- Determine which features of the email editor should be active.
- Fine-tune the search behavior.
The page customization is based on the structure of the Web Client pages. Each page element has its own set of attributes, which can be set. This can be done either directly in the Web Client by entering the attribute values in the page customization, or by script.
Elements of the page customization
Page structure
Starting the page customization opens a new section at the bottom of the page. On the right side, a tree with the configurable elements of the current page is displayed. The left side contains a list of the available page customization attributes for the selected element. On the page itself, all configurable elements are marked with a blue border. When you move the mouse to an element, its name is displayed. You can click on the name to open the element in the page customization section at the bottom of the page.
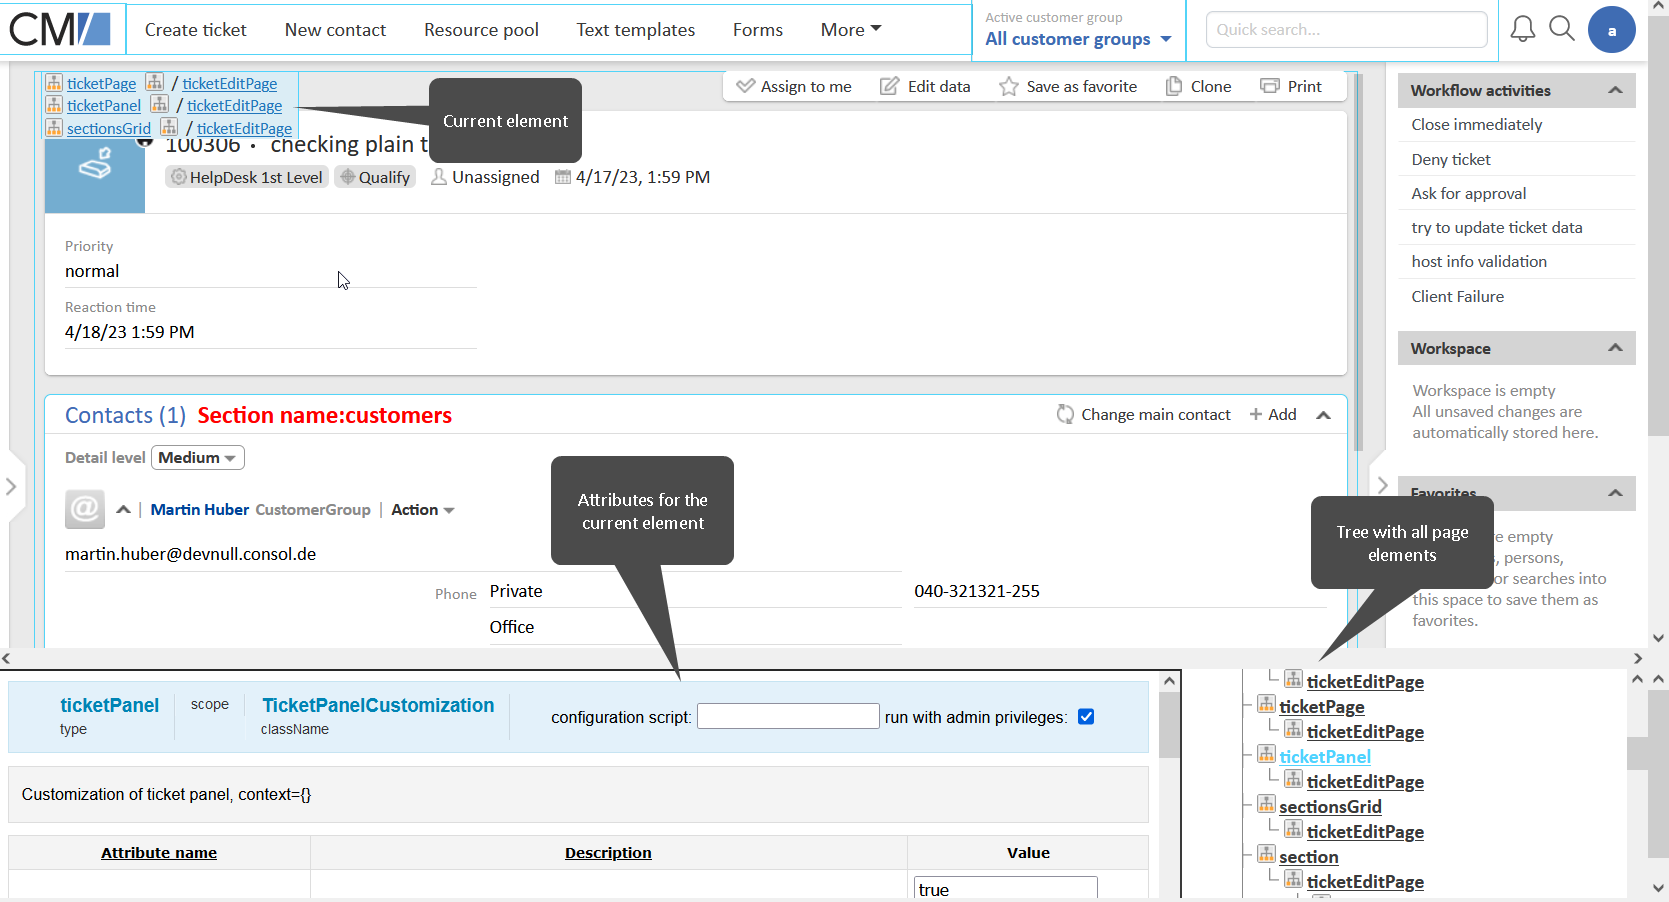
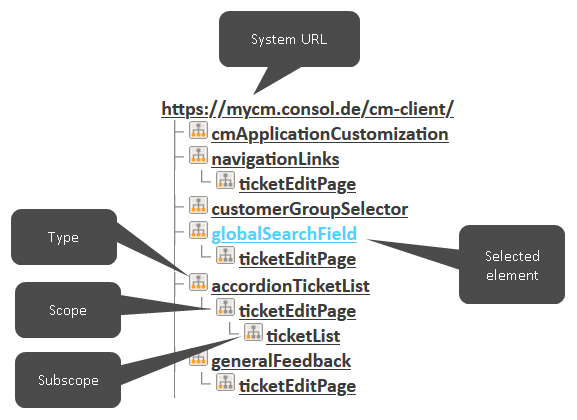
Tree
The page customization tree is displayed on the right side of the page customization section. The currently selected element, whose attributes are displayed on the left, is highlighted. The tree contains subtrees which consist of two or three levels:
- Type: Upper level. The settings which are done on this level apply to all pages where the element is used.
- Scope: Medium / lower level. The settings which are done on this level apply to the respective scope of the current page.
- Subscope: Lower level. The settings which are done on this level apply to the respective subscope of the current page.
The available attributes are the same for all levels. Settings on a lower level override the settings on an upper level.
Example
The type navigationLinks contains settings for the menu bar. If the settings are made in the type navigationLinks, they apply to the menu bar globally, i.e. the menu bar has the same appearance on all pages. If they are made in the scope ticketEditPage, the settings apply only when a case is open, i.e. the menu bar can have a different appearance depending on the current page.
You might need to scroll to see all elements in the tree.
Attribute configuration
The attributes for the element which is selected in the tree are displayed on the left side of the page customization section.
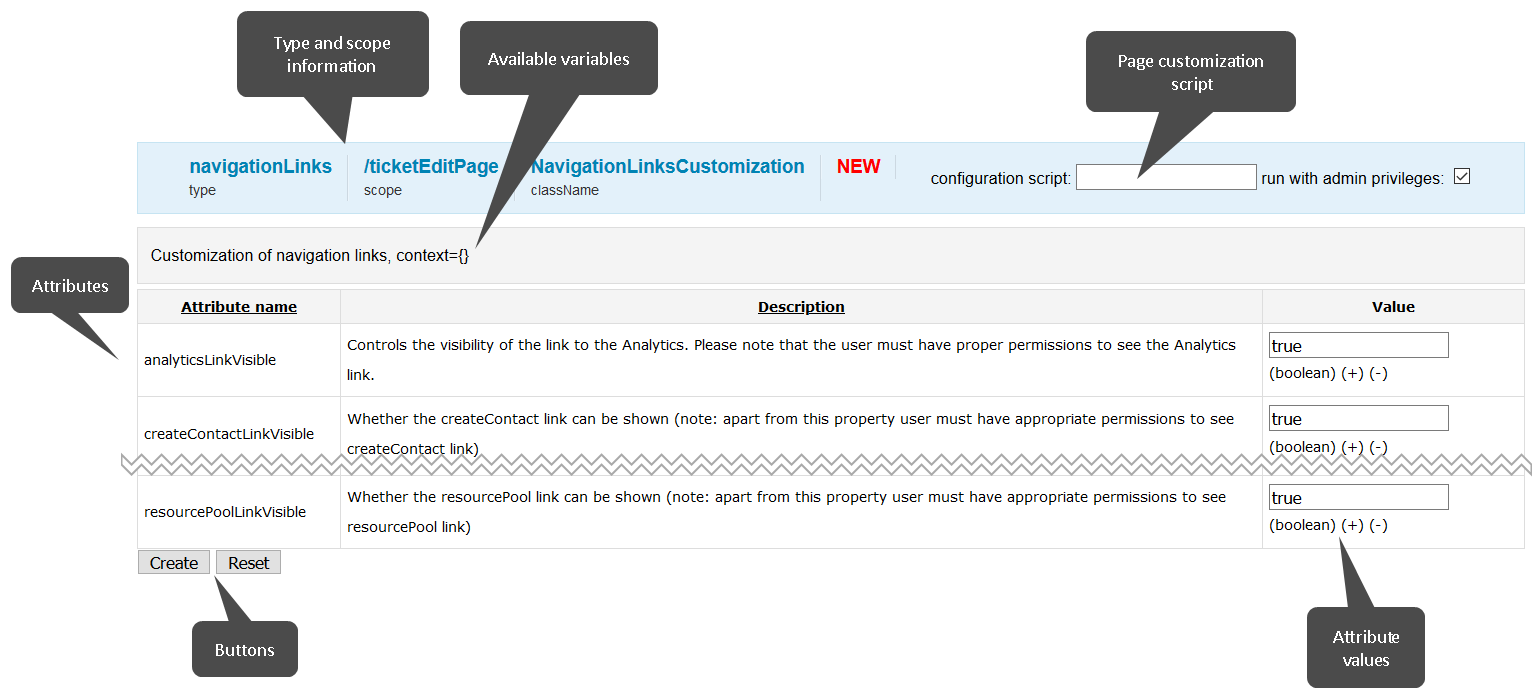
The header shows the selected type and scope. On the right, the configuration script field is displayed. You can enter the name of a script of the type Page customization, which contains logic to determine the values of the attributes and returns the attributes. See Using a script to set page customizations for details about using such a script.
The area below the header shows a short description. The variables which are available in the page customization script are shown in brackets at the end, e.g. context={ticketId} means that the case ID can be used as a variable.
The main section contains the attributes with a short description and a field to set the attribute value. You can enlarge the field by clicking the + icon next to the data type. The available attributes depend on the selected element. You can find a list of the available attributes for each type in the respective subpage.
The fields with the attribute values are prefilled with the default values.
Basic tasks
Setting page customization attributes
Please proceed as follows to set page customization attributes:
-
Log in as an administrator.
-
Go to the page which you want to configure and open the desired component.
Example: If you want to customize the email editor, you need to go to a case and open the email editor.
-
Click the Enable page customization link in the main menu.
-
Select the desired type, scope or subscope in the tree on the right side, see Elements of the page customization.
-
Enter the desired values for the attributes. The fields with the attribute values are prefilled with the default values.
-
Save your changes:
- If the element had not been modified yet (indicated by a red NEW in the header), you need to click the Create button to create a page customization for the element.
- If the element had already been modified, you need to click the Update button to modify the page customization.
You can click the Reset button to revert your changes. If the page customization had been modified previously, you can click the Delete button to remove the page customization and restore the default values.
If you enter an incorrect value for a page customization attribute, an error message is displayed upon saving the changes. You need to correct the value by opening the page customization again.
Advanced tasks
Using a script to set page customizations
Instead of entering the attribute values in the page customization, you can provide them by script. This allows to add additional logic, for example to adapt the page display to the user’s roles or some characteristics of the currently displayed object.
Please proceed as follows to use a page customization script:
-
Create a script of the type Page customization on the Scripts page, see Scripts. The script needs to return the attribute values in the following syntax (example for the attribute mailToSelection with the desired value contact):
return [mailToSelection: 'contact'];
Boolean values are passed as strings (example for the attribute emailFeature with the desired value false):
return [emailFeature: 'false'];
-
Enter the name of the script in the configuration script field of the page customization.
-
Optional. Select the checkbox run with admin privileges to execute the script as an administrator. This might be needed if the script needs to access data which is not available in the user context, e.g. cases for which the user does not have permissions.
The script overwrites any attribute values entered in the page customization.
Exporting page customizations
You can export page customizations on the Staging export page, see Staging export. Please consider that only the page customizations which have been defined specifically for the system (i.e. not the default values) are exported. These are the values which are stored in the database tables cmas_web_customization and cmas_web_customization_values. Default values are exported only if they were set to another value and have been changed back to the default value manually by clicking the Update button.