Hierarchical lists
Hierarchical lists are definitions of tree structures which consist of several lists. Each value of a list can be linked to another list, thus creating a hierarchical structure. Hierarchical lists fields can be created for cases, contacts and resources.
Introduction to hierarchical lists in ConSol CM
Hierarchical lists are used when defining the data model for cases, contacts and resources in ConSol CM. They allow to create hierarchical structures consisting of several lists, so that the users can locate specific values easily by navigating through the structure. Common use cases for hierarchical lists are product lines or computer configurations.
Example:
In a help desk process, you can use a hierarchical list for the item which causes the problem. The first level is a list with the values Hardware and Software. The list value Hardware is linked to a list with values such as Computer, Monitor and Keyboard. The list value Software is linked to a list with values such as Operating system, Office and Browser. These two lists form the second level. You can create further levels to specify more details about the item, as the browser version or the computer model. The user can navigate through the structure to select the desired item.
Concepts, terms and definitions
|
Concept |
Other terms |
Definition |
|---|---|---|
|
list |
|
A list contains a set of values which are displayed according to the configured sorting. |
|
hierarchical list |
hierarchical list field, MLA, MLA field |
A hierarchical list is a data field which contains a hierarchical structure consisting of several lists. |
|
level |
|
The lists which are referenced from values of the same list belong to the same level. |
Purpose and usage
A hierarchical list always belongs to one data field. Therefore, when you create a new hierarchical list, the corresponding data field is created as well. When you create a new data field of the type MLA field (see Data fields), an empty hierarchical list is automatically created on the Hierarchical lists page of the Web Admin Suite.
Available settings for hierarchical lists
Hierarchical lists are managed on the Hierarchical lists page of the Web Admin Suite. The following sections describe the available settings for hierarchical lists and their display in the Web Client.
A hierarchical list consists of a data field and one or more levels.
Data field settings
The data field has the following settings:
- object type: can be Case (blue icon), Contact (green icon) or Resource (purple icon)
- data field group: the internal name of the data field group
- data field: the internal name of the data field (type MLA field)
These settings are shown in the left panel of the Hierarchical lists page.
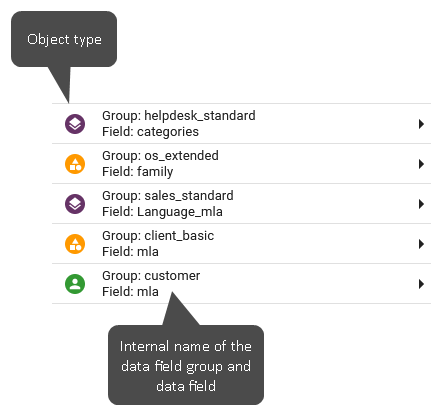
Figure 3: Data field settings
Level settings
The level settings are determined by linking lists to list values. Each list value can reference one list which becomes the child level of this list value. There is no limitation regarding the depth of the structure. Values which lead to a child list are indicated by a small arrow pointing to the right.
The following figure shows the display of a hierarchical list in the edit mode in the Web Client. The user can select a value anywhere within the hierarchical list. Thus, a value which has a child list can also be selected, as Printer in the example below.
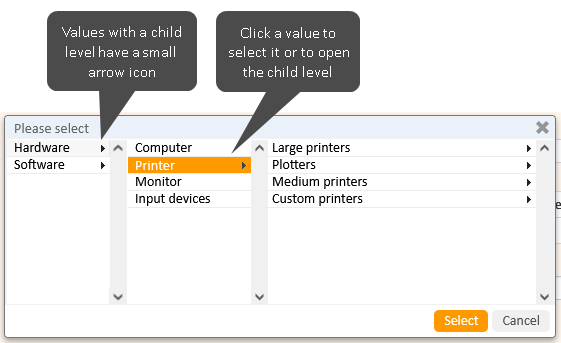
Figure 4: ConSol CM Web Client - Hierarchical list with child levels
Basic tasks
Hierarchical lists are managed on the Hierarchical lists page of the Web Admin Suite. The following sections describe the basic tasks for hierarchical lists.
Managing hierarchical list fields
You can perform the following actions on hierarchical list fields:
-
Create a new hierarchical list field
When you create a new hierarchical list, the corresponding data field is created automatically. Click the New hierarchical list button. Select the object type, which can be either Case, Contact or Resource, and the data field group which the hierarchical list field should belong to. Enter the name of the field to be created in the Data field (internal name) field. -
Edit the name of the hierarchical list field
Click the Edit icon and enter a new internal name, also called technical name, for the hierarchical list field.The change is applied automatically to both the hierarchical list and the data field. Therefore, it is not possible to change the name if the data field is already used.
-
Duplicate a hierarchical list field
You can click the Duplicate icon of an existing hierarchical list field to create a new hierarchical list field with the same level structure. Select the object type of the new field, which can be either Case, Contact or Resource, and the data field group which the hierarchical list field should belong to. Enter the name of the field to be created in the Data field (internal name) field. -
Enable/disable the hierarchical list field
Click the Activate/Deactivate icon to enable or disable the hierarchical list field.The change is applied automatically to both the hierarchical list and the data field.
-
Delete the hierarchical list field
Click the Delete icon to delete the hierarchical list field.The change is applied automatically to both the hierarchical list and the data field. You can only delete hierarchical list fields which are not used.
Before deleting or disabling items, or editing their internal names, make sure that they are not used in scripts. This is not checked automatically.
Managing the levels of a hierarchical list
You can perform the following actions on the hierarchical list levels:
-
Add a new level
Each list value can have one list as its child level. Click the Plus icon in the row of the list value which you want to link to the list. Select the list for the level in the modal window. The list category of the parent item is preselected in the Select list category field. You can change it if required. In the Select list or create new list field displayed below, you can either select one of the existing lists from the selected list category or create a new list.- To select an existing list, start typing the internal name and select the desired list from the autocomplete suggestions.
- To create a new list, enter the desired internal name and click the Create option which is displayed instead of the autocomplete suggestions. You can add values to the list by clicking the Edit values button in the newly created level.
If the list value already has a child level, instead of a Plus icon, a small arrow is displayed and you can expand the child level by clicking the list value.
-
Enable/disable a level
Click the Deactivate level button in the level header to disable the level and all its child levels. Click the Activate level button in the level header to enable the level and all its child levels and parent levels, including the hierarchical list field itself. -
Remove a level
Click the Remove level button in the level header to remove the level.You can only remove a level if neither the level nor any of its child levels are in use.
Managing the values of a referenced list
There are two places where you can make changes to the values of the lists which are referenced in the hierarchical list:
-
Open the Enumerated lists page of the Web Admin Suite, locate the list and make the desired changes.
-
On the Hierarchical lists page, click the Edit values button below the level header to edit the values of the list. A modal window with the following features is displayed:
- Create a new list value
- Enable/Disable a list value
- Delete a list value
- Change the order of the list values
- Edit the localized display names for the list value
- Select a color for the list value
Click the Update list value button to apply the changes.
When you edit list values, the changes affect all places where this list is used and not only the present hierarchical list.