Activity forms
Introduction to activity forms in ConSol CM
Activity forms are used in workflow activities for cases. They are available both in the Web Client and CM/Track. Activity forms link the entry of certain data to specific steps in the business process, in order to guide the users and structure the process.
Concepts, terms and definitions
|
Concept |
Other terms |
Definition |
|---|---|---|
|
workflow activity |
|
Action which the user performs to move a case through the business process |
|
activity form |
ACF, activity control form |
Form which has to be filled out when executing a workflow activity |
Purpose and usage
Activity forms can be assigned to workflow activities which the users can execute for cases in the Web Client and CM/Track. The activity form is opened when the user clicks the activity and needs to be filled out before proceeding. Activity forms play an important role in the design of the workflow and the case data model, as they allow to force the user to fill out certain fields in a certain step of the business process. In addition, they help to keep the case data concise by displaying certain fields only when they are needed in the process.
Available settings for activity forms
Activity forms have the following settings:
Basic data
The Basic data tab shows the name and description of the activity form and the workflows where it is used.
-
Used in workflows:
Read-only. Shows the workflows in which the activity form is used. -
Internal name:
The internal name of the activity form. -
Description:
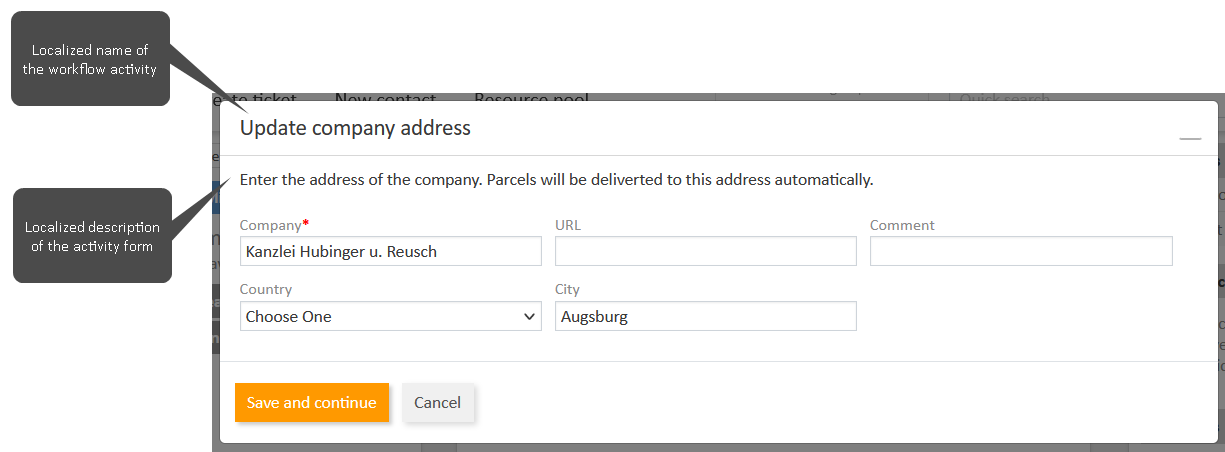
The localized description of the activity form. It is shown below the activity name in the Web Client.You can change the description in the prefill script of the activity form in the workflow, see Changing the form description.
The following figure shows which text is displayed in an activity form:
Fields
The fields which are included in the activity form and the field layout are set in the Fields tab:
-
Show queue:
Determines if the queue selector should be displayed in the activity form.Not supported in CM/Track.
-
Show assignee:
Determines if the assignee selector should be displayed in the activity form.Not supported in CM/Track.
-
Assigned fields:
Contains the fields which are used in the activity form. By default, the fields are shown in the order of the list. You can change the order using the Move up and Move down icons. You can overwrite the default configuration in the Layout tab, which provides further settings.Dependent enums and autocomplete features are not supported in activity forms used in CM/Track.
Required fields
The user needs to fill in the required fields before submitting the form. The required fields depend on the workflow activity, i.e. the same activity form can have different required fields in different workflow activities. Therefore, you can only determine the required fields for a specific workflow activity. This is done in the Required fields tab.
-
Select activity:
Select the workflow activity for which you want to set the required fields.If you open the activity form from within the workflow by clicking the Edit icon in the details panel of an activity form, the respective activity is preselected.
-
List of fields:
Displays the fields of the activity form. Select the checkboxes of the fields which should be mandatory when filling in the form in the selected workflow activity. If the form is only used in one activity, this activity is preselected.
Modifying required fields is only possible if Development mode is selected as Deployment mode in the settings of the Workflows page, see Deployment mode. Otherwise, the required fields are read-only on the Activity forms page, and can only be changed within in the workflow. This ensures that the changes to the required fields are linked to a workflow version if Strict versioning is selected.
Layout
The layout of the form in the Web Client is determined by several settings:
-
Form display size:
Determines the dimensions of the form. There are five sizes available: from S for small forms with few content to XXL for large forms with tables. -
Number of columns:
Determines the maximum number of columns used for the fields. 0 means that there is no limit. -
Field positioning:
Determines the position of each field in the grid. You can drag-and-drop fields to the desired position. If a position should remain empty, you need to click the Insert empty position button and drag the empty position to the desired place. You can increase the width or height of a field by clicking the arrow buttons on the right side of the field.For tables, it is recommended to use the full width, i.e. make the table span all columns.
You can click the Reset layout button to restore the default layout based on the order of the fields in the Fields tab.
Basic tasks
Activity forms are managed on the Activity forms page of the Web Admin Suite. The following sections describe the basic tasks for activity forms.
Finding an activity form
The list of activity forms is displayed directly after accessing the Activity forms page of the Web Admin Suite. You can filter the list to locate activity forms more easily:
-
Text search: Perform a free text search.
Enter a text in the Search field to filter by name or description.
-
Workflow: Choose to display only the activity forms which are used in a specific workflow.
Select the workflow in the All workflows drop-down list.
Managing activity forms
You can perform the following actions on activity forms:
-
Add a new activity form
Click the New activity form button. Enter the internal name and the localized descriptions for the activity form. You can already assign case fields to the form. -
Edit the basic data of an activity form
Open the details of the activity form. In the Basic data tab, you can edit the internal name and the localized descriptions of the activity form, see Basic data. -
Modify the fields and layout of an activity form
Open the details of the activity form. In the Case fields tab, you can select the fields which should be included in the activity form and determine the number of columns and field layout. Select fields from the Available fields list and move them to the Assigned fields list. You can filter the Available fields list by technical and localized field name and technical field group name to locate fields more easily. See Fields for details about the field layout. -
Modify the required fields for a certain activity
Open the details of the activity form. In the Required fields tab, you can select a workflow activity and select which fields of the activity form should be required fields in this workflow activity, see Required fields. -
Enable / disable an activity form
Click the Activate / Deactivate icon to enable or disable the activity form.Disabled activity forms cannot be assigned to workflow activities anymore. If an activity form which is in use is deactivated, it is skipped when executing the respective workflow activity.
-
Delete an activity form
Click the Delete icon to delete the activity form.You can only delete activity forms which are not used in the workflow. If you try to delete an activity form which is in use, the affected workflow and type of workflow version (deployed, saved, snapshot or draft) is shown. You need to remove the activity form from the deployed, saved or draft version and delete all affected snapshots, before you can delete the activity form.