Open topic with navigation
Deploying Workflows
This chapter discusses the following:
Introduction and Workflow Life Cycle
During the development of a workflow you use the following functions which reflect the workflow life cycle:
- Click the Load ... button to load the workflow or create a new workflow, e.g. version 1.2.
- Edit the workflow.
- Click the Save as new version button to save the workflow as a new version. A new version number will be used, e.g. 2.0.
- Continue editing the workflow.
- Click the Save ... button to save the workflow in the current version, e.g. version 2.0.
- Continue editing the workflow.
- Click the Deploy button to deploy the workflow. This will save and deploy the workflow, e.g. version 3.0.
A deployed workflow always has an increased major number compared to the last saved version.
The workflow which was active/deployed before is now no longer active, but the new version of the workflow is in operation at once. The ConSol CM system does not have to be stopped.
The new version is marked in bold characters and with status currently deployed in the workflow list which is opened for the Load and Delete operations.
After this step, the next saved version will be saved as new version.
Make sure you are aware of the number of tickets which have to be transferred when a new workflow is deployed! The deploy operation might take some time in large environments! See section Actions During Workflow Deployment.
Engineer Permissions Required for Workflow Deployment
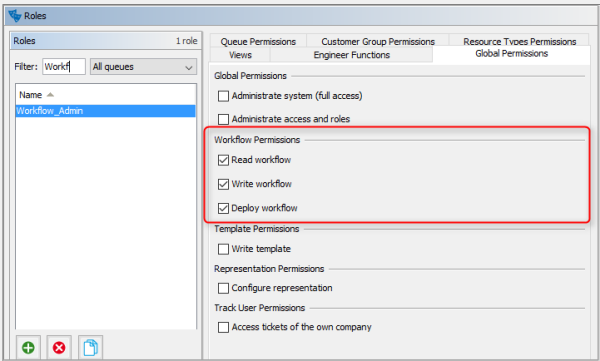
An engineer who is supposed to deploy workflows must have at least one role with one of the following access rights:
- Global Permissions:
Administrate
- Workflow Permissions:
Deploy workflow
Figure 181: ConSol CM Admin Tool - Engineer permissions for deploying workflows
Actions During Workflow Deployment
When a workfow is deployed, it will be active at once. Thus, consider well what will happen to open tickets which are in a queue where the new workflow will be applied. They will be transferred to the new workflow.
In case you have performed one or more of the following steps:
- removed one or more activities
- added one or more automatic activities
- added one or more triggers
the following actions will be initiated after you have pressed the Deploy button.
You will be prompted for a decision concerning the open tickets in the respective queues which cannot stay at their previous position within the process because the workflow architecture was changed:
- Stay as close as possible to the previous position (default).
- Let all those tickets start the process from the beginning.
In case you choose the first option (keep position), the following actions will be performed:
- The transfer of tickets starts.
- The name of the ticket's last executed activity is compared to the names in the current workflow definition. If the ticket's activity is no longer in the workflow definition, a new target activity for the ticket must be found.
- The History for the ticket is loaded. The transfer engine iterates over all activities executed from the beginning of the process instance and tries to find one which would be suitable, i.e. which
- is still present in the workflow definition,
- is not a trigger target element,
- is not a dead end activity.
Each ticket which cannot keep its position will be moved to the suitable position according to those criteria. In any case the tickets will be moved backwards, never forwards, within the workflow.
For a summary of all ticket transfers click on View in the main menu and select Show ticket transfer history:
- Workflow name
Name of the workflow.
- Version
Version of the old workflow.
- Start time
Start of the transfer. Will be the start time of the Deploy operation.
- End time
End of the transfer. After this time the new workflow will be in full operation.
- Transferred tickets
Number of tickets which have been transferred, i.e. which had to be touched by the system during workflow deployment. Should be identical to the sum of open tickets in all queues which use the workflow.
- Details
Additional information concerning the deployment with ticket transfer.
In the bottom right corner of the Process Designer GUI, the overall status of the ticket transfer is displayed.
