Time Triggers
Introduction to Time Triggers
A workflow can contain several time triggers.

Figure 67: ConSol CM Process Designer - Time trigger
A time trigger is a mechanism which reacts when a certain period of time has elapsed. This can be required, for example, in the following situations:
- Use case 1:
An engineer wants to put a ticket on hold for a defined time, because he knows that the customer will not be available until then. - Use case 2:
The system should automatically control the escalation time, i.e., when a ticket has come in and has not been taken care of, there should be an alert (this can be an overlay at the ticket icon, an email to the team lead, or other actions). - Use case 3:
A ticket has been solved and the engineer closes it. However, this should be a preliminary end and the ticket should be closed technically after a defined period of time.
Those use cases can be implemented using time triggers.
A time trigger can be configured to use a business calendar, i.e., to take only those times into consideration which are defined as working hours.
A time trigger can be attached to ...
- a scope
Then it controls all tickets which are currently in the scope. - an activity
Then it controls only the tickets which have just run through this activity.
A time trigger has to be of one of two types:
- manual
- with a defined period of time
You, as a workflow developer, have to implement everything that should happen as a consequence when a time trigger has fired! There are no automatic actions. All the time trigger does, is to give a signal time elapsed - just like an alarm clock.
Adding a Time Trigger to a Workflow
Adding a Time Trigger to a Scope
Grab the time trigger icon in the palette and drop it into the desired scope. It is automatically attached to the top of the scope. You can modify the position afterwards (move it to the left or right to change the order of triggers or just to improve the layout).
A time trigger, which has been attached to a scope, cannot be moved to another scope or activity. In case you would like to attach a time trigger to another scope/activity, remove the one you have defined and create a new one for the correct scope/activity.
To configure the properties of the trigger, select it in the editing panel and set the correct values in the Properties Editor. See section Properties of a Time Trigger.
You can draw connections from the trigger to put activities or decision nodes behind it. The first step which is executed after a time trigger always has to be an automatic activity!
Adding a Time Trigger to an Activity
Grab the time trigger icon in the palette and drop it into the desired activity. It will be attached to the corner of the activity.
A time trigger which has been attached to an activity cannot be moved to another scope or activity. In case you would like to attach a time trigger to another scope/activity, remove the one you have defined and create a new one for the correct scope/activity.
To configure the properties of the trigger, select it in the editing panel and set the correct values in the Properties Editor. See section Properties of a Time Trigger.
You can draw connections from the trigger to put activities or decision nodes behind it. The first step which is executed after a time trigger always has to be an automatic activity!
Properties of a Time Trigger
A time trigger has the following properties:
- name
Mandatory. The technical name of the trigger. It is set automatically but can be changed manually. - minutes/hours/days
Here you can enter the time interval after which the trigger should fire. The display mode always refers to a 24-hours-day, i.e., when you have entered 30 hours as reaction time and you re-open the workflow, there will be 1 day, 6 hours. -
use calendar
Optional. Mark this check box when the business calendar should be taken into consideration when the time interval is calculated.Please keep in mind that there are three steps which are necessary to make sure time intervals are calculated using a business calendar:
- Define a business calendar (see ConSol CM Administrator Manual, section Business Calendars).
- Assign the correct business calendar to a queue (see ConSol CM Administrator Manual, section Queue Administration).
- Mark the check box use calendar for each trigger which should work with the calendar.
Principle of the use of a business calendar:
1 day means 24 hrs of absolute time, it has nothing to do with the use of a calendar. The calendar only plays a role when the time trigger is activated, then the 24 hrs, i.e., 86400000 milliseconds, will be taken as business calendar input (if the calendar is enabled).
Example:
When we have as trigger time 1 day = 24 hrs without calendar, the 24 hrs are calculated like regular time, so the escalation will fire one day later at the same time.
In contrast: When we use a calendar (with, for example, 7 work hrs per work day), the 24 hrs will be split-up according to the calendar, resulting in the firing event more than 3 days later (24 hrs = 3 x 7 hrs + 3 hrs).
See also section Working with Calendars and Times.
- repeatable
Optional. Mark this check box to make sure the trigger can fire more than once for one ticket. If a trigger is repeatable, it is reset immediately after it has fired, i.e., the time count starts again.The script on timer start is executed again. The first firing event is initialized by the (technical) user admin, all following firing events are initiated by the Job Executor.
- script after timer
Optional. A script can be defined which is executed when the time interval which is controlled by the trigger has elapsed, i.e., when the time trigger fires. The return value of this script determines if the following automatic activity will be executed or not. - script on timer start
Optional. A script can be defined when the time trigger starts to measure time, i.e., when the ticket has entered the scope/activity to which the trigger is attached. In this script you can either:- return null or false, so that the timer won't be initialized and won't fire, or
- calculate a Long value, standing for the milliseconds from now until the date, when the timer should fire. The calculated Long value then has to be handed over as parameter of the method trigger.setDueTime() to initialize the timer.
- activate manually
Optional, only for time triggers at activities. Mark this check box when the user (the engineer) should select the time when the trigger should fire. For the user, a date-picker (web calendar) is displayed. - retry interval
The time in seconds after which the trigger execution should be executed again in case a script has run with an error. The time can be configured in the Admin Tool (property jobExecutor.timerRetryInterval.seconds).

Figure 68: ConSol CM Process Designer - Properties of a time trigger
Business Logic and Initialization of a Time Trigger
The time measuring of a trigger is started (i.e., the trigger is initialized) when the ticket enters the scope/activity. It stops (i.e., the trigger fires) when the defined period of time which has been set as fixed value (minutes/hours/days) or the manually defined time has elapsed.
When you, as a workflow developer, would like to initialize a trigger using other values, this has to be done using scripts. Here, short examples will be provided, please see section Working with Calendars and Times for a detailed explanation of programming workflow trigger times. In those chapters, the code examples are provided, too.
- Example 1:
The reaction time for a ticket should be calculated based on the priority. In the script on timer start, the different reaction times are used (a good way to implement this, would be to use customer-specific system properties) and the reaction time is calculated. Then the trigger is initialized, i.e., the time interval is set. - Example 2:
When an email to a ticket has come in and after three hours, no engineer has read the email and has taken care of the ticket, an alert should be triggered. To implement this, an incoming email (see section Mail Triggers) has an adjacent automatic activity which re-initializes a time trigger with 3 hours.
A time trigger can also be deactivated. In example 2, this would be required to prevent the time trigger from firing initially, because it should not be initialized before any email comes in.
Examples for Time Triggers
The implementations for the use cases mentioned above (see Introduction to Time Triggers) would be:
- Use case 1:
Put a manual time trigger to the activity Put ticket on hold. The engineer can select the desired end date by using the date picker in the Web Client. Usually then the ticket is led back to the active tickets.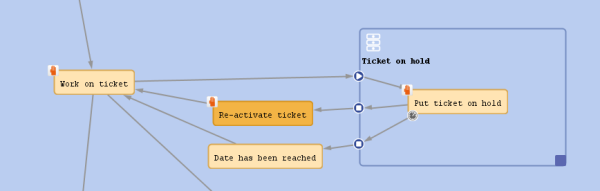
Figure 69: ConSol CM Process Designer - Use case 1: Workflow
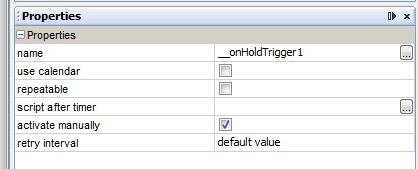
Figure 70: ConSol CM Process Designer - Use case 1: Properties editor for time trigger
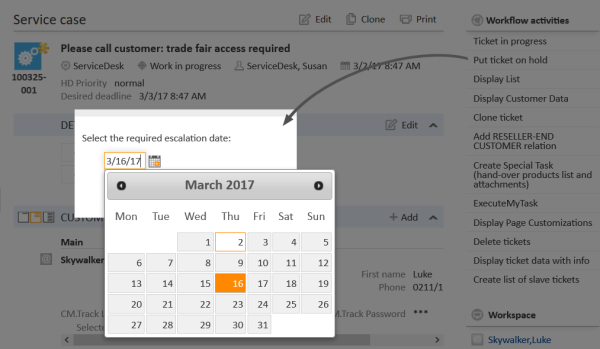
Figure 71: ConSol CM Web Client - Use case 1: Date picker
- Use case 2:
Put a time trigger on the scope where the new tickets come in. Define the time for the trigger (this might depend on SLAs), e.g., four hours. Put a decision node behind the trigger if an engineer has taken care of the ticket or not. If not, an email is sent to the team lead.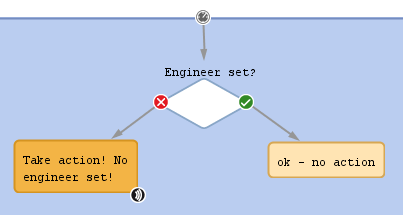
Figure 72: ConSol CM Process Designer - Use case 2: Workflow
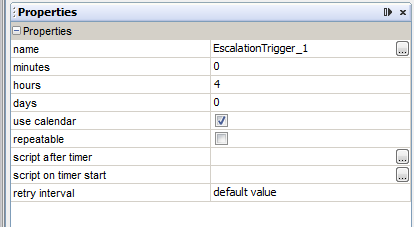
Figure 73: ConSol CM Process Designer - Use case 2: Properties editor for time trigger
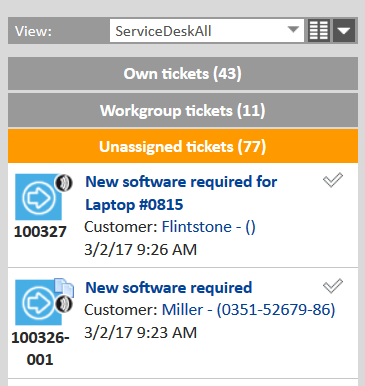
Figure 74: ConSol CM Web Client - Use case 2: Ticket list
- Use case 3:
Put a time trigger to the activity Close ticket with solution and set a defined period of time for the trigger, e.g., five days. Behind the trigger there is the end node of the process. For five days, the ticket can still be edited, after this time, it is closed automatically.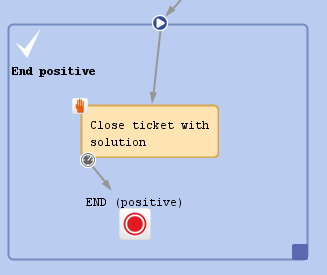
Figure 75: CM Process Designer - Use case 3: Workflow
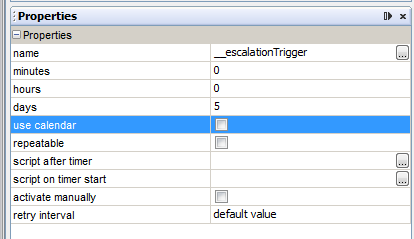
Figure 76: ConSol CM Process Designer - Use case 3: Properties editor for time trigger
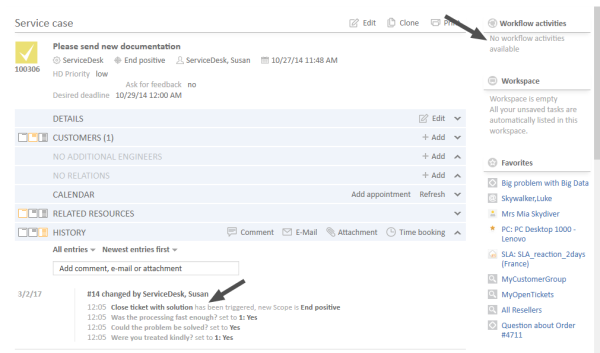
Figure 77: ConSol CM Web Client - Closed ticket


Scripting with Time Triggers
The following methods are of major importance when you work with time triggers:
TimerTrigger
The most important object in a script of a trigger is the trigger itself. It is an object of the Java class TimerTrigger and it is implicitly available as trigger in each trigger-script.
- TimerTrigger.setDueTime(long pDueTime in millisecs)
Sets the time when the trigger should fire, indicated in milliseconds. The time provided as method parameter will be added to the original start time of the trigger, i.e., to the time when the ticket entered the scope or the activity where the trigger is located. So setDueTime() defines the time period in milliseconds from the entry time to the desired firing event.
workflowApi
workflowApi (the singleton instance of the WorkflowContextService) offers two methods to reinitialize the firing time of a trigger. Reinitialization means the trigger is reset to its original state with no time elapsed. In both methods, the trigger name (pTriggerName) has to be provided as path, explanation see section about working with path information.
-
reinitializeTrigger(String pTriggerName)
The trigger is reinitialized with the base date of the ticket entering the respective scope. - reinitializeTrigger(String pTriggerName, Date pBaseDate)
The trigger is reinitialized with the base date set explicitly. In this way, a trigger can be reinitialized with a data which is different from the date when the ticket has entered the respective scope. pBaseDate is an absolute date, provided as Java Date object. - workflowApi.deactivateTimer()
(different method signatures)
Deactivates the given time trigger, i.e., the trigger will never fire until re-initialized.
(There is no method activateTimer(). Use workflowApi.reinitializeTrigger() to re-activate the trigger).
Please see also section Working with Calendars and Times.
Overview of the TimerTrigger Events
The following table provides an overview of possible events of time triggers. Please take the features of the objects and methods into consideration when working with time triggers!
|
Event in process |
Timer trigger event |
Result |
|---|---|---|
|
Ticket enters scope where timer trigger is attached |
Script on timer start is executed |
Script on timer start returns NULL or FALSE: Timer trigger is not initialized, will never fire unless it is reinitialized at another point of time in the process Script on timer start uses trigger.setDueTime(<Long>) to initialize the trigger. The firing time of the trigger is calculated using the base date (i.e., the timestamp when the ticket enters the scope) and adding the <Long> value milliseconds, i.e., the method setDueTime() uses time relative to the time of trigger initialization. In order to set a certain time, you could use a DATE object which contains the target date/deadline and the following line of code: trigger.setDueTime(target.time - (new Date()).time) If the checkbox use calendar is checked, the calendar will be taken into consideration. |
|
Ticket is still in the scope where the timer trigger is attached |
Some script in the workflow calls the method workflowApi.reinitializeTrigger() |
reinitializeTrigger(<TriggerName>) is called: The trigger is started again using the timestamp when the ticket entered the scope (where the trigger is attached) reinitializeTrigger(<TriggerName>,<newBaseDate>) is called: The trigger is started again, the time measuring starting with the newBaseDate. For example, if you would like to use "now" as newBaseDate, you have to call workflowApi.reinitializeTrigger("TIMER_NAME", new Date()). For a and b): If the checkbox use calendar is checked, the calendar will be taken into consideration. |
|
Timer trigger has fired |
Script after timer is executed |
Everything within the script will be executed. Then: Script after timer returns FALSE: Nothing else happens. An automatic activity which is linked to the trigger will not be executed. Script after timer returns TRUE: An automatic activity which is linked to the timer trigger will be executed. |
Please see also the section Use the Right Components to Work with Time Triggers.
Example 1: Set the Due Time of a Time Trigger Depending on the Queue
This script could be used as a script on timer start for a time trigger at a scope. It will initialize the trigger for an escalation depending on the queue, i.e., if the ticket is in the HelpDesk_1st_Level queue there is less time until the escalation than in the HelpDesk_2nd_Level queue.
Within the scripts scripts on timer start and script after timer, the object triggerexists as an implicit initialization of TimerTrigger. So you can work using triggers without any steps before. However, in an Admin Tool script you will have to import the TimerTrigger class or the respective Java package.
The following script could be used in a service desk and help desk environment and placed in the following TimerTrigger.

Figure 78: ConSol CM Process Designer - TimerTrigger in ServiceDesk workflow
def addedEscalMillis = 0
switch (ticket.queue.name) {
case "HelpDesk_1st_Level":
addedEscalMillis = 12*60*60*1000L;
break;
case "HelpDesk_2nd_Level":
addedEscalMillis = 24*60*60*1000L;
break;
case "ServiceDesk":
addedEscalMillis = 4*60*60*1000L;
}
trigger.setDueTime(addedEscalMillis)
Code example 7: Example for a script on timer start
For this example, it makes sense to use fixed values for the times directly in the script code. In real life environments you might want to store escalation times and the like in system properties and retrieve them using the configurationService. in this way, an administrator can easily access and edit the escalation times without any manipulation of the workflow implementation.
In real life, a business calendar might also be used - please see Example 2.
In the server.log file, you can see the time when the trigger is supposed to fire.
2017-03-02 13:22:25,979 INFO [w.DefaultWorkflowEventListener] [Susan-] Ticket's 100332-001 timer defaultScope/Service_Desk/TimeTriggerDesiredDeadline was activated with escalation time Thu Mar 02 17:22:25 CET 2017
The ticket was created on March 2, 2017, 1.22 p.m., thus the escalation time is four hours later: 5.22 p.m.
The same principle could be applied to calculate the escalation time depending on the ticket priority, the VIP status of a customer, or any other parameter.
Example 2: Calculate an Escalation as Warning 4 Hours before Desired End Date
A deadline can be selected in the ticket (ticket field of type Date). Four hours before this deadline will be reached, the ticket should be put into escalation state (marked by an overlay).
def deadl = ticket.get("serviceDesk_fields.desiredDeadline")
if (deadl == null){
log.info("No deadline set!")
} else {
log.info """DEADL: ${deadl}: ${deadl.time}"""
// 4hrs before deadline the escalation should be set
// business calendar should be used
// ServiceDeskCalendar is assigned to queue ServiceDesk, this is transparent here
def now = new Date()
log.info """NOW: ${now}: ${now.time}"""
// time required in millisecds
def four_hours = -4*60*60*1000L
// calculate escalation date
def escalDate = BusinessCalendarUtil.getBusinessTime(deadl, four_hours, ticket.queue.calendar)
// calculate and set due time
log.info """escalDate: ${escalDate}: ${escalDate.time}"""
def dueTime = escalDate.time - now.time
trigger.setDueTime(dueTime)
log.info 'DUE TIME is now ' + dueTime
}
Code example 8: Calculate and set time for TimerTrigger using BusinessCalendar
Example output in the server.log file:
