Best practices
How to use scopes for organizing the workflow
One of the first things you have to consider, when you start making a concept for a workflow, is the number and organization of scopes. If you would like to refresh your knowledge about scopes, please refer to the introduction to scopes.
Of course you can always modify the workflow in later steps, but this might have implications for existing tickets, views, and reports. This is particularly significant if the workflow is used in a production environment.
Consider the following points when setting up the basic structure of a workflow:
- Which trigger should be active for the ticket in which states of the process?
For example, should a time trigger, which monitors the new tickets, also be active for tickets which are already in progress? Or, should a mail trigger be active when the ticket has been finished by the engineer? - Which views are required?
Views are based on the position of tickets in scopes, see ConSol CM Administrator Manual section View Administration for details.
Variant A: Using a global scope
A global scope is a scope which contains all other scopes of the workflow. You might want to use such a global scope because some processes require reactions to events during the entire process. Those events are implemented using triggers which are attached to the global scope. For example, if you want to supervise for the entire process, if an email has been received, you attach a mail trigger (see section Mail triggers) to the global scope. All sub-scopes of the global scope inherit the sensitivity to this trigger. If the email should only be monitored for a sub-scope, you can attach the mail trigger to this sub-scope.
The same applies to all kinds of triggers, i.e., business event triggers (see section Business event triggers) and time triggers (see section Time triggers).
The START node always has to be positioned outside the global scope!

Figure 152: ConSol CM Process Designer - Workflow with global scope
Please keep in mind that you can always use triggers in inner scopes which will then consume the event (see section Firing order of business event triggers in hierarchical scopes as an example for business event triggers). For example, if you would like to use a mail trigger in the entire process in the global scope but you need a certain reaction of the ticket in the Finished scope, you can use a mail trigger which is attached to the Finished scope.
Variant B: Using three or more main scopes
An alternative way to construct a workflow is to use three or more main scopes:
- New tickets
- In progress (only here, a mail trigger is applied)
- Closed tickets (in one or more separate scopes)
The following picture shows an example for a workflow which has been built according to this principle.

Figure 153: ConSol CM Process Designer - Workflow with three types of main scopes
Where to position the start node
The best position of the start node (see section Start nodes) depends on the use of triggers in the following scope. If time triggers are used in the first scope, where tickets are forwarded after the start node, the start node should be placed outside the scope. In case the start node is placed inside the first scope, the time trigger might not be initialized correctly. So place the start node in the default scope.


Figure 154: ConSol CM Process Designer - Position of start node
Where to save scripts
For scripts, which are used over and over again in workflow activity and/or precondition scripts, it might be better to store them (in our example: myscript.groovy) in the Script section of the Admin Tool and call them from the workflow script.
Use the following syntax in the workflow script (see also the example in the following section):
scriptExecutionService.execute("myscript.groovy")
When to use Admin Tool workflow scripts
We would neither recommend to always use this method nor would we advise against it. We will illustrate the advantages and disadvantages of this approach and you can then decide for yourself where in your system you want to apply it.
The advantages of storing workflow scripts in the Admin Tool are the following:
- The script is stored only once and has to be maintained / changed at only one place.
- Changes of the scripts are executed in the system just in-time, no deployment (as for workflows) is required.
The disadvantages of storing workflow scripts in the Admin Tool are the following:
- The process logic is stored at two separate places, i.e., you always have to work with the Process Designer as well as with the Admin Tool to see the entire process.
- Most objects have to be imported into Admin Tool scripts, because they are not present implicitly.
- A workflow export alone is not sufficient to move the workflow, because scripts in the Admin Tool are not included in the export.
How to use Admin Tool workflow scripts
Admin Tool scripts which are used in the workflow have to be of type Workflow. An Admin Tool script usually is called from the workflow using the ScriptExecutionService.
scriptExecutionService.execute("myscript.groovy")
Code example 78: Calling an Admin Tool script from the workflow
// Define a HashMap with the key-value pairs which you would like to pass to the Admin Tool
def params = [ "templateName": "newCustomer" ]
// Execute the script. The passed parameters are available in the Admin Tool script. In the
// example, the variable templateName does not have to be defined in the Admin Tool script
// but it is present based on the definition in the passed HashMap.
// The variable r will contain the return value of the script or Null if there is no return
// value
def r = scriptExecutionService.execute("myscript.groovy", params)
Code example 79: Calling an Admin Tool script from the workflow with use of parameters
Since the object workflowApi (see section workflowAPI) is not available in the Admin Tool scripts, you will have to find other classes with methods which you can use instead of the methods of workflowApi.
How to optimize trigger combinations
Beware of unnecessary trigger executions! They will consume resources and slow down application performance.
Example 1:
This example shows many business event triggers in one big global scope.

Figure 155: ConSol CM Process Designer - Scope with triggers
Example 2:
If it is possible, please use triggers in the smallest scope possible (in this example, the trigger with Decision6 was moved to a smaller scope).

Figure 156: ConSol CM Process Designer - Move trigger to smaller scope
Example 3:
If it is not possible to move triggers to smaller scopes and you do not want to call all of the triggers while executing some activity, move this activity to an outside scope without any triggers.
![]()
Figure 157: ConSol CM Process Designer - Separate scopes with and without triggers
In this example, the position of Activity11 is optimized. It triggered many decision calls and all of them went to NOTHING. Executing Activity11 outside of the global scope keeps a good quality of workflow performance!
How to avoid unneeded ticket update events
Beware of unnecessary ticket update events (Java class TicketUpdateEvent)!
For example, assigning the current engineer (the engineer who is logged in and working with the Web Client) to a ticket can be done in two ways. In one solution a ticket update event is fired, in the other this does not happen. If it is not necessary for a business case to throw a TicketUpdateEvent, avoid it, because an unnecessary call of TicketUpdateEvent causes a decrease in performance.
//this method throws a TicketUpdateEvent after assigning the current engineer to the ticket
workflowApi.assignEngineer(workflowApi.currentEngineer)
Code example 80: Code which triggers TicketUpdateEvent
//this method does NOT throw a TicketUpdateEvent!
ticket.setEngineer(workflowApi.currentEngineer)
Code example 81: Code which does not trigger TicketUpdateEvent
How to use the disable auto update parameter
Use the disable auto update flag for workflow components with care!
Please remember that a ticket update event is by default fired after every activity execution. A ticket update event is an operation that has a great impact and must be used with care!
To avoid performance problems, you can use the disable auto update flag. It depends on the business logic, if it makes sense to use this flag or not.
For example, when we have a series of automatic activities, a good practice is:
- The 1st automatic activity has the disable auto update flag on.
(It will not call the ticket update service method after activity execution.) - The 2nd automatic activity has the disable auto update flag on.
(It will not call the ticket update service method after activity execution.) - The 3rd automatic activity has the disable auto update flag on.
(It will not call the ticket update service method after activity execution.)
... - The last automatic activity has the disable auto update flag off.
(It will call TicketUpdateEvent once, at the end of the pipeline!)

Figure 158: ConSol CM Process Designer - Activities with "disable auto update" option
How to avoid self-triggering business event triggers
When you use a business event trigger which is followed by an automatic activity, be careful that in this automatic activity the fields or objects, which trigger the business event trigger, are not changed again (which would fire the trigger again)!
If the use case requires that the fields, which caused the firing of the trigger, have to be changed again, then the logic, where the fields are changed, has to be placed in an activity outside the scope which hosts the trigger.
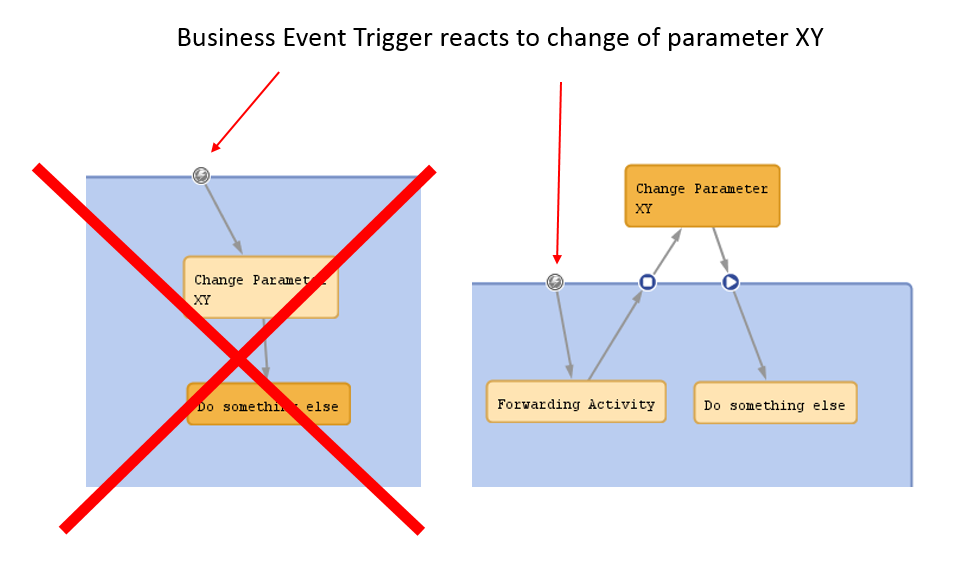
Figure 159: ConSol CM Process Designer - Avoiding self-triggering business event triggers
Which components to use with time triggers
Figure 160: A time trigger with an automatic activity
There are two ways of implementing an event which should happen, when a time trigger has fired:
- Use the script after timer
- Use an automatic activity
The ConSol CM best practice for this use case is the following:
- Use the script after timer to control if the following automatic activity should be executed or not.
This is slightly better than using a decision node, because a decision node is too complex at this location of the process and it would require two return values. Of course, it is - in principle - possible to use a decision node and in the end, it is up to you what you prefer. - Use an automatic activity for everything else which should happen when the time trigger has fired.
This can be seen in the graphical representation of the process logic and thus becomes instantly clear when the workflow is opened. You can easily add an overlay.