Activity Control Forms (ACFs)
Introduction to ACFs
An Activity Control Form (ACF) is a web form which is offered to the engineer at one or more process steps. In this way, the data input can be controlled in a very strict way.
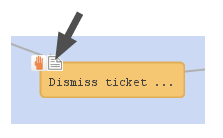
Figure 95: ConSol CM Process Designer - Activity Control Form (ACF)
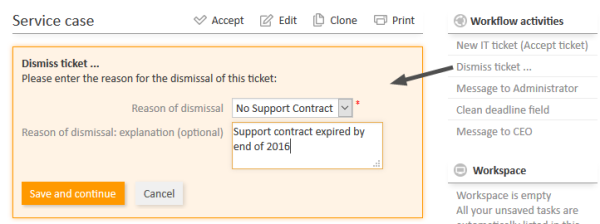
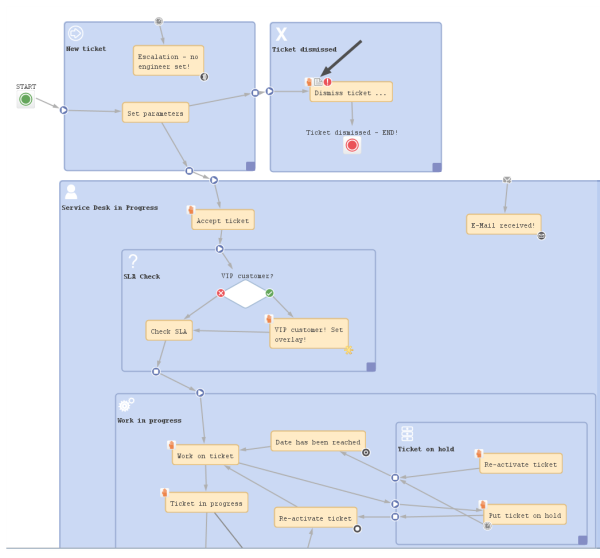
For example, when a help desk agent wants to dismiss a complaint, this cannot be performed without giving a reason. In the process this is implemented using an ACF which is displayed when the engineer has clicked on the workflow activity Dismiss ticket. A form is opened where the engineer has to select a category for the dismissal and a text box where he/she can enter a note. Or, using the example of a sales process, when an engineer (a sales agent in this case) clicks on Make appointment with potential customer, a form is displayed, where the budget, the size of the customer's company, and the products of interest have to be entered.
An ACF can offer optional and mandatory fields.
We recommend to set a "..." behind the name of every activity which will automatically open an ACF. This helps the user to distinguish between ACF-loaded activities and simple activities.
Figure 96: ConSol CM Web Client - Opened ACF
Adding an ACF to a workflow
Variant A: Starting the ACF definition in the Admin Tool
Before you can add an ACF to the workflow, it has to be defined using the Admin Tool. Please refer to the ConSol CM Administrator Manual, chapter Ticket Field Administration for a detailed explanation. In the current manual, we assume you have already defined an ACF and want to add it to the workflow.
An ACF is always added to a manual or scope activity. To add an ACF to the target activity, grab the ACF icon in the palette and attach it to the activity using drag-and-drop. Then you can configure the ACF properties. In case you add an ACF to an automatic activity, this activity is changed to type Manual.
In the Web Client, the ACF will be opened when the user clicks on the workflow activity to which the ACF is attached in the workflow. See figure above.
Variant B: Starting the ACF definition in the Process Designer
You can also add an empty ACF to a workflow activity and define the name during this operation. Then an empty ACF will be created in the Admin Tool and you have to assign the ticket fields to this ACF in a later step.
Do not forget to reload the Admin Tool data! When you have defined the ACF in the Process Designer, there is no automatic data transfer to the Admin Tool.
Properties of an ACF
ACFs have the following properties:
-
name
String. The name of the ACF. Select the name from the drop-down menu. All ACFs which have been defined in the Admin Tool are available.
-
required fields
This opens a pop-up window (see figure below) where you can define mandatory fields. As a default, all ACF fields are optional, i.e. when the form is opened in the Web Client, the engineer can enter data but can also continue the process without doing so. For mandatory fields, the process can only be continued when the field has been filled in.
-
Initializing script
Here, you can define a script which will be executed before the ACF is loaded. Usually, this kind of script is used to set default values in ACF ticket fields.
-
Precondition script
Here, you can define a script which is executed to determine if the ACF will be displayed (return value true) or not (return value false).
All ticket fields which are part of an ACF have to be available in the target queue, i.e. the respective ticket field group has to be assigned to the queue where the workflow is used! There are two possibilities to achieve that:
- You assign the ticket field group to a queue manually.
- You just create the ACF and use it in a workflow. When you deploy the workflow, ConSol CM will automatically assign the required ticket field groups to the queues where the workflow is used.
For a detailed explanation of queue management, please see the ConSol CM Administrator Manual.
Business logic of ACFs
ACF at a manual, scope or reopen activity
ACFs are only possible for manually executed activities, i.e., for manual, for scope and for reopen activities. When a user selects a workflow activity which has an ACF in the Web Client, the following steps are performed:
- If an ACF precondition script is present, this precondition script is executed.
- If an ACF Init Script is present: the ACF Init Script is executed.
- The ACF is displayed and the engineer fills in the form, with optional and mandatory fields. If fields, which are part of the ACF, are also available in the regular ticket data fields, those fields might have been edited/filled-in by an engineer before the ACF is used. Thus those fields might be already filled-in in the ACF. The engineer can leave them as-is (and use the ACF as control only) or can modify the content of the fields.
- The workflow activity is executed as soon as the engineer has clicked on OK in the ACF.
- The ACF is not displayed.
- The workflow activity is executed as soon as the engineer has clicked on the workflow activity (name) in the Web Client.
If the ACF precondition script returns true:
If the ACF precondition script returns false:
When an ACF is canceled, it returns to the scope of the last activity, because the ticket always waits behind the last activity (and not before the next).
If the data of the ACF should not be shown before a certain step in the process has been reached, the data can be put into one (or more) separate ticket field group(s) which are invisible at the start of the process (ticket field group annotation group-visibility = false). In the step after the activity with the ACF, the ticket field groups are faded in using the script of a workflow activity. Please refer also to the Best practices section in this manual for more recommendations concerning the use of ACFs.
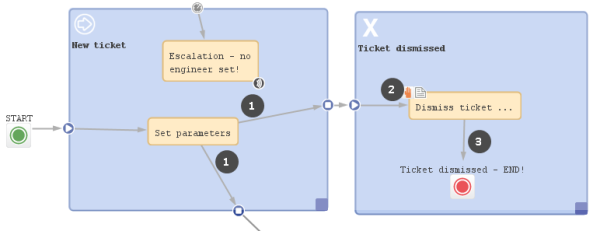
Figure 97: ConSol CM Process Designer - ACF process logic
Example (ACF with init script, without precondition script):
- A ticket is created and runs through the automatic activity Set parameters.
- It waits behind this activity, at position (1) in the scope New ticket. The next activities Dismiss ticket ... and New IT ticket (not shown here) are displayed in the Web Client.
- The engineer selects Dismiss ticket ... .
- The init script for the ACF at Dismiss ticket ... is executed (2).
- The ACF is shown in the GUI.
- Variant 1:
- The ACF is canceled.
- The ticket goes back to (1).
- Variant 2:
- The ACF is filled-in and confirmed.
- The activity Dismiss ticket ... is executed (in case there is a script in this activity, the script is executed), the ticket passes through the node and continues on its way (3). In the example above, it is closed.
- Variant 1:
ACF at manual activity with condition
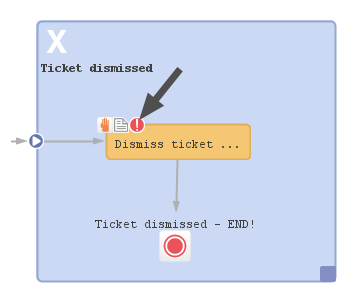
In case a manual activity has a condition, the activity is only displayed if the condition script returns true, i.e. also the ACF is only displayed if the condition script returns true.
Figure 98: ConSol CM Process Designer - Manual activity with ACF and condition
Examples for the use of ACFs
Example 1: ACF for the dismissal of a customer request
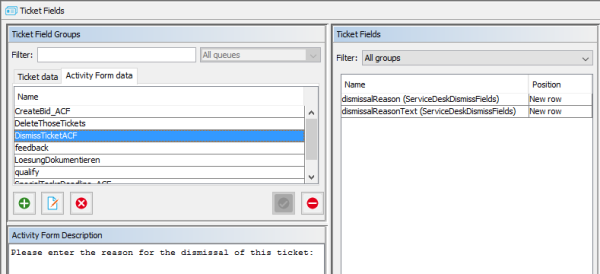
This example was used in the previous sections. The engineer can only dismiss a customer request when a reason has been given. This is selected from a drop-down menu. Additionally, the engineer can add a note in a text field.
Figure 99: ConSol CM Admin Tool - definition of ticket fields which will later be used in an ACF
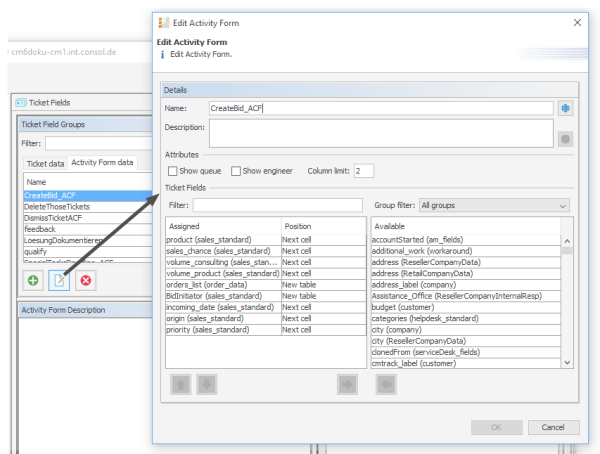
Figure 100: ConSol CM Admin Tool - ACF definition
Figure 101: ConSol CM Process Designer - ACF in workflow
The Web Client GUI and the ACF properties are shown in the figures of the previous paragraphs.
Example 2: Fill-in sales information when a bid is created
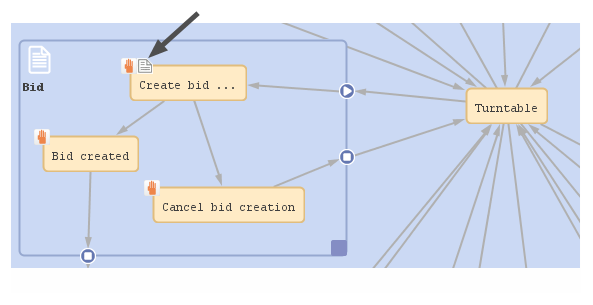
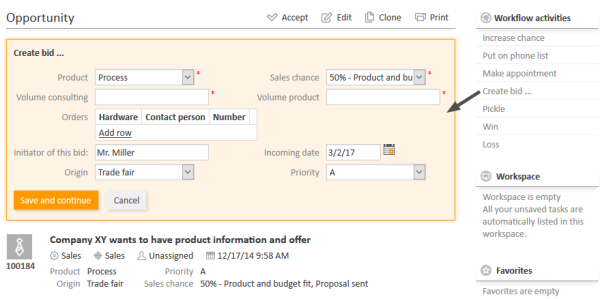
When a sales representative selects the workflow activity Create bid in the Web Client, an ACF is opened where several fields are offered. One field is a drop-down menu and a default value is set via script. The other fields are optional. The field Product has been filled-in for the ticket in previous process steps, so this field is offered with the selected value. It can either be left unchanged or it can be modified.
Figure 102: ConSol CM Admin Tool - ACF for Sales workflow
Figure 103: ConSol CM Process Designer - ACF in Sales workflow
ticket.set("sales_standard.BidInitiator","Mr. Miller")
Code example 16: Process Designer: Initializing script for Create bid ACF
Figure 104: ConSol CM Web Client - Sales process ACF
ACFs in CM/Track
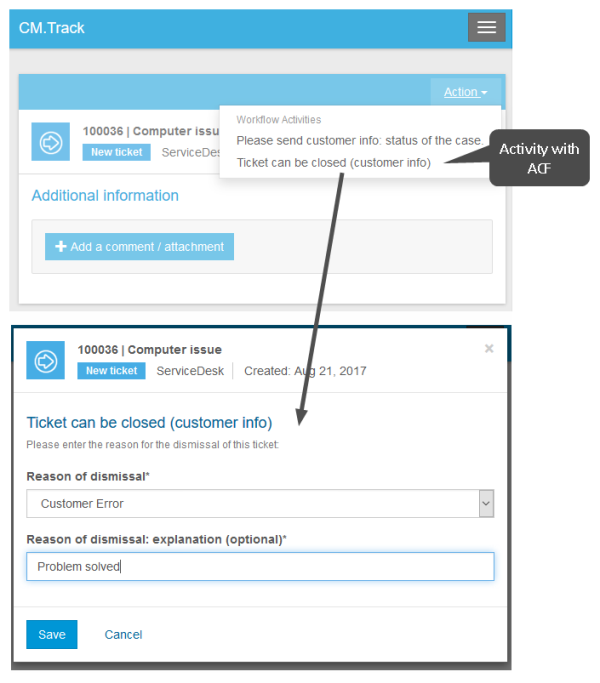
If an activity with an ACF is configured as expose to customers (see section Editing the properties of a workflow element), the ACF will be available in CM/Track.
Figure 105: CM/Track - Activity with ACF
Please note that in order to expose data fields (ticket fields, customer fields) in CM/Track, either the CM system property cmas-restapi-core, security.fields.customer.exposure.check.enabled has to be set to false (which will expose all fields to customers!) or the property has to be set to true and the data fields which should be available ("exposed") have to be annotated with customer exposure = true. This also applies to all data fields which are used in an ACF!
The following features and functionalities are or are not (yet) available for ACFs in CM/Track.
Supported:
- Ticket fields as well as customer fields can be used
- Mandatory fields (red asterisk)
- Add/remove rows in lists (single field lists or lists of structs)
- Pre-filled fields
- Layout definition using ACF design in the Admin Tool
Not supported (as of CM version 6.11.0.4):
- Queue fields
- Engineer fields
- Dependent enums
- Autocomplete features
- Post activity execution mechanism (e.g. postActivityExecutionHandler)
- Web Client annotations (annotations in the group cmweb-common)
However, the features which are not (yet) supported are usually not in operation for customer interactions in CM/Track.
