Jump-out and jump-in nodes
Introduction
A process often consists of one or more sub-processes, e.g., in an IT help desk, there might be a first level team who accepts and qualifies the tickets, a second level team who can solve several problems, and some third level team with specialists. When you want to represent this process, you have to build a workflow for each special sub-process (1st level, 2nd level, 3rd level). Then the sub-processes have to be linked to make sure the handover of the ticket from one team to the next uses the correct way in the process.
A ticket might pass from the first level to the second level, on to a third level team, back to the second level team with another question, back to another third level team, and then back to the first level team who contacts the customer. So we need connections from one sub-process to the next one, i.e., nodes where a ticket leaves the present workflow, a jump-out node, and the counterpart in the following workflow, the jump-in node. If the ticket should start at the start node of the new process, no jump-in node is required.
In the Process Designer, jump-out and jump-in nodes are inserted into the workflow by drag-and-drop from the palette and are linked to other workflow elements depending on the desired process.

Figure 106: ConSol CM Process Designer - Example for jump-out and jump-in nodes
The following question might have come up during the design and development of your business processes:
Why do I have to use more than one workflow and use jump-out and jump-in nodes? Can't I just use one workflow with different scopes?
Answer based on our best practices:
We presume that when different teams are involved that these teams have different access permissions to the system and a team-specific process has to be used for tickets. Therefore, as one workflow is assigned to one queue and as access permissions are also based on queues, each of the involved teams needs at least one queue with one workflow and team-specific access permissions. This implies that a hand-over from one (sub-)process to another is implemented. The hand-over is modeled using jump-out and jump-in nodes. It is possible to use one and the same workflow for several queues or to implement a specific workflow for each team. In any case it is far easier to maintain several small workflows compared to one huge-and-complex workflow.
It is possible to check the roles of an engineer and to display some activities only if a certain role is present. However, this is a mechanism for single activities or a single scope within a workflow. The mechanism should definitely not be used to model the cooperation of entire teams.
Jump-out nodes
A jump-out node defines a position where the ticket is to leave the (sub-)process and to enter the next (sub-)process.

Figure 107: ConSol CM Process Designer - Jump-out node
Properties of a jump-out node
Jump-out nodes have the following properties:
-
name
String. Mandatory. Technical object name.
-
label
String. Optional. Localized name (if not set, the technical name is used) that will be displayed in the Web Client GUI.
-
description
String. Optional. It will be displayed as mouse-over in the Web Client GUI.
-
sort index
Selection. Mandatory. Defines the order of the activities in the Web Client GUI.
-
jump out node type
Selection. Mandatory. Either Automatic or Manual has to be selected. In case it is a manual node, the node is marked with the hand/manual icon in the Process Designer GUI.
-
script
Optional. A script can be defined which is executed when the ticket enters the node.
-
target queue name
Selection. Mandatory. Select the queue name to which the ticket should be passed.
-
target jump in node
Selection. Optional. Select the jump-in node from the drop-down menu. All jump-in nodes from the workflow of the selected queue are offered. If no jump-in node is selected, the ticket will enter the other process, i.e., the target queue, at the start node.
When you start designing workflows you might have a chicken-and-egg problem when you start to define jump-out and jump-in nodes, because obviously you will have to start with one workflow when the other workflow is not yet present. We recommend to work with dummy queues without specific jump-in node. Then add the correct target queue name and the name of the jump-in node later.
-
history visibility
Mandatory. This property defines on which display levels the execution of the activity is shown in the ticket history in the Web Client. The possible values are:
- 2nd level and 3rd level
- only 3rd level
- on every level
- default (default value)
The activity is shown on the display level which is configured in the Admin Tool, navigation group Tickets, navigation item History. Depending on the type of activity, one of the following settings is used:
- Manual activity or activity with overlay executed
- Activity executed after escalation
- Automatic activity executed
- hidden on all levels
The execution of the activity is never displayed in the ticket history of the Web Client.
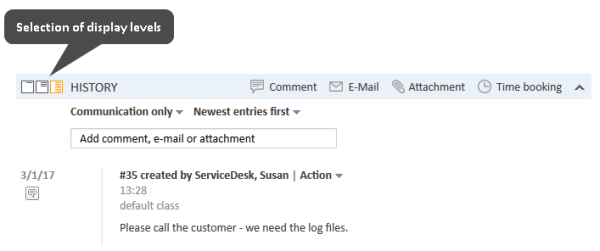
Figure 108: ConSol CM Web Client - Display levels in the ticket history
-
disable auto update
Defines the behavior of the ticket when an event has been fired or executed. Usually, after an event, a ticket update operation is performed automatically. In case a chain of events is used you should avoid triggering a ticket update operation after every single event. To avoid this, set disable auto update to true in all events except for the last one. Then, the ticket is only updated once, after the last event.

Jump-in nodes
A jump-in node is a node which defines the position where a ticket from another process (queue) can enter a queue with the current workflow. All jump-in nodes of a workflow are offered as target jump-in nodes when the queue with the respective workflow has been selected as target queue for a jump-out node.

Figure 109: ConSol CM Process Designer - Jump-in node
Properties of a jump-in node
Jump-in nodes have the following properties:
-
name
String. Mandatory. Technical object name.
-
label
String. Optional. Localized name (if not set, the technical name is used) that will be displayed in the Web Client GUI.
-
description
String. Optional. It will be displayed as mouse-over in the Web Client GUI.
-
script
Optional. A script can be defined which is executed when the ticket enters the node.
-
overlay
Selection. Optional. Click into the orange space to load a standard ConSol CM overlay or use the file explorer (...) for an upload of another icon from the file system.
-
overlay range
Selection. Only displayed when overlay has been set.
- Activity
The overlay is attached only as long as the ticket stands behind the activity. As soon as the next activity is executed, the overlay is deleted from the ticket icon. - Scope
The overlay is deleted when the ticket leaves the scope. - Process
Once the overlay has been attached to the ticket icon, it stays there for the rest of the process. - Next overlay
The overlay is attached to the ticket icon as long as no new overlay appears. In that case, only the new one is attached, the old one is deleted.
- Activity
-
history visibility
Mandatory. This property defines on which display levels the execution of the activity is shown in the ticket history in the Web Client. The possible values are:
- 2nd level and 3rd level
- only 3rd level
- on every level
- default (default value)
The activity is shown on the display level which is configured in the Admin Tool, navigation group Tickets, navigation item History. Depending on the type of activity, one of the following settings is used:
- Manual activity or activity with overlay executed
- Activity executed after escalation
- Automatic activity executed
- hidden on all levels
The execution of the activity is never displayed in the ticket history of the Web Client.
Figure 110: ConSol CM Web Client - Display levels in the ticket history
-
disable auto update
Defines the behavior of the ticket when an event has been fired or executed. Usually, after an event, a ticket update operation is performed automatically. In case a chain of events is used you should avoid triggering a ticket update operation after every single event. To avoid this, set disable auto update to true in all events except for the last one. Then, the ticket is only updated once, after the last event.