This chapter discusses the following:
A resource-customer relation (for greater readability called customer relation in this section) defines the relation between this resource and a customer. Customer relations allow you, for example, to link your assets to the customers (contacts and companies) who use them. In an Help Desk process, these assets could be the computer and printer used by the customer or their contracts. You can also use customer relations to support the CRM functionalities of ConSol CM: For example you create a resource for a trade fair you attended and link this trade fair to all the customers you met there. You can quickly access the pages of the related customers from the resource page.
You can create relations based on the relation models which are configured in your CM system. The following is defined for each relation model:
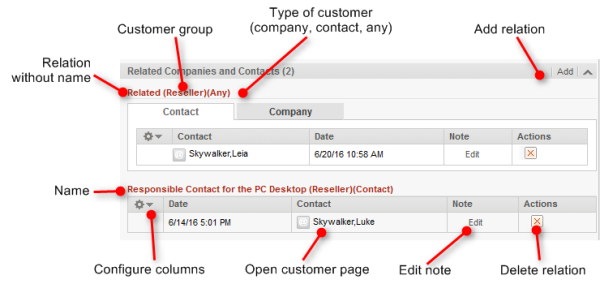
The customer relations are displayed in the Section for Related Customers of the resource page. There is a table for each relation model. The heading states the name of the relation model, the target customer group, and the type of customer (either company, or contact, or any). The table contains the relations which were created for this relation model.
If the type of customer is any, i.e., either a company or a contact, there are two tabs: one for relations to contacts and one for relations to companies (see upper part of the following figure).
Figure 120: Customer relations of resources
The relations are displayed on the resource page and the related customer pages. Please note that the same relation can have a different name on the customer pages.
Open the context menu next to the wheel icon to configure the table columns. To add columns, enter the column name and select a suggestion from the Autocomplete Search. You can remove columns by clicking the cross next to their name.
Please proceed as follows to add a new customer relation:
Figure 121: Adding a customer relation
The following figures show the resulting relation:
Figure 122: Resulting relations
Click Edit in the Note column of the relation to add or edit its note. The note is optional. If the Note column is not displayed, you have to add it first (see Configuring the Displayed Columns).
You can switch to the customer page of the related customer by clicking his name in the column named Contact or Company. If you click another column, a preview window is opened where you can choose to open the customer page.
Click the red cross in the Actions column to delete the relation. The relation is now displayed in italics. At this point you can still undo the removal by clicking Undo remove. As soon as you execute any other action, the relation is removed for good. Note that the relation is also removed from the page of the related customer.