This chapter discusses the following:
A resource-ticket relation (for greater readability called ticket relation in this section) defines the relation between this resource and a ticket. Ticket relations allow you to link your assets to the tickets concerning them. For example, you can link an incident ticket to the printer which caused the problem or a service ticket to the customer's SLA. You can quickly access the tickets from the resource page.
You can create relations based on the relation models which are configured in your CM system. The following is defined for each relation model:
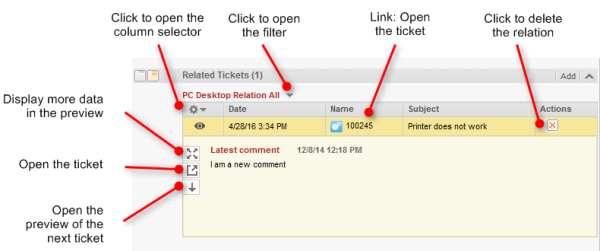
Ticket relations are displayed in the Section for Related Tickets of the resource page. The layout depends on the selected visibility level. The following figure shows the Section for Related Tickets with the visibility setting Extended. There is a table for each relation model. The heading states the name of the relation model and the range of tickets (all, open, or closed). If no name has been configured for the relation, Related is displayed instead. You can change the range of tickets by clicking the arrow next to the relation name and selecting another value.
The table contains the relations which were created for this relation model.
Figure 123: Ticket relations
Open the context menu next to the wheel icon to configure the table columns. To add columns, enter the column name and select a suggestion from the Autocomplete Search. You can remove columns by clicking the cross next to their name.
Please proceed as follows to add a new ticket relation.
Figure 124: Adding a ticket relation
Click Edit in the Note column of the relation to add or edit its note. The note is optional. If the Note column is not displayed, you have to add it first (see Configuring the Displayed Columns).
You can open the related ticket by clicking its number in the column Name. If you click another column, a preview window is opened where you can choose to open the ticket (see figure in section Display of Ticket Relations in the Web Client).
Click the red cross in the Actions column to delete the relation. The relation is now displayed in italics. At this point you can still undo the removal by clicking Undo remove. As soon as you execute any other action, the relation is removed for good.