Emails
The Web Client can send and receive emails related to tickets. Emails are always sent from within the ticket they concern. You can send emails to the customer and to any recipient with a valid email address. All emails sent from the Web Client are displayed in the ticket history. If the recipient replies to the email, the reply is also added to the ticket history. The ticket history therefore provides an overview of all email communication, including attachments.
Sending Emails
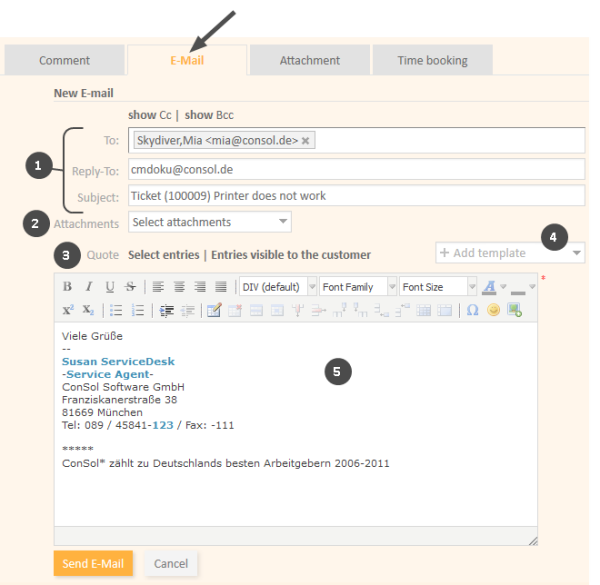
To draft the email click the Email link in header of the History Section. The background of the history section turns yellow to indicate that it is in edit mode. If the section is already in edit mode, you can also write an email by clicking the Email tab. Depending on your system configuration, the Rich Text Editor might already contain a certain template, e.g., your signature. You can edit the text before sending the email.
Figure 63: Sending an email
- Standard email fields (1)
- To
This field contains the recipient of the email. In most CM systems, it is initially filled with the email address of the ticket's main customer (if provided). Depending on the system configuration, you see the email address and/or the name of the recipient. You can remove the recipient by clicking the little cross next to the name and you can add multiple recipients separated by a comma. As soon as you start typing the recipient's email address or name, the CM system suggests matching recipients. - Cc/show Cc
This field contains the recipients which should receive a copy of the email. If the Cc field is not displayed, click the show Cc link. - Bcc/show Bcc
This field contains the recipients which should receive a blind copy of the email. If the Bcc field is not displayed, click the show Bcc link. - Reply-To
This field contains the reply-to address used in the email. This is usually a system address. Do not change it! - Subject
This field contains the email subject. The subject is set automatically by the system. Do not change it! Otherwise the replies might not be correctly attached to the ticket.
- To
- Attachments (2)
Here you can select attachments to be sent with the email. You can only select attachments which are already added to the ticket or included in a selected template, i.e., it is not possible to upload a new attachment here. This field is hidden if the ticket does not have any attachments. - Quote (3)
Here you can quote entries from the ticket history. If you click Select entries, you can select from all communication entries (comments and emails) in the ticket history. Click Entries visible to the customer to limit the selectable entries to those entries which the customer is allowed to see. - Add template (4)
Here you can select one or several templates for the email text. Depending on your system configuration, a standard template might be initially selected. You can select another template or edit the template text before sending the email. Please see Templates for Creating Emails or Comments for a detailed description of templates. - Rich Text Editor (5)
This field contains the email body, i.e., the text which is sent. You can format the email text using the features of the Rich Text Editor.
Draft your email and click Send Email to send it to the indicated recipients.
Replying to Emails and Forwarding Emails
You can reply to and forward an email from the ticket history.
Figure 64: Email actions
To reply to an email, open the Action menu of the desired email and click Reply. The Rich Text Editor is opened. The sender of the original email is automatically selected as a recipient in To: and the original email is quoted under in reply to. You can edit and send your email as described in Sending Emails.
To forward an email, open the Action menu of the desired email and click Forward. The Rich Text Editor is opened. The original email is quoted under Original Message and you have to specify the recipient in the To: field. You can edit and send your email as described in Sending Emails.

