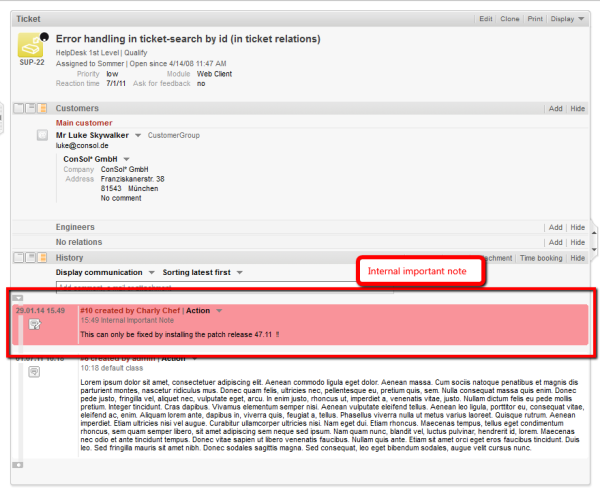
A class of text is a classification that you assign to a ticket entry. This entry can be:
Assigning a class of text can serve one or more of the following purposes:
Thus, with classes of text you can organize ticket information within the ticket and can also control the process flow and the availability of information.
Figure 308: ConSol CM Web Client - Using a class of text for an internal important note
Two steps are required to install a new class of text for tickets in a certain queue:
Classes of text are defined and managed in the corresponding navigation item in the navigation group Global Configuration in the Admin Tool (see the following figure).
Figure 309: ConSol CM Admin Tool - Global configuration: Classes of Text
You define a new class of text by clicking the Add button below the list. The following pop-up window appears:
Figure 310: ConSol CM Admin Tool - New Class of Text
Here, you have to define the details of the class of text:
Figure 311: ConSol CM Admin Tool - Choose a color for the Class of Text
There are three ticket history levels in the Web Client:

Thus, the configuration of a class of text concerning one or more of those levels determines whether a text entry marked with this class of text is displayed at a given level.
The addition short and full indicates whether entries are shown within the chosen visibility level in full length (full) or are truncated after a certain number of characters (short):
Figure 312: ConSol CM Web Client - Example: Visibility level "Extended" (2nd level) shows entries in full length ("full")
Figure 313: ConSol CM Web Client - Example: Visibility level "Basic" (1st level) shows entries shortened ("short")
Select, in the drop-down menu, the history levels at which the marked ticket information should be visible (see picture below).
Figure 314: ConSol CM Admin Tool - Choose a visibility level
If you choose hidden, the ticket History entry marked by this class of text will not be visible in the ticket history. For a detailed explanation of visibility level and display mode for ticket History entries, please refer to section General Information about the Visibility of Ticket History Entries in the Web Client.![]()
Figure 315: ConSol CM Admin Tool - Choose an icon for the Class of Text
Click OK to save the details of the new class of text and to close the window.
Figure 316: ConSol CM Web Client - Context menu for classes of text in ticket history section
After assigning the class of text to a queue within the Queue Administration it will be available for tickets of this queue in the Web Client.
If you want to edit a class of text, select it in the list and click the Edit button. The same window as described above for creating a class of text will appear. You can modify all details and save your changes by clicking OK.
You can only delete a class of text if it is not used within any tickets and if it is not assigned to a queue. In order to delete a class of text select it in the list and click the Delete button. If you confirm the following dialog with Yes, the class of text will be removed from the list and the system.
To define the default class of text, use the system property cmweb-server-adapter, defaultContentEntryClassName (see System Properties). The default class of text will be applied to any ticket entry which is not explicitly marked with another class of text.
Depending on the visibility configuration of this class of text, the regular comments in the ticket (i.e., the comments which have the class of text default class) will be displayed, see section visibility.
You can work with classes of text in scripts which are used in workflow activities or which are located in the Script section of the Admin Tool. For details about programming, please read the ConSol CM Process Designer Manual.
In scripts, you can assign a class of text to a TextEntry even if the class of text is not assigned to the queue! This can help automate certain processes.
All classes of text (default classes and special ones) used in history entries (comments, e-mails) are transferred from ConSol CM to the data warehouse (DWH) automatically in all transfer modes (LIVE and ADMIN). There is no configuration required for this feature, and the installation is upgraded automatically. A new initialization and initial transfer are required, however.