Queue Administration
Introduction
Queues are a central element of ConSol CM. Tickets are grouped in queues, e.g., for certain tasks or work groups. Each queue is assigned a single workflow which controls the processing steps of all tickets in this queue. For example, there might be one queue Service Desk one queue Marketing, and one queue Sales.
The following parameters and objects are assigned to a queue (the parameters and objects are defined on other Admin Tool tabs, and are assigned to a new or existing queue here):
- The workflow of the queue (mandatory), i.e., the process which should be used for all tickets in the queue (e.g., all tickets of a department). A queue can only have one workflow but a workflow can be used by multiple queues.
- The template for the emails which are sent to engineers when a ticket is assigned or removed (optional).
- Several scripts that define the behavior of tickets in this queue (optional).
- One or more customer group(s) which are associated with the queue. Tickets can only be added to the queue for customers of this/these group(s) (one customer group is mandatory, more are optional).
- The business calendar (i.e., the working hours) which should be applied for tickets in this queue (optional).
- The data fields (ticket fields) which should be available in tickets in this queue. They are defined by assigning ticket field groups to the queue (some mandatory, some optional).
- The classes of text which should be available for tickets in this queue (optional).
- The project(s) which should be available for time booking in tickets of the queue (optional).
As a central element, the queue uses various objects and elements that are defined in other places, i.e., on another page of the Admin Tool, so usually all elements which are required for the definition of a queue are defined first. However, except for the workflow, all parameters can be modified after a queue definition has been saved for the first time (i.e. after the queue has been created), so you can configure the queue using an iterative approach if you like.
Furthermore, a queue is the basis for the assignment of access permissions, please see section Role Administration for details.
Queue Administration Using the Admin Tool
In the Admin Tool, queues are managed on the navigation item Queues in the navigation group Global Configuration.

Figure 310: ConSol CM Admin Tool - Global Configuration, Queues: Queue administration
The navigation item Queues contains a list of all queues (1) which can be filtered using a string filter and/or a pull-down menu where the customer group can be selected. In the Details section (2) on the left hand side, all queue details are displayed (in read-only mode).
To add, edit, delete, copy or (de-) activate a queue, use the respective button in the button bar (3) below the queue list.
Filter the Queue List
Queues you want to edit or copy can be found most quickly if you enter filter information in the fields above the queue list.
You can filter for queues which
- contain a certain text string (blanks are interpreted, too) and/or
- are assigned to customer groups.
Create a Queue
You create a new queue by clicking the Add button below the queue list. The pop-up window which appears is the same for adding and for editing a queue. In both cases, you have to edit the queue details.
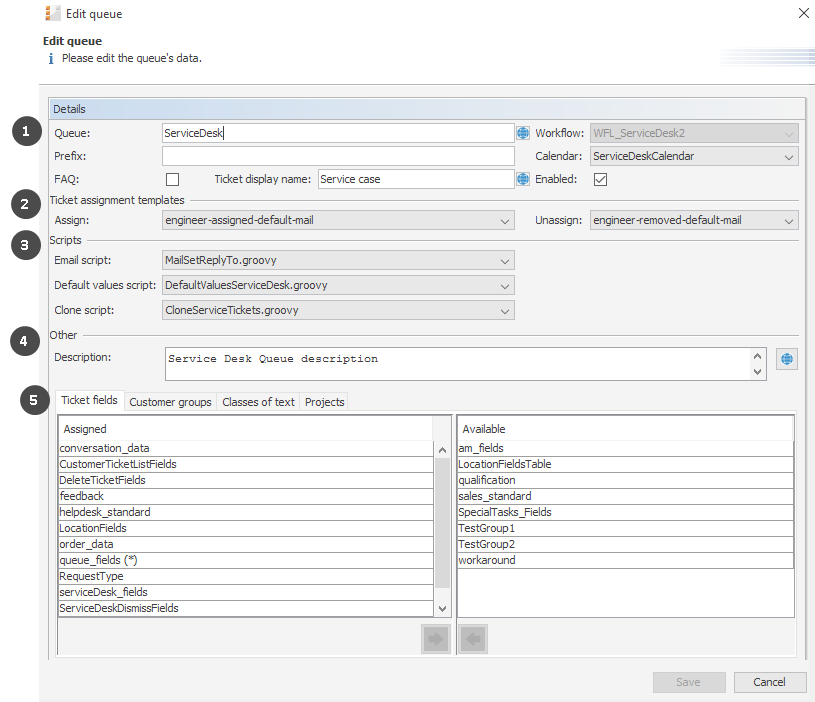
Figure 311: ConSol CM Admin Tool - Global Configuration, Queues: Create a queue
The following fields are available:
- General configuration (1):
- Queue:
Enter the technical queue name in this field. Click the Localize button to enter the localized queue name for all languages that are available in the system. The localized queue name (depending on the web browser locale) will be displayed in the Web Client in the ticket header. If no localized values are provided, the technical name will be displayed. - Workflow:
Choose the workflow for the queue from this list.When you have developed and deployed a new workflow, it will only be available in the Admin Tool after a reload of Admin Tool data!
Once you have assigned a workflow to a queue it cannot be changed anymore!
- Prefix:
You can enter a prefix for the ticket IDs of a queue, e.g., when the ticket ID should indicate to which queue or organizational structure it belongs.The prefix remains with the ticket name if the ticket is moved to another queue.
- Calendar:
Choose the business calendar for the queue from the list. Business Calendars in CM define working hours, holidays and the valid time zone (see section Business Calendars). They are used, e.g., for time triggers in the workflow and have to be activated explicitly for each trigger, i.e., in order to work with time calculations based on a business calendar, it has to be configured in three places:- In the navigation group Global Configuration, navigation item Business Calendars the calendar is created and the active and vacation times are configured.
- In the queue administration a calendar is assigned to the queue.
- For each time trigger in the workflow the use of the queue-specific calendar can be activated or not. Refer to the ConSol CM Process Designer Manual for a detailed explanation of working with time triggers.
- FAQ:
Ticking this checkbox marks the queue as a knowledge base for CM.Track users. They can search for tickets in this queue in CM.Track, the ConSol CM Web Portal. Please see also section CM.Track V1: FAQs in CM.Track or CM.Track V2: FAQs in CM.Track for more information about this topic. - Ticket display name:
Optional. The string entered here will be displayed as ticket header. If a localized value is provided, this will be used, otherwise, the technical name will be used. In this way, you can adapt the CM system to display terms like Service case, Request or Case and you are not limited to the term Ticket. If nothing has been defined manually, the default value Ticket is used.
Please note that two manually defined parameters can potentially define the value for the ticket display name:- The ticket display name set here, in the queue details definition. This is queue-specific, i.e. for each queue, a different display name can be defined. For example, in the Service Desk queue, this might be Service case, whereas in the Sales queue, this might be Opportunity.
- The value which is defined using the label ticket.base.initcap. This is used only if the queue-specific ticket display value is not set. For details about labels, please read the section about Labels.
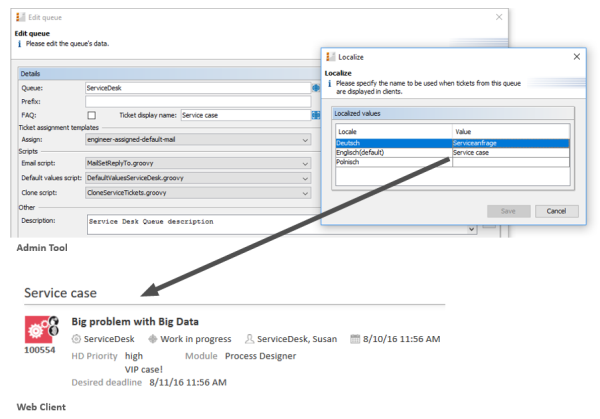
Figure 312: ConSol CM Admin Tool and Web Client: Setting and viewing a queue-specific ticket header
- Enabled:
If this checkbox is checked, the queue is immediately available in the system after saving, otherwise the queue is disabled. In enabled queues, you can create tickets. In disabled queues, this is not possible.
- Queue:
- Ticket assignment templates (2):
Here you can choose email templates which are used for automatic emails which are sent to the (new) engineer when a ticket is assigned to an engineer (Assign), or to the (old) engineer when a ticket is taken away (Unassign). When you have defined the templates in the Scripts & Templates Administration of the Admin Tool (see section Admin Tool Templates) they will be available in the drop-down menu. If you do not want the ConSol CM system to send an automatic email in case of the engineer operation, just leave the field empty. Please keep in mind that the system properties cmas-core-server, mail.notification.engineerChange (=true) and cmas-core-server, mail.notification.sender have to be set, see System Properties for details. - Scripts (3):
Scripts are used to automate recurring tasks and activities. They are managed and stored in the Scripts & Templates Administration (see section Admin Tool Scripts). You can assign:- Email script
Choose a script from the list if outgoing emails for this queue should be modified by the script, e.g., to contain default values like the sender or address fields. The email script indicated here is the last script that processes an outgoing email, so all former settings will be overwritten if a variable has been set before. All scripts of type Email that are stored in the script section are available for selection, so please make sure to pick the correct one. - The Reply-To address which is set with the system property mail.reply.to. If it is set, it will be displayed in the Ticket Email Editor in the Web Client. If it is really the effective Reply-To address in an email depends on the configuration in the queue-specific outgoing email script. See next item. If the Page Customization attribute showReplyTo for the type mailTemplate is set to false, no Reply-To address will be displayed in the Ticket-Email-Editor, but if the property mail.reply.to is set, this address will be used anyway - unless an outgoing mail script sets another address, see next item.
- The Reply-To address which is set in a queue-specific outgoing email script. Since the outgoing email script is the last instance which processes an outgoing email, the Reply-To address set in this script will always be the effective Reply-To address which is used. In case the mail.reply.to property is set, this mail-reply.to-address will not really be used (but it will be displayed in the Ticket Email Editor which might cause some confusion! What that means for your system configuration is explained in the next section).
- The email address which is set in the system property mail.from. If this is set and neither mail.reply.to nor a queue-specific Reply-To address is set, most email clients will set the From address as Reply-To address.
- The email address of the current engineer (the engineer who is logged in to the Web Client). This personal email address is used as Reply-To address for emails from the Web Client if neither the mail.reply.to property is set nor a queue-specific outgoing email script is configured nor the mail.from property is set.
- work with the Reply-To address in the queue-specific outgoing email script
- use the mail.reply.to system property.
- The simplest way to set a Reply-To address is by using the mail.reply.to system property. It will be displayed in the Ticket Email Editor and will be the effective Reply-To address.
- If queue-specific Reply-To addresses are required, we recommend to write one outgoing mail script where queue names are mapped to specific Reply-To addresses. This can then be extended for Bcc, Cc or other addresses.
You can combine the mail.reply.to property and queue-specific Reply-To addresses: for all queues without a specific outgoing mail script, the mail.reply.to address will be used, for all queues which have a queue-specific outgoing mail script that contains a Reply-To address, this will be used. - Use the object and method configurationService.getValue("cmweb-server-adapter","mail.reply.to") to retrieve the value of the system property and set it as Reply-To address in the outgoing email.
- Use the Mail object when the queue-specific script should be used: e.g. mail.useDefaultScript() . This will overwrite the mail.reply.to property!
- Default values script
Here you can select a script to preset values of list boxes when creating a ticket for this queue in the Web Client. The script has to be present in the Scripts & Templates Administration of the Admin Tool and has to be of type Default values. Please refer to section Scripts of Type Default Values for details about this topic. - Clone script
Here you can select a script which is executed when a ticket in this queue is cloned (duplicated) using the Web Client (Clone option in the ticket menu). The script has to be present in the Scripts & Templates Administration of the Admin Tool and has to be of type Clone. The clone script sets default values for a ticket which is created using the Clone operation. Please refer to section Scripts of Type Clone for details.
When you work with the configuration of the Reply-To email address, please note the following technical behavior of ConSol CM and adapt your system accordingly!
The technical background:
There are four potential Reply-To addresses which you deal with:
In the Web Client, in the ticket history, the Reply-To address which was really used is always displayed for outgoing emails. So even in case there should be a difference between the address which was displayed in the Ticket Email Editor (the mail.reply.to property) and the Reply-To address which was really used (the Reply-To in the queue-specific outgoing email script), the effective address is displayed. This would be the one from the script in this case.
What we recommend:
A system Reply-To address should always be set! You can decide if you
or
However, since the email communication should take place via ConSol CM and not using personal email addresses, one of the two system settings mentioned above should be used to prevent CM from using personal email addresses as Reply-To. The latter would automatically lead to customer emails being sent to an engineer's personal email account instead of CM.
What that means for your system configuration:
What that means when you work with workflow scripts which send emails:
(A detailed explanation is provided in the ConSol CM Process Designer Manual!)
If neither the system property nor the queue-specific outgoing email script is used, i.e. when the Reply-To address is not set, usually the From address will be used as Reply-To by the email client.
- Email script
- Other (4)
-
Description:
You can enter a free-form description in this field, e.g., to document the purpose of the queue. This information is shown in the Admin Tool only.
-
- Tabs for assignment of fields, customer groups, classes of text, and projects (5):
-
Tab Ticket fields:
In order to show data fields (ticket fields) in tickets of the queue, you have to assign the respective ticket field groups here. See section Ticket Field Administration (Setting Up the Ticket Data Model) for details about the definition of ticket fields.Tab Customer groups:
Tickets in the queue can only be created for customers from the selected customer groups. Please make sure that the engineers who are supposed to work with tickets of the queue also have the respective access permissions to the customer (group) data.Tab Classes of text:
Here you can assign the classes of text which should be available in tickets of this queue. Please see section Classes of Text for an explanation of the text class definition. -
Tab Projects:
Here you can assign projects to the queue. Engineers who work on a ticket in the queue can book times on the projects that have been assigned to the queue. Projects are defined on the Projects page.
-

On each tab you can assign a selected entry by clicking the Assign button and remove it by clicking the Unassign button.
Click Save afterwards to create the queue. The details of the new queue are displayed on the right-hand side of the page.
Edit a Queue
If you want to edit a queue, select it in the list and click the Edit button or double-click the name of the queue. Modify the queue details and click Save to store your modifications.
You cannot change the workflow of a queue once the queue has been saved for the first time!
Delete a Queue
Select the queue you want to delete in the list and click the Delete button. If you confirm the following dialog with Yes, the queue will be deleted and is no longer available in the system.
If there are still tickets for a queue it cannot be deleted. You have to move the tickets to another queue before you can delete it.
Copy a Queue
The Copy button allows you to save time when creating a queue. The selected queue will be copied. The new queue has the same name as the copied queue. Double-click the name or click the Edit button to open the edit window where you can modify the name and details of the queue. Click Save to store your modifications.
You cannot change the workflow of a queue once the queue has been saved for the first time!
Enable or Disable a Queue
You can disable a queue to prevent that new tickets can be opened in this queue. This allows a queue to be made temporarily unavailable without having to delete it. To disable a queue, select the queue in the queue list and click the Deactivate button. The entry in the list is now shown in italics. Just click the Activate button at the bottom of the page to enable the queue again.
You can still read tickets in a disabled queue (provided you have read access rights for this queue), but you cannot process tickets, i.e., they cannot be moved to the next step in the process using workflow activities.