CM/Doc
Introduction to CM/Doc
Even in companies where most processes are managed by IT applications, a great number of documents still have to be printed out or are required in .doc or .pdf format. These can be, for example:
- invoices
- contracts
- documents concerning the acceptance of IT systems
- orders
ConSol CM offers the add-on CM/Doc to print documents directly from the business management process. CM/Doc supports Microsoft Word documents and OpenOffice documents.
Templates guarantee that ...
- all documents of one type are identical (text and layout).
- all documents match the company’s corporate design.
- the engineers do not have type the same text over and over again.
Data from the ticket can be integrated into the template automatically, these can be:
- ticket data (e.g., amount in an invoice, service level in a contract)
- customer data (name and address of the main customer (and of the company, if the main customer is a contact belonging to a company), additional customers are not relevant in CM/Doc!)
- engineer data (name, phone number, email address of the engineer who works on the case)
When CM/Doc is active in ConSol CM, the tab Document is displayed in the ticket history section, where the engineer can select the required document template. The document is opened in Microsoft Word or OpenOffice automatically with all required data fields already filled in. The engineer can then work on the document and save it. It is automatically attached (as a regular attachment) to the ticket and can be opened by users who have read access to the ticket and who have installed the required software (Microsoft Word, OpenOffice) on their PCs.
With special adaptations implemented by the ConSol CM consulting team, the ConSol CM system can be extended in a way that .docx documents can also be converted to .pdf files in order to make sure that no further changes can be made to the document.
Requirements for Using CM/Doc
On the client PC or laptop, the following requirements have to be met to use CM/Doc:
- Microsoft Windows operating system
- Locally installed CM/Doc application
- Locally installed Microsoft Word / OpenOffice
Detailed information about the supported Microsoft Word and OpenOffice versions can be found in the current System Requirements.
The engineers can download the CM/Doc application for Windows from the Downloads section of their user profiles.
If you use CM/Doc with Microsoft Internet Explorer or Microsoft Edge, some additional installation steps are required.
For both browsers: Go to Internet Options -> Security in Microsoft Internet Explorer. Select Local Intranet. Click Sites. Click Advanced. Enter the URL of the ConSol CM server and add it to the websites belonging to the local intranet zone.
If you use Microsoft Edge, you need to execute the following command as an administrator:
CheckNetIsolation LoopbackExempt -a -n="Microsoft.MicrosoftEdge_8wekyb3d8bbwe"
If HTTPS is used, the engineers need to trust the URL configured for CM/Doc (see cmweb-server-adapter, cmoffice.websocket.port) in their browsers. The prompt to trust CM/Doc will be displayed automatically in the default browser. If the engineers use the Web Client in another browser, they need to manually add the certificate as trusted in this browser. The corresponding URL can be copied from the window which is opened when clicking Preferences -> Web Browser in the context menu of the CM/Doc application in the system tray.
For Microsoft Internet Explorer, the certificate generated by CM/Doc (file public.crt in C:\Users\<your user name>\AppData\Local\cmdoc\security) also needs to be imported manually to the Trusted Root Certificate Authorities certificate store. Go to Internet options -> Content -> Certificates -> Trusted Root Certificate Authorities to import the file.
Configuring the ConSol CM System for CM/Doc
CM/Doc is enabled using the system property cmweb-server-adapter, cmoffice.enabled. Go to the navigation item System Properties in the navigation group System and click the respective entry. Set the value of the system property to true.
If CM/Doc is enabled for the ConSol CM system, the engineers can enable or disable it on an individual basis in their user profiles (section General settings, option Document generation via CM/Doc).
Enabling CM/Doc with OpenOffice
If CM/Doc is used with OpenOffice, the engineers have to set the path to the OpenOffice installation within the CM/Doc application. They have to perform the following steps:
- Right-click the icon of the CM/Doc application in the system tray.
- Go to Preferences -> Open Office.
- Select the OpenOffice executable in the file browser.
Configuring the Saving Strategy for CM/Doc
There are two saving strategies for CM/Doc:
- A new document is attached to the ticket with each save operation in Microsoft Word or OpenOffice. This option creates a history of all changes to the document but might lead to a great number of attachments, which might increase the ticket size considerably.
- A new document is attached to the ticket after the first save operation in Microsoft Word or OpenOffice. Further save operations overwrite this attachment as long as the document is not closed in Microsoft Word or OpenOffice. This option limits the number of attachments and hence the ticket size, so that it does not matter how often the engineers use the Save button in Microsoft Word or OpenOffice.
The saving strategy is configured using the CM system property cmweb-server-adapter, cmoffice.strict.versioning.enabled:
- true(default)
A new version of the Word/ OpenOffice document is saved and attached to the ticket with each SAVE operation from within the document. - false
A SAVE operation from within the Word / OpenOffice document overwrites the existing attachment with the same name as long as Word / OpenOffice has not been restarted in the meantime.

Figure 415: ConSol CM Web Client, documents attached to a ticket, cmoffice.strict.versioning.enabled=false
Creating a Role with Permissions for the Document Template Manager
The menu item Document templates which is used to create templates for CM/Doc in the Web Client is only available to engineers who have the permission Write template from the Global permissions tab of the role administration. So, as a second step, you have to create one or more roles with the respective permissions. For a detailed explanation about setting role permissions, please refer to section Roles.
We recommend to create a role (e.g., TemplateManager) that has only the permission Write template, with no queue permissions or other permissions. Every user who should have access to the Document Template Manager can be given this role. In this way, there is no merge between regular user permissions and document template permissions and you can grant and retrieve the document template permission in a very flexible way.
However, the permission Write template also grants access to the Text Template Manager (for text templates, see section Text Templates).
Creating Document Templates
Once CM/Doc is enabled, you can create the document templates. This is done using Microsoft Word or OpenOffice. Please create .doc, .docx or .odt files as templates. Do not use the template format of the word processor (.dot or .ott files)!
Adding a Document Template
Log in to the Web Client and click on Document templates in the main menu to open the Document Template Manager.
As the next step, you have to fill in the requested data fields as merge fields in the document template, i.e., you create a CM/Doc template from your regular Microsoft Word or OpenOffice document. This is done using the ConSol CM Web Client.

Figure 416: ConSol CM Web Client - Document Template Manager
The Document Template Manager is opened.
Enter the following data for each new template, then click on OK:
- Name
The name of the (new) template. This will be displayed for engineers in the Web Client. - Group
The name of the template group. This does not have any technical implications but serves as an easy-to-use parameter to sort the templates in the template list in the Document Template Manager. - Language
Select the required language. All languages which have been activated in the Admin Tool are listed. - Queues
Select the queues for which the template should be available. - Data object
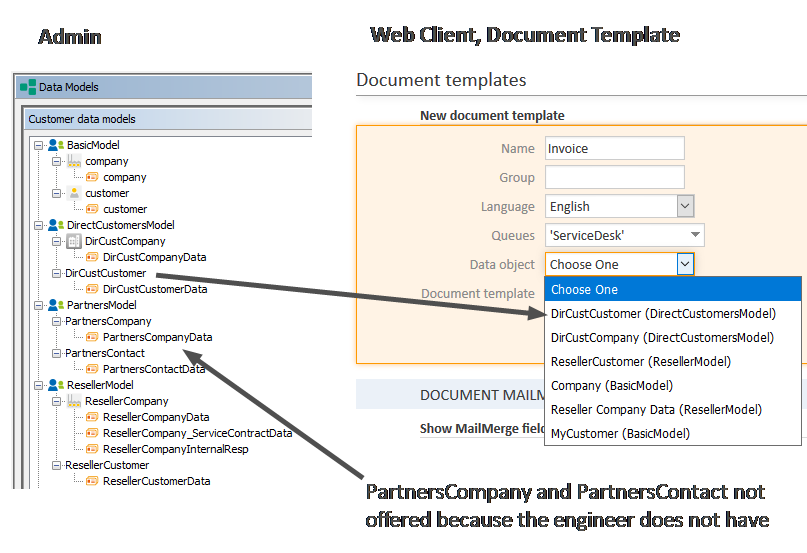
For the selection of the data object which should be used as reference object for customer data within the template. All data objects are listed, please see section Selection of the Data Object and Its Consequences for a detailed explanation about which data object you have to select. - Document template
Use the file browser to select the .doc or .docs file that should serve as a template in the file system.
Selection of the Data Object and Its Consequences
In the form where you have to fill in all fields for a document template, you also have to select a data object, i.e., a customer object (contact or company object) from your customer data model. If you are not familiar with the ConSol CM customer data model concept, please read the Customer Data Model first.
In the drop-down menu Data object, the data objects are listed in the following format:
- [localized name of the data object (localized name of the customer data model)]
For a data object to be listed in the drop-down menu, the following conditions have to be met:
- The customer data model with the respective data object has to be created in the Admin Tool.
- The customer data model has to be assigned to at least one customer group.
- The engineer who works on the document templates has to have at least read access to at least one customer group with the respective customer data model.
You have to select the data object which represents the main customer of the tickets. The document template will only be available in tickets which have main customers from a customer group with this customer data model. This means if you want to use the same document template text for two customer groups with two different customer data models, you have to create two document templates, one for each customer data model. You can, of course, use the same document template for two or more customer groups which share the same customer data model.
If you try to assign a data object to a document template which is not compatible with the selected queue (because the selected data model is not assigned to the selected queue), you will get an error message.
Please be aware that it makes only sense to select an object at company level if the parameter Company as customer has been set for this customer data model.
Please be aware that if you leave the Data object field empty, the document template will theoretically be available for all customer groups, but there might be runtime errors if the required fields are not found when the template is loaded. ConSol CM will display a message that field content is missing and the fields will be filled with the string 'n/a'. However, we recommend that you always select a data object to keep the system in good working order.
Availability of Document Templates in Tickets
If the document template is available in a certain ticket (see section Using Document Templates in the Web Client below) depends on two parameters:
- Queue
The template is only listed for tickets in the selected queue(s). - Customer data model
The template is only listed in tickets which have, as main customer, a customer object which is based on the selected data object.
The following figure shows a document template which is defined for the queue ServiceDesk and for the data object ResellerCustomer.

Figure 417: ConSol CM Web Client - Definition of a document template for one queue and for a certain data object
The availability of the document template depends on the queue and customer group of the current ticket:
- In the Web Client, the template can be used in a ticket which is in the queue ServiceDesk and which has a main customer of the ResellerCustomer data object type.
- In the Web Client, the template cannot be used in a ticket which is in the queue ServiceDesk and which has a main customer of a data object which is not of the ResellerCustomer data object type.
- In the Web Client, the template cannot be used in all tickets which are not in the queue ServiceDesk.
Creating and Editing the Document
When you have filled in all fields and clicked OK, the new template appears in the Template library, List of templates. After entering the new template data, you can perform the following step directly or you can click on the name of the template file (in the Document template column) to download and edit the template.
In the next step, MailMerge fields, which represent the fields of ticket and customer data, can be added to the template. Select a ticket which has all the required fields by using the Document MailMerge fields section. Enter the ticket name or subject in the field under Show MailMerge fields available for a ticket and select the correct one from the search result list.

Figure 418: ConSol CM Web Client - Selection of a ticket to see all required data fields
All available MailMerge fields are displayed.

Figure 419: ConSol CM Web Client - Show available MailMerge fields
The list contains the following columns:
- Key
The name of the field (this is the one you will have to use for the MergeField later on) - Group
This is set for customer data and for ticket data. For customer data, the customer field group is shown (here, only the customer field groups from the selected data object are offered). For ticket data, the ticket field group is shown. - Field
This is set for customer data and for ticket data. For customer data, the customer field name is shown (here, only the customer fields from the selected data object are offered). For ticket data, the ticket field name is shown. - Value
The value of this field in the selected ticket. You do not have to use this in the document template.
You can use all fields which are available in the ticket, i.e.:
- Company fields
Customer fields from the selected data object if this is a company, or from the company of the selected data object if the selected object is a contact. The keys start with ticket_queue_fields_ and have a customer field group name as Group. - Contact fields
Customer fields from the selected data object if it is a contact, or from the contact of the selected data object if the selected data object is a company. The keys start with ticket_queue_fields_ and have a customer field group name as Group. - Ticket data fields
Ticket fields from the ticket. The respective keys start with ticket_ and have a ticket field group name as Group. - Engineer data
- Data concerning the current engineer of the ticket. The respective keys start with ticket_Engineer_ and do not have Group and Field names.
- Data from the engineer who is currently logged in. This must not be confused with the engineer of the ticket! The respective fields start with engineer_ and do not have Group and Field names.
Download and open the document template from one of the following locations. In both cases, the technical file name of the template is shown:
- from the Edit document template section (at Download document template)
- from the list in the Template Library (Document template column)
Add the required fields to the document. See Editing the Document in Microsoft Word and Editing the Document in OpenOffice for detailed steps. The following figure shows an example of a document template with some MailMerge fields.

Figure 420: Example for a document template
Save the document in the local file system and then upload it using the field Update document template. This will store the template in the Document Template Manager.
Editing the Document in Microsoft Word
Please proceed as follows to add a field to the Microsoft Word document:
- Go to the menu entry Insert -> Quick parts -> Field.
- Select MergeField.
- Copy and paste the key of the MailMerge field from the Web Client into the field Field name below Field properties (see following figure).
- Click the OK button to insert the field into the document at the current cursor position.

Figure 421: Microsoft Word - Insert MergeField into document
Editing the Document in OpenOffice
Please proceed as follows to add a field to the OpenOffice document:
- Go to the menu entry Insert -> Fields -> Other.
- In the Fields dialog, select the tab Variables.
- Select User Field as a Type and Text as a Format.
- Enter the field name (from the Key column in the Document MailMerge fields section) in the Name field below the Type.
- Add a useful Value for recognizing the field in the document.
- Click the green checkmark to the right of the field Value, so that the field is shown under Selection in the middle, and make sure it is selected there.
- Click the Insert button to insert the field into the document at the current cursor position.

Figure 422: Creating a document template using OpenOffice
Details about the Keys for MailMerge Fields
For customer data, there are always two keys for the same value, i.e., two keys which in the end retrieve the value from the same customer field. You can always use either one - there is no difference as far as the behavior in the templates is concerned.
The two keys are:
- A generic field, e.g., ticket_queue_fields_contacts_member_companyReferenceField_company_name
- A field which comes from the specific customer data model according to the following syntax: xxx_[data object]_[customer field group]_[customer field], e.g., ticket_queue_fields_contacts_member_companyReferenceField_ResellerCompany_ResellerCompanyData_company_name
Using Document Templates in the Web Client
Creating a New Attachment Using a Document Template
When document templates are available for the ticket, an engineer can use them by clicking Document in the history section of a ticket and selecting the requested template. If CM/Doc is not running yet, it is started. Afterwards, Microsoft Word or OpenOffice is started and a document based on the selected template is created. The document is opened, with all values/parameters filled in at the correct positions. This might look like the example in the following figures.

Figure 423: ConSol CM Web Client - Document templates in Document tab

Figure 424: Microsoft Word example document
The engineer can then edit the document, if required, and save it. This will automatically attach the new version of the document to the ticket.

Figure 425: ConSol CM Web Client - Newly edited Word document as attachment at the ticket
From here on, working with the Word document is exactly the same as working with regular Word (.doc, .docx) attachments.
Working with Existing Document Attachments
An engineer can also open a document which has been attached to the ticket. As an engineer, click on the attachment name. This will open the file in Microsoft Word or OpenOffice. Edit the document and save it. A new version of the document will be attached to the ticket automatically.
Using Document Templates in Scripts
You can use document templates in automatic actions to attach a document, which is based on a certain template, to a ticket, customer or resource. It is also possible to generate a PDF document from a template or to create a document from scratch.
This is done using methods of the class ContentFileTemplateService:
- generateWordDocumentByTemplate to generate a DOCX document from a CM/Doc template
- generateWordDocumentFromXHTML to generate a DOCX document from XHTML input
- generatePDFDocumentFromXHTML to generate a PDF document from XHTML input
- generatePDFDocumentFromWord to generate a PDF document from a DOCX document
If you attach a DOXC document generated from a document template to a ticket, the merge fields are filled with the data from the respective ticket and ticket customer.
The following example shows a workflow script which attaches four documents to the current ticket. The file extension is added automatically, so you only need to provide a file name. If you create a document from a template, the name of the template is used as a file name.
Ticket ticket = workflowApi.ticket;
String html = "<html><header></header><body><h1>H1Text</h1><p>Text</p></body></html>";
ContentFile docxContentFile;
ContentFile pdfContentFile;
// generating docx from office template (template with testDocx name must be prepared before)
String templateName = "testDocxFromTemplate";
docxContentFile = contentFileTemplateService.generateWordDocumentByTemplate(templateName, ticket);
addContentFileAsAttachmentEntry(ticket, docxContentFile);
// generating pdf from docx
pdfContentFile = contentFileTemplateService.generatePDFDocumentFromWord(docxContentFile);
addContentFileAsAttachmentEntry(ticket, pdfContentFile);
// generating docx from XHTML
String fileName = "testDocxFromXhtml";
docxContentFile = contentFileTemplateService.generateWordDocumentFromXHTML(fileName, html);
addContentFileAsAttachmentEntry(ticket, docxContentFile);
// generating pdf from XHTML
fileName = "testPdfFromXhtml";
pdfContentFile = contentFileTemplateService.generatePDFDocumentFromXHTML(fileName, html);
addContentFileAsAttachmentEntry(ticket, pdfContentFile);
def addContentFileAsAttachmentEntry(Ticket pTicket, ContentFile pContentFile) {
AttachmentEntry attachmentEntry = new AttachmentEntry();
attachmentEntry.setFile(pContentFile);
attachmentEntry.setDescription(pContentFile.getName());
attachmentEntry.setMimeType(pContentFile.getMimeType());
ticketContentService.createContentEntry(pTicket, attachmentEntry);
}