Roles
Introduction to Role Administration
Roles provide access rights and views, they specify what an engineer is allowed to do or to see. Without a role, an engineer can log in to the system but cannot perform any actions. Only by being assigned one or more role(s) does an engineer obtain system permissions. For each task in a company using the system there should be a role which defines its permissions. Engineers fulfilling the task should have this role.
When engineers log in to the system, they will have all permissions from all roles they have been assigned. So all permissions are added! There is no way of explicitly preventing access to objects in ConSol CM - access can only be granted! The sum of all granted permissions defines the final permissions for the engineer.
Roles define:
- Access permissions for one or more queue(s)
E.g. read, write, and append rights are granted. The permissions are valid for all tickets in the queue(s). - Global permissions
Several system-wide permissions are managed here, e.g., the rights concerning template management, workflow design, and system administration. Using the option Administrate access and roles, it is possible to define an administrator “light” who can manage CM engineers with their system access permissions but who cannot modify technical system-wide settings. This is explained in section Defining Additional Administrator Roles. - Access permissions for customer data
Read, write, modify, and delete permissions for each distinct customer group. - Access permissions for resource data
Read, write, modify, create permissions, assigned on the basis of resource types. - Views
To do lists of tickets which are displayed in the ticket list in the Web Client. - Engineer functions
Additional engineer functions which can be assigned to members of this role, e.g., approver.
Role Administration Using the Admin Tool
You reach this screen by opening the navigation item Roles in the navigation group Access and Roles.
You might also see this screen when you have worked in the Engineers and have selected Jump to role for a role in the role list of an engineer.

Figure 17: ConSol CM Admin Tool - Access and Roles, Roles: Queue permissions
You see the list of all available roles on the left-hand side (1) and the permissions which can be granted on the right-hand side (2). In the list of roles, all roles which have been set as main role for at least one engineer are marked with a red dot. You always work on the access permissions of the role which has been selected in the list of roles. Only one role can be selected at a time. You can use the buttons below the list of roles (3) to add, delete or copy a role.
On the right-hand side, several tabs are available:
- Tab Queue Permissions
- Tab Global Permissions
- Tab Customer Group Permissions
- Tab Resource Types Permissions
- Tab Views
- Tab Engineer Functions
All changes in the Role Management tabs take effect immediately or after clicking the OK button. You do not have to click the Synchronize button in the icon bar.
In the Web Client, engineers have to log in again to use their new roles. Views become effective after pressing F5 (page refresh).
Working in Role Administration, you always mark a role and then can display and modify the parameters of this role. However, it is not possible to display a list of all engineers who have been assigned this role. In order to have such a list displayed, please change to Engineers (navigation item Engineers) and filter the engineer list for a certain role.
Please note that you can edit the name of a role by clicking on it in the list of roles and by modifying the name as required.
Create a Role
Click the Add button below the role list to create a new role. A pop-up window appears where you can enter the role name. Since the role name is used only for admin purposes and not displayed in the Web Client, no localization is required here. Afterwards you have to set the permissions of this role using the tabs on the right side of the page (see also the preceding picture).
Tab Queue Permissions
The permissions set in this tab apply to the selected role (left part of page) and the selected queue (center part of page). Without an entry here, an engineer with this role is not able to see tickets nor to perform any actions in the system.
You reach this screen by clicking the Queue Permissions tab in the navigation item Roles, navigation group Access and Roles.

Figure 18: ConSol CM Admin Tool - Access and Roles, Roles: Setting queue permissions
The following permissions can be set:
- Read
Read tickets. - Write
Edit data fields (default fields, ticket fields, etc.) of a ticket. The fields might be located in the ticket header section or in the group section. - Append
Add information to a ticket (comments, emails, attachments, time booking entries), i.e. add content in the ticket history. - Act
Execute workflow activities, i.e. move the ticket forward in the workflow. - Assign
Assign tickets to another engineer. The permission to assign a ticket to oneself and to accept a ticket is not relevant in this context.
The engineer who should receive the ticket has to have at least one role with the Get assigned permission! - Refer
Assign an additional engineer (with engineer function, see Tab Engineer Functions) for a ticket. - Change queue
Move a ticket from this queue to another queue.
If the current engineer has the Change queue permission for the respective range of tickets (mine, referenced etc., see below), the pull-down menu where the queue can be changed is displayed. All queues where the current engineer has the Change queue permission are listed. This means, the engineer needs the Change queue permission in the source as well as in the target queue. However, the engineer can only perform the entire operation if he has the permission for the right range of tickets in the target queue. For example, if an engineer wants to move a ticket which is assigned to himself to another queue, the minimum permission which is required for this operation is the Change queue permission for the range mine in the target queue. If another range was set (e.g. referenced or none), the operation would not succeed, because the ticket engineer is not changed during the operation and thus the suitable range has to be used.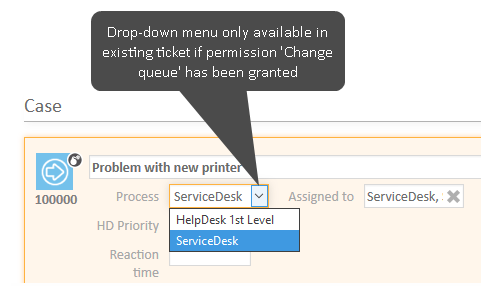
Figure 19: ConSol CM Web Client - Drop-down menu to change queue
It depends on the workflow of the target queue where the processing of the ticket will continue:
- If the source queue and the target queue have the same workflow, the ticket will start its processing in the target queue at the original position (i.e., its last position in the source queue).
- If the source queue and the target queue have different workflows, the ticket will start the process in the target queue at the START node.
Be very careful when granting the Change queue permission!!! Usually it is not required. On the contrary, it can destroy your process chain definition where tickets are passed from one process to another using process/workflow components, namely the Jump-in and Jump-out nodes.
This permission should only be granted if it is absolutely necessary and when all side-effects have been considered thoroughly!

You can define for which range of tickets the permissions are valid:
- Mine
Own tickets. - Ref
Tickets to which the engineer is assigned as an additional engineer (with engineer function, see Tab Engineer Functions). - None
Tickets without assigned engineer. - Other
Tickets assigned to other engineers.
Click the corresponding checkbox to assign one or more permissions for the desired ticket range.
Two general permissions can also be set:
- Create
An engineer is allowed to create tickets in this queue. - Get assigned
Other engineers can assign tickets to an engineer who has a role with this permission (if the other engineers have the Assign permission!)
An engineer can receive tickets by ticket transfer which is performed using the Admin Tool.
If you want to select all permissions simultaneously just click the Select all button below the list. Clicking Deselect all removes all selections.
Tab Global Permissions
Global permissions are general and queue-independent rights for a role. Setting these permissions is optional.
You reach this screen by clicking the Global Permissions tab in the navigation item Roles, navigation group Access and Roles.
You can specify the following:
- Administrator Permissions
- Administrate system (full access)
Provides administrator access to the entire CM system, this applies to the Admin Tool, the Process Designer, and admin access to the Web Client. An administrator with this role has access to all navigation groups and items in the Admin Tool. - Administrate system (configuration only)
Provides access to the complete system configuration in the Admin Tool and Process Designer, and the page customization, text templates and web forms in the Web Client. An administrator with this role does not have access to runtime data (runtime data in the Web Client and navigation item Administration in the navigation group Tickets in the Admin Tool). - Administrate access and roles
Provides administrator access only to the navigation group Access and Roles.
Please see Defining Additional Administrator Roles for detailed information about the impact of the different administrator permissions.
- Administrate system (full access)
- Workflow Permissions
Provides permissions concerning workflow design and management. These are- Read
- Write (modify and store)
- Deploy (install and put in operation).
- Template Permissions
- Write Template provides the permission
- to use the Text Template Manager, which is used to create and edit email and comment templates. See section Text Templates for details.
- to use the Document Template Manager, which is required to define templates for CM/Doc. Only available if CM/Doc is active in the CM system.
- Write Template provides the permission
- Representation Permissions
Configure representation
If this permission is set, engineers with this role can configure themselves as a representation for other engineers, e.g., who are ill and have not defined other engineers to represent them resp. if the defined engineers are not available at the moment. On the Web Client the engineers that can be represented by an engineer with this permission are shown in a list within the engineer profile.
Important information about representation configurations
Please note that there are two different scenarios for sending emails and that the CM system behavior concerning sending representation mails might differ for the two scenarios!
An engineer writes an email using the Ticket Email Editor
It depends on the value of the property cmweb-server-adapter, forward.mails.to.representatives if the representation rule is applied and the representing engineer receives a copy of the email. By default, this property is set to false, meaning that this email is not sent to the representing engineer. If the property is set to true, all emails which are sent manually using CM are sent to the original recipient and his current representative. The CM system checks if a representation rule is active for the respective (recipient) email address. Please keep this in mind when you configure the representation permissions in the Admin Tool and inform your CM users (engineers) about this behavior! It might lead to unwanted effects, especially when persons are registered as engineers and as contacts in the ConSol CM system (e.g., for an internal help desk).
An email is sent automatically from the CM system
It depends on the specific configuration of the CM system which engineers receive a copy of the email, the email is (!) not sent to the representing engineers automatically!
It might be implemented that the representing engineer gets a copy, but this is not mandatory. The automatic email might be sent from a workflow script or from an Admin Tool script (which might also be called from a workflow). It depends on the implementation in this script who receives a copy of the email. For details, please refer to the ConSol CM Process Designer Manual.
- Track User Permissions
- Access tickets of the own company
Users with this permission are allowed to access not only their own tickets in CM/Track, but all tickets of the company they belong to. This permission makes only sense for roles that define access rights of CM/Track users/user profiles, not for single users.
- Access tickets of the own company
- Archive Permissions
Provides permissions for CM/Archive:- Read
View tickets in CM/Archive - Write
Archive tickets - Delete
Remove tickets from CM/Archive - Admin
Display statistics in CM/Archive
The engineers also need read permissions to the queues which the archived tickets belong to. Any of the read permissions for the queue (Mine, Ref., None, or Other) is sufficient to view tickets from the queue in CM/Archive.
- Read
- Analytics Permissions:
Provides permissions for CM/EBIA:- EBIA full access
Users with this permission see the menu item Analytics for CM/EBIA in the Web Client. They are allowed to ask questions, create dashboards and explore data in CM/EBIA.
- EBIA full access
Tab Customer Group Permissions
In order to let engineers work with customer data from one or more customer groups, e.g. to edit reseller data sets or to create new contact data within the customer group, you have to grant access permissions concerning the customer group(s) to one or more roles.
You reach this screen by clicking the Customer Group Permissions tab in the navigation item Roles, navigation group Access and Roles.

Figure 20: ConSol CM Admin Tool - Access and Roles, Roles: Assigning permissions for customer groups to a role
A concept which has proven very useful in various customer environments is the set-up of specific roles for customer data management. For example, there could be a role CustomerManager_CustomerGroup1 and another role CustomerManager_CustomerGroup2. You can even differentiate between CustomerManager_CustomerGroup1_full and CustomerManager_CustomerGroup1 _light. In this way, you can use the assignment of the customer manager roles as a toggle and you do not mix up queue access permissions and customer management permissions. This can be very helpful in case you have a heterogeneous team in which not everyone is allowed to edit the complete customer data.
However, do not forget to grant read permissions to customer data of the required customer groups to all engineers of the respective queues! Otherwise, they cannot open their tickets at all!
Customer permissions can be granted separately to the general sections (1) and the Comments and Attachments section (2).

Figure 21: ConSol CM Web Client - Sections of a contact page
The following access permissions can be granted:
- Customer type
Refers to the tickets of the customer.- Own
All (main or additional) customers of tickets which are currently assigned to the engineer or where the engineer is set as additional engineer. - All
All customers.
- Own
- General sections (1)
- Read
Read the customer data. - Write
Write/modify the customer data, and change the company of a contact on the contact page using the Change link. - Delete
- Delete a customer data set. This refers to companies as well as to contacts. For contacts, two types of deletion are available (with or without related data).
- Transfer all tickets associated with a customer of this customer group to another customer.
- Anonymize a contact
- Act
Execute actions for this customer (see section Action Framework - Customer Actions for details about customer actions). - Deactivate/activate
- Deactivate and (re-)activate the contact or company. It is not possible to create tickets for a deactivated customer.
- Transfer all tickets associated with a customer of this customer group to another customer.
Information concerning transfer permissions for tickets and resources
Please note that starting with CM version 6.10.4.4, the permission Transfer tickets is linked to the permission Delete (customer data) as well as to the permission Deactivate/activate (customer data), i.e., an engineer can have either one of these permissions to be able to transfer data.
- Read
- Comments and Attachments section (2)
- Details read
Read customer data in the Comments and Attachments section. - Details write
Write/modify customer data in the Comments and Attachments section. - Details delete
Delete customer data in the Comments and Attachments section.
- Details read
- General
- Create
Create a customer data set. In a two-level customer data model this refers to contact as well as to company data sets.
- Create
Please keep in mind that an engineer must have at least read permissions for a customer group to open and/or create tickets for customers in this group!
Tab Resource Types Permissions
Resource types permissions control an engineer's access to resources, i.e., objects which are stored in the Resource Pool.
You reach this screen by clicking the Resource Type Permissions tab in the navigation item Roles, navigation group Access and Roles.

Figure 22: ConSol CM Admin Tool - Access and Roles, Roles: Resource types permissions
The following permissions can be granted:
- Read
Load and display resources of the selected type in the Web Client. - Write
Change data fields of this type of resources. - Delete
Delete resources of the respective type from CM. - Act
Execute resource actions defined for this type of resources. - Deactivate/Activate
(De-) Activate resources of the selected type. - Details read
Load and display comments/attachments for resources of this type. - Details write
Add and change comments/attachments for resources of this type. - Details delete
Remove comments and attachments for resources of this type. - Create
Create new resource entries for the type of resources.
Tab Views
Views define which tickets engineers will see in the ticket list of the Web Client. This tab shows the assigned views on the left and the available views on the right (see also Views). The displayed views can be filtered by name and queue. Assigning views is optional.
We recommend to assign at least one view to a role. Otherwise an engineer with this role will see no tickets in the Web Client's ticket list.
You reach this screen by clicking the Views tab in the navigation item Roles, navigation group Access and Roles.

Figure 23: ConSol CM Admin Tool - Access and Roles, Roles: Views
Select a role on the left side of the page first and then the desired view(s) in the list of available views. Click the Assign button to move the selected view(s) to the list of role views. If you want to remove views from this list, select the respective views and click the Unassign button.
For regular roles, you cannot define the order of the views here. In the drop-down menu of the Web Client, the views will always be displayed in the order they have in the list of the view administration. Please see also section Views. When a role has been marked as main role for at least one engineer (and is thus marked with a red dot), the views can be sorted using the Move upwards and Move downwards buttons. The sorting affects the order in which the views are displayed in the Web Client.
Tab Engineer Functions
On this tab you can assign engineer functions to a role. Engineer functions are used if you need an additional engineer for a ticket, e.g., a supervisor who has to decide what to do before the ticket can be moved on in the workflow. Thus you have to assign a role with the respective engineer function to this supervisor. In the Web Client engineer functions and associated engineers are shown when assigning an additional engineer.
You reach this screen by clicking the Engineer Functions tab in the navigation item Roles, navigation group Access and Roles.

Figure 24: ConSol CM Admin Tool - Access and Roles, Roles: Engineer functions
Select a role on the left side of the page and then the desired engineer function(s) in the list of available functions. Click the Assign button to move the selected function(s) to the list of role functions. If you want to remove functions from this list, select the respective function(s) and click the Unassign button.
After you have defined the new role by setting permissions, views, and engineer functions in the tabs you can assign the role to the desired engineer accounts. Engineers obtain the rights of a role immediately after assignment (without an additional update of the system).
Delete a Role
Select the role you want to delete and click the Delete button below the role list. If you choose Yes in the following confirmation dialog, the role is removed from the list and the system.
If you delete a role, please consider that engineers with only this role will immediately lose all permissions in the system.
In case tickets, e.g., from a certain queue, are not covered by any role permission, engineers and/or administrators could get the impression that tickets are missing.
Copy a Role
If you want to create a new role and use an existing role as a template you can copy it. Select the existing role and click the Copy button below the role list. A pop-up window appears in which you can enter the name for the copy. Afterwards you can modify the copy according to your wishes.
Edit a Role
Select the role you want to edit in the list and modify the permissions in the respective tabs as desired. The changes are immediately effective for engineers with this role. The engineer just has to login again.
Defining Additional Administrator Roles
There are three types of administrator permissions:
- Global administrator
Access to all configuration and runtime data. Permission: Administrate system (full access) - Configuration administrator
Access to all configuration data, no access to runtime data. Permission: Administrate system (Configuration only) - Engineer administrator
Access to engineers, roles, views and engineer functions, no access to other configuration or runtime data. Permission: Administrate access and roles
There always needs to be at least one role with global administrator permissions and one user with this role. If required, you can create roles for additional administrators. This can be useful, for example, to create a user administrator role which can be assigned to the power users of the system. In this way, you can enable team leaders to create and delete engineers without giving them access to the rest of the configuration.
Roles with global administrator and configuration administrator permissions are displayed in a red color. Roles with engineer administrator permissions are displayed in a brown color.
Impact on Access and Role Management
Administrators cannot assign roles or permissions of a higher level or manage engineers who have roles with higher level permissions. Therefore, some restrictions regarding role and engineer management apply for the configuration and engineer administrator. These administrators cannot perform the following actions:
- Add or remove higher level permissions to/from roles
- Assign roles containing higher level permissions to engineers or unassign them from engineers
- Manage roles containing higher level permissions (create, copy, delete)
- Manage engineers who have roles containing higher level permissions (edit, enable, disable, delete)
These restrictions apply to the following permissions:
Configuration administrator:
- Administrate system (full access)
Engineer administrator:
- Administrate system (full access)
- Administrate system (configuration only)
- Workflow read
- Workflow write
- Workflow deploy
The permission which the current administrator is not allowed to assign are grayed out.