Classes of Text
Introduction
A class of text is a classification that you assign to a ticket entry. This entry can be:
- a comment
- an email that was sent from the ticket
- an email that was received in the ticket
- an attachment
Assigning a class of text can serve one or more of the following purposes:
- Highlighting the text in the ticket with a special color to make it easier to find (e.g., an important note, as shown in the following figure). An icon can also be used for each class of text.
- Marking a ticket entry to make it visible in CM/Track, i.e., to make it available for customers who log in to the ConSol CM customer portal.
- Marking the entry to control the process flow, e.g., a ticket can only be finished when exactly one entry has been marked as solution.
- Marking the entry for hand-off to another process, e.g., the entries marked question and answer are automatically used for an FAQ ticket.
Thus, with classes of text you can organize ticket information within the ticket and can also control the process flow and the availability of information.

Figure 178: ConSol CM Web Client - Using a class of text for an internal important note
Managing Classes of Text Using the Admin Tool
Installing a New Class of Text
Two steps are required to install a new class of text for tickets in a certain queue:
- Defining the class of text in the navigation item Classes of text.
- Assigning the class of text to the queue where it should be available for tickets (see section Queues for more information).
Defining a Class of Text
Classes of text are defined and managed in the corresponding navigation item in the navigation group Global Configuration in the Admin Tool (see the following figure).

Figure 179: ConSol CM Admin Tool - Global Configuration, Classes of Text
You define a new class of text by clicking the Add button below the list. The following pop-up window appears:

Figure 180: ConSol CM Admin Tool - Global Configuration, Classes of Text: New Class of Text
Here, you have to define the details of the class of text:
- Name
Enter a name for the new class of text. The name must be unique. - Color
When you click into the Color field a pop-up window appears. It contains a range of colors from which you can choose the desired color for the class of text. You can see the selected color in the Preview area. Click OK to save your choice. Click Reset to return to the last saved color.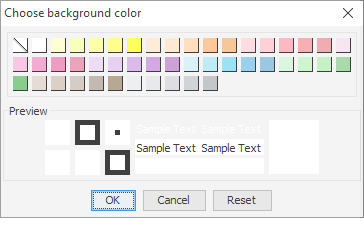
Figure 181: ConSol CM Admin Tool - Global Configuration, Classes of Text: Choose a color
- Availability
You can choose here for which ticket information the class of text shall be available. Mark one or several of the following options:- Attachment
- Comment
- Incoming mail
- Outgoing mail

- Visibility
Sets the visibility level for comments and emails, is not applied to attachments. See also General Information about the Visibility of Ticket History Entries in the Web ClientThere are three ticket history levels in the Web Client:

- Basic (1st level)
- Extended (2nd level)
- Detail (3rd level)
Thus, the configuration of a class of text concerning one or more of those levels determines whether a text entry marked with this class of text is displayed at a given level.
The addition short and full indicates whether entries are shown within the chosen visibility level in full length (full) or are truncated after a certain number of characters (short):
- short - shortened
- full - full length
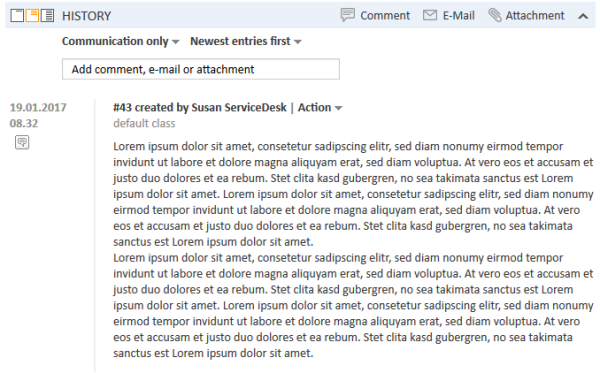
Figure 182: ConSol CM Web Client - Example: Visibility level "Extended" (2nd level) shows entries in full length ("full")
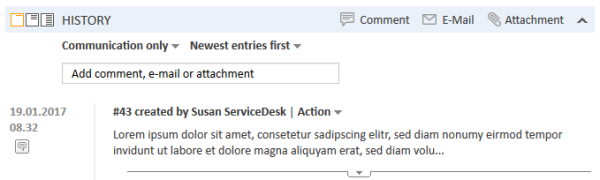
Figure 183: ConSol CM Web Client - Example: Visibility level "Basic" (1st level) shows entries shortened ("short")
Select, in the drop-down menu, the history levels at which the marked ticket information should be visible (see picture below).
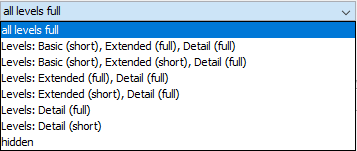
Figure 184: ConSol CM Admin Tool - Global Configuration, Classes of Text: Choose a visibility level
If you choose hidden, the ticket History entry marked by this class of text will not be visible in the ticket history. For a detailed explanation of visibility level and display mode for ticket History entries, please refer to section General Information about the Visibility of Ticket History Entries in the Web Client. - Icon
When you click the box next to Icon you will get a selection of standard ConSol CM icons. Select one of these icons for the new class of text or load your own individual icon by clicking the Browse... button. An icon for a class of text must have the size 16 (height) * 24 (width) px to be correctly placed and aligned in the drop-down menu in the Web Client.
Figure 185: ConSol CM Admin Tool - Global Configuration, Classes of Text: Choose an icon
- Customer readable
Select this checkbox if ticket information marked with this class of text shall be visible for customers in CM/Track, the ConSol CM customer portal. - Localized values
You can localize the name of a class of text. Enter the corresponding class name in the Value field for each additional language. A detailed explanation of the localization mechanism is given in section Localization of Objects in General, Type 2.


Click OK to save the details of the new class of text and to close the window.

Figure 186: ConSol CM Web Client - Context menu for classes of text in ticket history section
Assigning the Class of Text to a Queue
After assigning the class of text to a queue within the Queues it will be available for tickets of this queue in the Web Client.
Editing a Class of Text
If you want to edit a class of text, select it in the list and click the Edit button. The same window as described above for creating a class of text will appear. You can modify all details and save your changes by clicking OK.
Deleting a Class of Text
You can only delete a class of text if it is not used within any tickets and if it is not assigned to a queue. In order to delete a class of text select it in the list and click the Delete button. If you confirm the following dialog with Yes, the class of text will be removed from the list and the system.
Setting the Default Class of Text
To define the default class of text, use the system property cmweb-server-adapter, defaultContentEntryClassName (see System Properties). The default class of text will be applied to any ticket entry which is not explicitly marked with another class of text.
Depending on the visibility configuration of this class of text, the regular comments in the ticket (i.e., the comments which have the class of text default class) will be displayed, see section visibility.
Working With Classes of Text in Scripts
You can work with classes of text in scripts which are used in workflow activities or which are located in the Script section of the Admin Tool. For details about programming, please read the ConSol CM Process Designer Manual.
In scripts, you can assign a class of text to a TextEntry even if the class of text is not assigned to the queue! This can help automate certain processes.
Transferring Classes of Text to the DWH
All classes of text (default classes and special ones) used in history entries (comments, emails) are transferred from ConSol CM to the data warehouse (DWH) automatically in all transfer modes (LIVE and ADMIN). There is no configuration required for this feature, and the installation is upgraded automatically. A new initialization and initial transfer are required, however.