Roles
Introduction to roles in ConSol CM
RolesRoles are assigned to users. They define the users' access permissions and views. are used to bundle the permissionsPermissions determine which objects the users can see in the Web Client and which actions they are allowed to perform. Permissions are always granted via roles, i.e., they are not assigned to a single user but to a group of users sharing a common role. Usually these users belong to the same team and/or have similar functions in the company. required for working with ConSol CM. The roles are assigned to usersUsers are the people who work with the ConSol CM system. In the Web Client, the assigned user of a case is called assignee. Users who work with the Web Client were previously called "engineers"., who are granted the respective permissions.
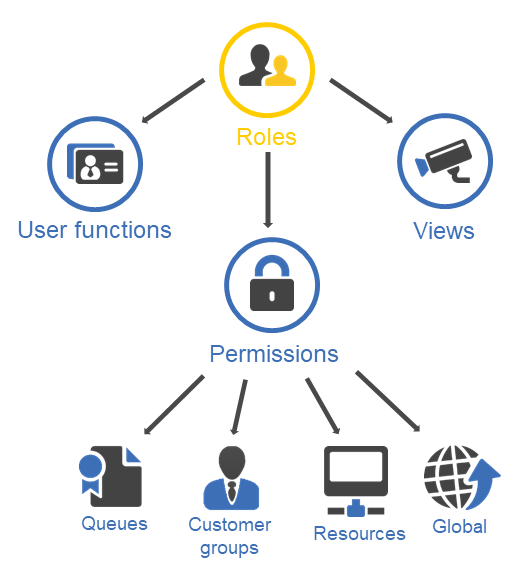
Figure 8: Roles in ConSol CM
Concepts, terms and definitions
Purpose and usage
Roles are used to bundle permissionsPermissions determine which objects the users can see in the Web Client and which actions they are allowed to perform. Permissions are always granted via roles, i.e., they are not assigned to a single user but to a group of users sharing a common role. Usually these users belong to the same team and/or have similar functions in the company. to objects and functions in ConSol CM. They are assigned to usersUsers are the people who work with the ConSol CM system. In the Web Client, the assigned user of a case is called assignee. Users who work with the Web Client were previously called "engineers". in order to grant them the permissions included in the role. Users who do not have any role assigned can log in to the Web Client, but they can neither view objects nor perform any action. By default, access is blocked and it can only be granted via roles. A user can have several roles according to his capacity within the organization. The permissions from the different roles are added to define the final set of permissions for the user.
In addition, it is possible to assign Views and Engineer functions to roles. The users can select the viewsViews limit the cases which are shown in the case list in the Web Client to the cases matching specific criteria (scopes from one or more workflows). Views are assigned to roles. which are assigned to their roles in the case listThe case list is located to the left of the main working area of the Web Client. It shows cases which are relevant for the current user.. When users are assigned as additional assigneesAdditional essignees are users who have a specific purpose, which depends on your business process. Usually, they have to carry out certain tasks within the process. to casesThe case is the request of the customer which the user works on. It is the object which runs through the business process defined by the workflow. Formerly called "ticket"., they can receive the functions which are assigned to their roles.
During the initial setup of ConSol CM, an initial administrator role is created and assigned to the initial administrator user.
Available settings for roles
The definition of a role consists of assigning the required permissions, views and user functions. The permissions are grouped in four categories:
- Permissions for cases are managed in the Queue permissions section.
- Permissions for contacts are managed in the Customer group permissions section.
- Permissions for resources are managed in the Resource type permissions section.
- Permissions for functions and actions within ConSol CM are managed in the Global permissions section.
There are no further settings regarding Views and Engineer functions, which are simply assigned to roles.
Permissions for cases
Permissions for casesThe case is the request of the customer which the user works on. It is the object which runs through the business process defined by the workflow. Formerly called "ticket". are called queue permissions because they are managed by queueThe queue contains cases which should be handled in the same way and follow the same business process (workflow). Permissions and other parameters are also defined based on queues.. They always apply to all cases which are in the respective queue.
There are two general permissions regarding cases:
-
Role can create cases in this queue
Permission to create cases in the queue. -
Other people can assign cases to users with this role
Permission to be the assigned user of a case. Cases can be assigned manually by a user or automatically by script.If the users should be able to accept cases, i.e., assign cases to themselves, they need the Assign permission.
The remaining permissions are defined depending on the assignment status of the cases. There are four status:
-
Assigned
Cases assigned to the current user. -
Assigned as additional assignee
Cases to which the user is assigned as an additional assignee. -
Unassigned
Cases without assigned user. -
Assigned to colleagues
Cases assigned to other users.
For each assignment status, the following permissions can be set:
-
Read
Permission to view cases, i.e., to open a case and view its content. -
Edit
Permission to edit cases, i.e., to edit default fields and case fields in the header or details sections of a case. -
Append
Permission to add information (comments, emails, attachments, time booking entries) to a case. -
Act
Permission to execute workflow activities, i.e., move the case forward in the workflow. -
Assign
Permission to assign cases to oneself or other users.The user who should receive the case has to have at least one role with the Other people can assign cases to this role permission.
-
Assign additional
Permission to add an additional assignee to a case. -
Change queue
Permission to move cases from one queue to another queue. If this permission is granted, the Queue drop-down list is displayed in the case header. The drop-down list includes all queues for which the user has Change queue permissions. This means that the user needs the Change queue permission for cases with the same assignment status in the source as well as in the target queue.It depends on the workflow of the target queue where the processing of the case continues:
- If the source queue and the target queue share the same workflow, the case starts its processing in the target queue at its last position in the source queue.
- If the source queue and the target queue have different workflows, the case starts the process in the target queue at the start node.
Best practice
Only grant the Change queue permission if it is absolutely necessary and after carefully considering all side-effects. Usually it is not required and it can break the defined process chains. The recommended method to change the queue of a case is using jump-in and jump-out nodes within the workflow.
Permissions for contacts
Permissions for contactsThe contact represents the external side of a case. It designates the person or object that gave the reason for creating a case. A contact can either be a company or a person. Formerly called "customer". are called customer group permissions because they are managed by contact groupThe contact group determines which contact data model is used for its contacts and which actions are available.. They always apply to all contacts who belong to the contact group. Contact group permissions are required to create, view and edit the contacts who belong to the respective contact group.
A case always has a main contact. In order to view a case, the users need at least read permissions for the contact group which the case’s main contact belongs to.
There is one general permission regarding contacts:
- Role has create permissions for this customer group
Permission to create a new contact in the respective contact group. In a two-level contact data model, this permission refers to both persons and companies.
The remaining permissions are defined depending on the assignment status of the cases where the contact is the main or additional contact. There are two status:
- Own
Permissions for all contacts which are the main or additional contact of cases which are currently assigned to the user or where the user is set as additional assignee. - All
Permissions for all contacts.
For each assignment status, the following permissions can be set:
- Read
Permission to view the contacts. - Write
Permission to edit contact data and to change the company of a person on the person page. - Delete
Permission to delete contacts. This permission refers to both companies and persons. In case of persons, it allows to anonymize the person and to delete it both with related data and without related data. In addition, it also includes the permission to transfer the cases of a contact to another contact. - Act
Permission to execute contact actions (see section Action Framework - Customer Actions). - Deactivate/Activate
Permission to disable and re-enable contacts, so that no cases can be created for the contact. This permission refers to both companies and persons. In addition, it also includes the permission to transfer the cases of a contact to another contact. - Details read
Permission to view the comments and attachments of the contacts. If this permission is not granted, the Comments and Attachments section is not displayed in the Web Client. - Details write
Permission to add comments and attachments to the contacts. If this permission is not granted, the Comments and Attachments section in the Web Client is read-only. - Details delete
Permission to delete comments or attachments in the Comments and Attachments section in the Web Client.
Best practice
Set up specific roles including only customer group permissions.
For each contact group, you can create one role with permissions to view the contacts and one role with full permissions. The role with view permissions is then assigned to all users who work with cases whose main contact belongs to the contact group. The role with full permissions can be assigned as needed to those users who are also allowed to edit contact data or create new contacts.
This approach can be helpful if not everyone is allowed to edit contact data.
Permissions for resources
Permissions for resourcesResources are objects managed in CM/Resource Pool. are called resource type permissions because they are managed by resource typeThe resource type is the definition of the resources. It determines the available data fields and possible relations and actions.. They always apply to all resources of the resource type.
The following permissions can be granted:
- Read
Permission to view resources. - Write
Permission to edit resource data. - Delete
Permission to delete resources. - Act
Permission to execute resource actions (see CM/Resource Pool - Resource Actions) - Disable
Permission to disable and re-enable resources. - Details read
Permission to view the comments and attachments of the resources. If this permission is not granted, the Comments and Attachments section is not displayed in the Web Client. - Details write
Permission to add comments and attachments to the resources. If this permission is not granted, the Comments and Attachments section in the Web Client is read-only. - Details delete
Permission to delete comments and attachments of the resources in the Comments and Attachments section in the Web Client. - Create
Permission to create new resources of the respective resource type.
Global permissions
The following permissions are available:
- Administrate full system + access all entities
Provides administrator access to the entire CM system, this applies to the Admin Tool / Web Admin Suite, the Process Designer, and administrator access to the Web Client, including runtime data. Also see section Defining additional administrator roles. - Administrate full system
Provides access to the complete system configuration in the Admin Tool / Web Admin Suite and Process Designer, and the page customization, text templates and web forms in the Web Client. An administrator with this role does not have access to runtime data (runtime data in the Web Client and navigation item Administration in the navigation group Tickets in the Admin Tool). Also see section Defining additional administrator roles. - Administrate users and roles
Provides access to the navigation group Access and Roles of the Admin Tool / Web Admin Suite. Also see section Defining additional administrator roles. - Read workflow
Permission to open and view workflowsThe workflow is the implementation of the business process managed in ConSol CM. It contains a series of steps which are carried out by the users.. - Write workflow
Permission to create, edit, and delete workflows. - Deploy workflow
Permission to deploy a workflow, i.e., put a new workflow version into operation. - Read archived cases
Permission to view cases in CM/Archive. - Archive cases
Permission to archive cases. - Delete cases from the archive
Permission to remove cases from CM/Archive, i.e., delete them permanently. - Access archive statistics
Permission to display statistics in CM/Archive. -
Manage templates
Permission to manage templatesTemplates contain predefined and preformatted text. They can be used for comments, emails, and documents. in the Web Client. If this permission is granted, the menu items Text templates and Document templates are displayed in the Web Client. Please see Text templates and CM/Doc for further information about templates. -
Configure myself as representation for other users
If this permission is set, users with this role can configure themselves as a representationRepresentations are temporary replacements. The representing user receives a copy of all emails which are sent from the CM system to the represented user's email address. In addition, his case list has an option to display the cases of the represented user. for other users. In the Web Client the users that can be represented by an user with this permission are shown in a list within the user profile.If this permission is not set, users can only configure other users as a representation for themselves.
Please see Configuring representations for details about the implications of using representations.
- Access cases of own company
This permission is only relevant for CM/Track user profiles, see Regular users vs. CM/Track profiles. CM/Track users with this permission are allowed to access all cases of the company which they belong to. Users without this permission only see their own cases.
Best practice
Set up a specific role for the users in charge of the text and document templates. Create a role with the permission Manage templates only and assign it to the users who create or edit templates.
Basic tasks
The basic tasks regarding roles are available in the menu item Roles. It shows a list of roles with the number of assigned users, permissions, and views. The main roles panel also allows to edit the name of a role, duplicate a role, or delete a role. You can find the respective icons on the right side of the row of the role.
Managing roles
You can perform the following actions on roles:
-
Click the New role button and enter the name of the role.
-
Change the name of a role
Click the Edit icon and enter a new name for the role in the Role name field.
-
Delete a role
Click the Delete icon. The users who had this role assigned loose the respective permissions when they log in again.
-
View the permissions of a role
Click one of the permissions columns of a role. In the Permissions panel on the right, you can select the tab of the type of permission which you want to view.
-
Edit the permissions of a role
Click one of the permissions columns of a role. In the Permissions panel on the right, you can select the tab of the type of permission which you want to assign or unassign. Select the checkboxes of the desired permissions.
The permissions are updated as soon as you check/uncheck them. They become active at the next login of the users with the role.
-
View the assigned users of a role
Click the Users assigned column. The assigned users are displayed in the Users with role panel.
-
Click the Users assigned column and click the Assign users button, which is displayed above the search field in the Users with role panel. This opens a pop-up window where you can select several users on the left. The role is assigned to all the selected users.
-
Remove users from a role
Click the Users assigned column. The assigned users are displayed in the Users with role panel on the right. Click the Minus icon next to the name of the user to remove the user from the role. To remove several users from the role at once, click the Assign users icon, which is displayed next to the search field. This opens a pop-up window where you can remove users from the role by clicking the X icon next to the name of the user.
-
Click the Views assigned column and click the Assign views icon, which is displayed next to the search field in the Views of role panel. This opens a pop-up window where you can select several views. You can filter the views displayed in the drop-down list by queue.
If the role is the main role of at least one user, you can sort the views to determine their order in the case list of the Web Client. Use the Sort order: up and Sort order: down buttons.
-
Remove views from a role
Click the Views assigned column. The assigned views are displayed in the Views of role panel on the right. Click the Unassign button next to the name of the view to remove it from the role. To remove several views from the role at once, click the Assign views icon, which is displayed next to the search field. This opens a pop-up window where you can remove views from the role by clicking the X icon next to the name of the view.
Advanced tasks
The advanced tasks are related to roles but require additional configuration of items outside the role administration.
Defining the role concept
There a several approaches when it comes to designing a concept for roles. The appropriate approach depends on how the system is used. The following questions can be helpful for designing the role concept:
- Which teams work with ConSol CM? Should all team members have the same permissions?
- How is contact data maintained? Is everybody allowed to edit contact data?
- If CM/Resource PoolCM/Resource Pool is an optional add-on which allows to store different kinds of objects as resources in ConSol CM. is used: How is resource data maintained? Is everybody allowed to edit resource data?
- Do you have any power users who are in charge of special tasks?
The following restriction applies:
- In order to view cases, the users need at least read permissions for the contact group which the cases’ main contact belongs to.
The following best practices have been proven useful:
- Queue permissions:
- Customer group permissions:
- Global permissions:
Best practice
Set up a specific role for the users in charge of the text and document templates. Create a role with the permission Manage templates only and assign it to the users who create or edit templates.
Best practice
Only grant the Change queue permission if it is absolutely necessary and after carefully considering all side-effects. Usually it is not required and it can break the defined process chains. The recommended method to change the queue of a case is using jump-in and jump-out nodes within the workflow.
Best practice
Set up specific roles including only customer group permissions.
For each contact group, you can create one role with permissions to view the contacts and one role with full permissions. The role with view permissions is then assigned to all users who work with cases whose main contact belongs to the contact group. The role with full permissions can be assigned as needed to those users who are also allowed to edit contact data or create new contacts.
This approach can be helpful if not everyone is allowed to edit contact data.
Defining additional administrator roles
There are three types of administrator permissions:
- Global administrator
Access to all configuration and runtime data. Permission: Administrate full system + access all entities - Configuration administrator
Access to all configuration data, no access to runtime data. Permission: Administrate full system - User administrator
Access to users, roles, views and user functions, no access to other configuration or runtime data. Permission: Administrate users and roles
There always needs to be at least one role with global administrator permissions and one user with this role. If required, you can create roles for additional administrators. This can be useful, for example, to create a user administrator role which can be assigned to the power users of the system. In this way, you can enable team leaders to create and delete users without giving them access to the rest of the configuration.
Impact on access and roles management
Administrators cannot assign roles or permissions of a higher level or manage users who have roles with higher level permissions. Therefore, some restrictions regarding role and user management apply for the configuration and user administrator. These administrators cannot perform the following actions:
- Add or remove higher level permissions to/from roles
- Assign roles containing higher level permissions to users or unassign them from users
- Manage roles containing higher level permissions (create, copy, delete)
- Manage users who have roles containing higher level permissions (edit, enable, disable, delete)
These restrictions apply to the following permissions:
Configuration administrator:
- Administrate full system + access all entities
User administrator:
- Administrate full system + access all entities
- Administrate full system
- Workflow read
- Workflow write
- Workflow deploy
Configuring representations
Representations are set in the user profile of the Web Client. Every user can select another user with whom he has at least one role in common to represent him. Users who have roles with the Configure myself as representation for other users permission can also set themselves as a representation for other users.
Representations have several effects:
- The representing user can view the case list of the represented user using a special option in the case list.
- The representing user receives a copy of the emails sent to the represented user through ConSol CM.
There are two different scenarios for sending emails:
-
A user writes an email using the email editor
It depends on the value of the property cmweb-server-adapter, forward.mails.to.representatives if the representing user receives a copy of the email. By default, this property is set to false, meaning that this email is not sent to the representing user. If the property is set to true, all emails which are sent manually from CM are sent to the original recipient and his current representative. The CM system checks if a representation rule is active for the recipient’s email address.
Please inform your CM users about this behavior. It might lead to unwanted effects, especially when persons are registered as both users and as contacts in ConSol CM.
-
An email is sent automatically from the CM system
The email is not sent to the representing users automatically. It depends on the implementation of the script if the representing user receives a copy of the email. For details, please refer to the ConSol CM Process Designer Manual.