Open topic with navigation
Creating a New Ticket
Starting the Creation of a New Ticket
Depending on the business process implemented in your ConSol CM system, you might work on existing tickets or create new tickets yourself. Your business process can be configured for example to automatically create a ticket when a customer sends an e-mail to the help desk. Alternatively, you might have the option to create a new ticket, for example when you receive a call from a customer who has a support request.
You need the permission to create tickets for at least one queue in order to create new tickets. If you do not have this permission or your business process requires you to work on existing tickets only, you can skip this section as it does not apply to you.
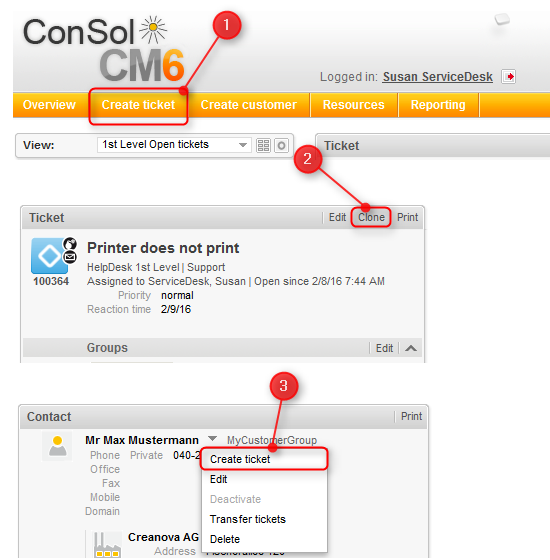
There are several ways to create a new ticket:
- Click the Create ticket link in the main menu.
- Click the Clone link in the ticket that you want to copy. In this case, the new ticket will be filled automatically with the ticket and customer data of the original ticket. Also see Cloning a Ticket.
- Click the Create ticket link in the context menu of a customer. In this case, the new ticket will be filled automatically with the data of this customer. Also see Creating a Ticket for the Customer.
Figure 50: Creating a ticket
Depending on your system configuration, there might be additional ways to create a new ticket, e.g., using customer actions or resource activities.
Providing Data on the Create New Ticket Page
The Create New Ticket page is displayed after you chose to create a new ticket as described in the previous section. Depending on the selected way, some of the data may already be filled out. The following example shows the creation of an empty ticket.
Figure 51: Create New Ticket page
Fill out the data in the following sections:
- Ticket Header
Enter the basic ticket data. The available fields depend on the selected queue. Mandatory fields are marked with an asterisk.If you have permissions to create tickets in more than one queue, you can change the queue in the Queue field. The ticket will automatically adapt to the new queue.
- Customers Section
Select the desired customer group by clicking the respective tab first. Afterwards you have to specify the customer. Depending on the customer data model of the selected customer group, you might have to select or create both a company and a contact. Please see Explanation of Terms for further information. You can specify the customer by either:- Selecting an existing customer
Start the Autocomplete Search by typing some customer data. In case of a two-level customer data model, you have to search for the company first. Use the field Please find or create company first. for this purpose. In case of a one-level model, you can directly search for the company or contact. Select the desired customer from the suggestions. - Creating a new customer
In case of a one-level customer data model, enter the data of the new customer in the appropriate data fields. Click Create and select to save the new customer. If you want to create a new company in a two-level model, you have to click the Create link above the Please find or create company first. field first in order to display the data fields for the company.
You can only create a new customer if you have the permission to create customers in the selected customer group.
- Content Section
You have to add a comment to create the ticket. If you want, you can also add an attachment.
- Once you have entered all the required data, click the Create button to save the ticket. The background color will change from yellow (edit mode) to gray (view mode).
