Resource-contact relations
Introduction
A resource-contact relation (for greater readability called contact relation in this section) defines the relation between this resource and a contact. Contact relations allow you, for example, to link your assets to the contacts (persons and companies) who use them. In an Help Desk process, these assets could be the computer and printer used by the contact or their contracts. You can also use contact relations to support the CRM functionalities of ConSol CM: For example you create a resource for a trade fair you attended and link this trade fair to all the contacts you met there. You can quickly access the pages of the related contacts from the resource page.
You can create relations based on the relation models which are configured in your CM system. The following is defined for each relation model:
- The customer group which the contact has to belong to.
- The level determines the type of contact used in the relation. This can be:
- Company
- Person
- Any (either a person or a company)
- The cardinality of the relation, i.e., if you can link several resources to the contact, or several contacts to the same resource.
- Whether the relation name is displayed. If no relation name is displayed, the table heading states Related.
- Whether the relation is editable, i.e., whether it can be added, edited and deleted in the Web Client.
Display of contact relations
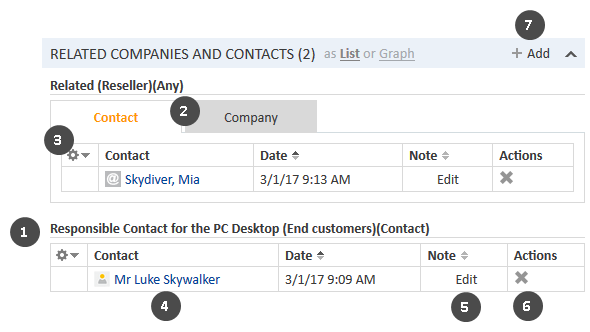
The contact relations are displayed in the section for related contacts of the resource page. There is a table for each relation model. The heading states the name of the relation model, the target customer group, and the type of contact, which can be either company, or person, or any (1). If the type of contact is any, i.e., either a company or a person, there are two tabs: one for relations to persons and one for relations to companies (2).
The table contains the relations which were created for this relation model. You can configure the displayed column using the tool icon (3). The table usually contains a link to open the contact page (4), a link to edit the note of the relation (5) and an icon to delete the relation (6).
You can add a relation by clicking the Add link (7).
Figure 122: Contact relations of resources
The relations are displayed on the resource page and the related contact pages. Please note that the same relation can have a different name on the contact pages.
You can also show a relation graph in this section.
Configuring the columns
You can resize the table columns by dragging each column to the desired width.
Open the context menu next to the wheel icon to configure the table columns. To add columns, enter the column name and select a suggestion from the Autocomplete Search. You can remove columns by clicking the cross next to their name.
Adding a contact relation
Please proceed as follows to add a new contact relation.
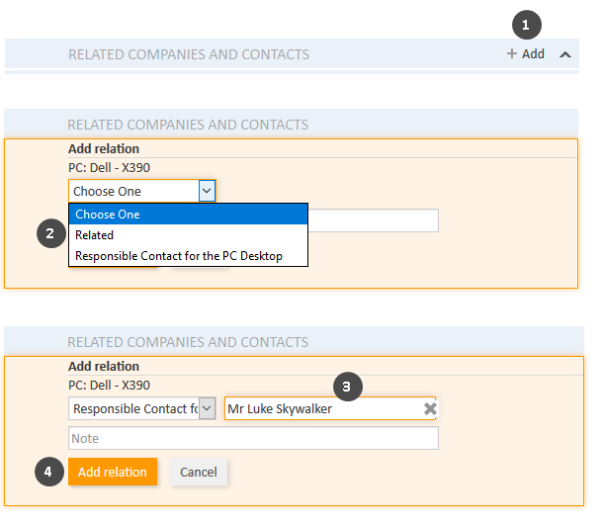
Figure 123: Adding a contact relation
- Click Add in the header of the section for related contacts.
- Select the relation model from the drop-down list.
- Select the target contact using the Autocomplete Search in the field Unassigned. Optionally, you can enter a note in the field below.
- Click Add relation to create the relation to the selected contact.
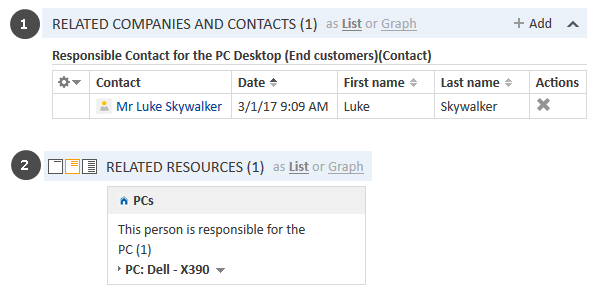
The following figures show the resulting relation:
- On the resource page of PC Dell X390, you can see the relation of type Responsible Contact for the PC Desktop to the person Luke Skywalker from the customer group End contacts (1).
- On the contact page of Luke Skywalker, you can see the relation of type This person is responsible for the PC to the resource PC Dell X390from the resource category PCs (2).
Figure 124: Resulting relations
The action of adding or deleting a relation can trigger additional changes, e.g., the value of a data field can be updated. This depends on the individual configuration of your CM system.
Editing the note of a contact relation
Click Edit in the Note column of the relation to add or edit its note. The note is optional. If the Note column is not displayed, you have to add it first (see Configuring the columns).
Switching to the related contact
You can switch to the contact page of the related contact by clicking his name in the column named Contact or Company. If you click another column, a preview window is opened where you can choose to open the contact page.
Deleting a contact relation
Click the cross in the Actions column to delete the relation. Then, click OK in the red field to confirm the removal. Note that the relation is also removed from the page of the related contact. You cannot undo the removal once you confirmed it.
The action of adding or deleting a relation can trigger additional changes, e.g., the value of a data field can be updated. This depends on the individual configuration of your CM system.


