CM/Track from the customers' point of view
This section deals exclusively with the external side of CM/Track, i.e., how your customers work with CM/Track. Please see Configuring CM/Track for customers and Considering CM/Track when working with cases for your tasks concerning CM/Track. You do not need to log in to CM/Track, you always work with the Web Client.
Logging in to CM/Track
The CM/Track login page can be embedded into your company's website or can be a website on its own. Your CM administrator can tell you the URL.
Customers can log in to CM/Track by providing their user name and password. These login data are part of their CM/Track account.
It depends on the configuration of your CM system, if the Forgot your password? link is available.
Viewing the welcome page
After logging in, the welcome page with the following elements is displayed:
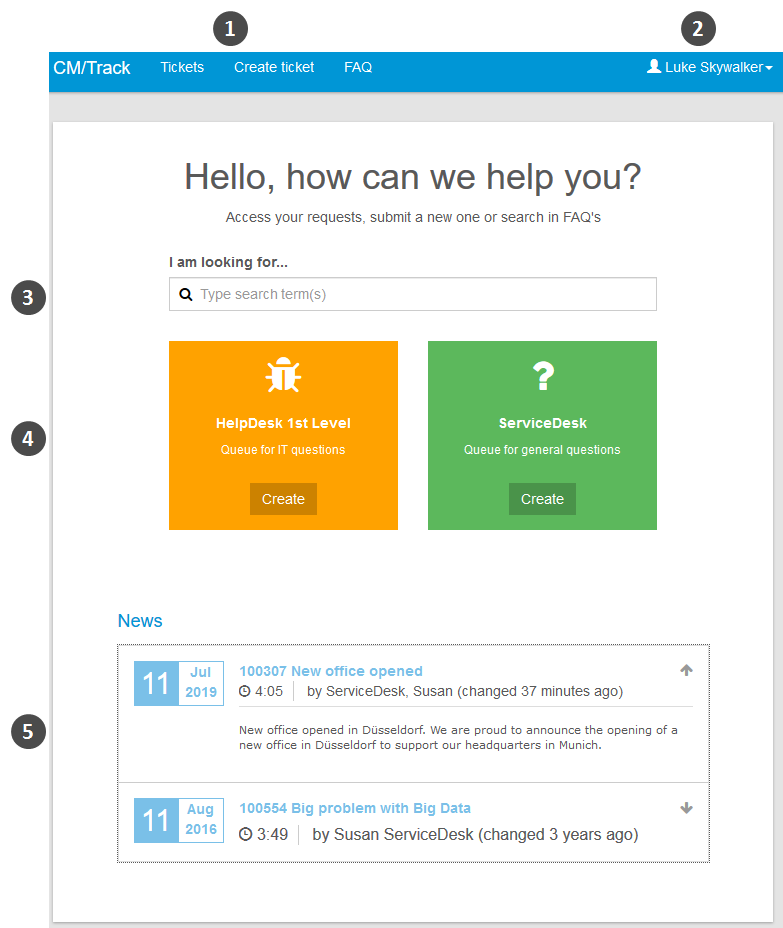
Figure 130: Welcome page in CM/Track
The menu bar (1) contains links to different features. The available links depend on the individual configuration of your CM system. The following links are available in a standard setup:
- Tickets
Opens the overview with the case list. - Create ticket
Opens the screen where the customer can create a new case. - FAQ
Opens the FAQ search screen.
The name of the current user is displayed next to the menu bar on the right side (2). The customer can click his name to open a drop-down menu containing a logout link. Depending on the configuration of the CM system, a link to change the password might be available as well.
The main panel contains a search bar (3) and tiles (4). There is one tile for each process in which the customer can create cases. The Create button in the tile redirects the customer to the Create ticket page where the respective process is preselected. The search bar allows the customer to search his cases.
Optionally, CM/Track can be configured to display news (5). If the news feature is configured, the customers can view the news text by clicking the header of the respective entry.
Viewing the case list
The case list is opened by clicking the Tickets link in the menu bar. It shows the cases which the customer has access to and includes several options for filtering, sorting, and navigating the case list.

Figure 131: Case list in CM/Track
Above the case list (3), a section with several filtering, sorting, and navigation options is displayed (1). The customer can set the following options:
- Show
Determines whose cases are displayed in the case list. The available options are:- My tickets
Only cases of the current customer. - Tickets of company
Cases of the current customer, another customer of his company, or his company. (The availability of this option depends on the CM/Track profile assigned to the customer.)
This option is only displayed if the customer is allowed to see the cases of his company.
- My tickets
- Filter by
Determines which cases are to be displayed in the case list. The available options are:- All queues
The case list shows cases from all processes which the customer has access to. Alternatively, the customer can select one process. - Open + Closed
The case list shows open and closed cases. - Open
The case list shows only open cases. - Closed
The case list shows only closed cases.
- All queues
- Sort by
Determines how the cases are sorted in the case list. The customer selects the element to be considered for sorting from the drop-down list. The sorting order can be changed by clicking the sorting order button (two arrows). The available options are:- Queue
Sorts the cases by process name. - Creation date
Sorts the cases by creation date. - Subject
Sorts the cases by subject. - ID
Sorts the cases by case number. - Scope
Sorts the cases by process and scope. (The scopes are usually sorted according to their position in the workflow.)
- Queue
- Search (2)
Searches the case subject, comments, attachments (if configured), and indexed case fields. The search results are combined with the selected filters, i.e., only cases matching both the search and the filters are displayed.The availability of the case fields for customers in CM/Track is not considered during the search. This means that the customer can find cases due to values of case fields which are then not displayed in CM/Track.
For each case the following information is provided:
- Case icon (1)
- Case number (2)
- Subject (3)
- Scope (4)
- Process (5)
- Creation data (6)
- Main customer (7) - only displayed if the filter Tickets of company is selected

Figure 132: Details of an entry in the case list
Filtering the case list
The customers can filter the case list by entering a search term into the search bar located above the cases. The case list is filtered automatically to display only those cases which contain the search term in the case number, subject, comments, attachments or case fields. It depends on the individual configuration of your CM system which case fields are searched and if attachments are searched.
Scope of the case list
The cases displayed in the case list depend on the CM/Track profile which you assigned to the CM/Track account. Depending on the permissions included in the profile, the customer can see either:
- Own cases
All cases where the customer is the main customer or an additional customer (filtering option My tickets). - Company cases
All cases where the customer, another contact of the company which the customer belongs to, or the company itself is the main customer or an additional customer (filtering option Tickets of company).
Working with cases
Viewing a case
Customers can view the details of a case by opening the case. They just have to click the row of the case in the case list. The case details contain the basic case data at the top (1) and the additional case data in the Additional information section (2). The Add a comment / attachment button (3) is located below the case data. The customers can click this button to add comments and attachments. The comment and attachment history (4) is displayed at the bottom of the page. It also includes emails (not shown in the figure below).

Figure 133: Case details
The customer can return to the overview containing the case list by clicking Tickets in the menu bar.
Adding content to a case
Customers can add comments and attachments to their cases using CM/Track. To do so, they have to open the respective case and click the Add comment / attachment button. This opens the editor shown in the following figure.

Figure 134: Editor to add content to a case
The customer can perform the following actions:
- Write a comment (1)
The customer can use the rich text editor to enter his comment. - Add an attachment (2)
The customer can click the Drop files or click to select files area to select a file from the file system. Alternatively, he can drag-and-drop files into this area. The uploaded file (3) is displayed below (here Order.docx). Optionally, a description can be entered. The customer can remove the file by clicking the X icon. It is possible to add several files at once.
The customer has to click Save to save his changes. Usually, the comments and attachments are directly visible in CM/Track.
The comments which were added by the customer have a person icon instead of a bubble icon. The entry’s author is displayed with a blue background if the entry was added by the current customer. Otherwise, the background is gray.

Figure 135: Added content visible in the case history
You can see your customers' comments and attachments in the Web Client, see Customers add content to cases.
Performing workflow activities for a case
Customers can perform workflow activities to move cases to the next step in the business process. Usually, the ConSol CM system is configured in a way that only some specific workflow activities are available to the customers. For example, the customers might be able to close their cases or to provide feedback, but they do not see any activity related to the internal processing of their request, e.g., requests for approval or questions to other teams.
The customers have to carry out the following steps to perform a workflow activity:
- The customer clicks the workflow activity located in the upper right corner of the case details. Depending on the number of available activities, a drop-down list is displayed.
- If the workflow activity has an ACF, the customer fills out the ACF and clicks Save.
A green success message is displayed after the activity has been executed successfully.

Figure 136: Performing a workflow activity with ACF in CM/Track
Creating a new case
Customers can create new cases using CM/Track provided that their CM/Track profile contains the required permissions. They have to carry out the following steps:
- The customer clicks Create ticket in the main menu.
- The customer fills out the Create ticket screen.
- Subject (1) (mandatory)
- Queue (2) (mandatory)
- Data fields (3)
- Comment (4)
- Attachment (5) (optional)
- The customer clicks the Create Ticket button to save the case.

Figure 137: Creating a new case in CM/Track
You can see the new case in the Web Client, see Customers create new cases.
In the standard configuration, the customer sees the same fields in CM/Track as you see in the Web Client.
Searching the FAQs
FAQs (Frequently Asked Questions) help your customers to find answers to common questions by themselves. FAQs are managed as cases within your CM system, where FAQ cases are located in a special FAQ process. In contrast to normal cases, which are visible to their customers only, FAQ cases are visible to all customers in CM/Track. FAQ cases can contain solutions to known problems or instructions on common tasks.
It depends on the individual configuration of your CM system whether the FAQ functionality is available.
Your customers can search the FAQ by proceeding as follows:
- The customer clicks FAQ in the menu bar.
- On the FAQ screen, the customer selects a process, enters a search pattern, and clicks the Search button (1). If the customer does not enter a search pattern, all cases in the selected process are displayed.
- The matching FAQ cases are displayed in the case list (2) and the customer can click a case to open its details.

Figure 138: Searching the FAQ
It is possible to use an asterisk (*) as a wildcard in the search pattern.
Changing the password
Your CM system can be configured to allow your customers to change their CM/Track password within CM/Track. In this case, the menu bar includes a link for password change.
The customers can change their password by clicking the Change password link, and entering the old and new passwords into the respective fields. Afterwards, they have to click the Change password button to save their changes.