With FlexCDM various customer data models can be implemented. Please refer to section Introduction to FlexCDM for a detailed introduction. To work with a new customer data model within a certain customer group (or in several customer groups), the following steps have to be performed:
A customer data model comprises objects on three model levels:
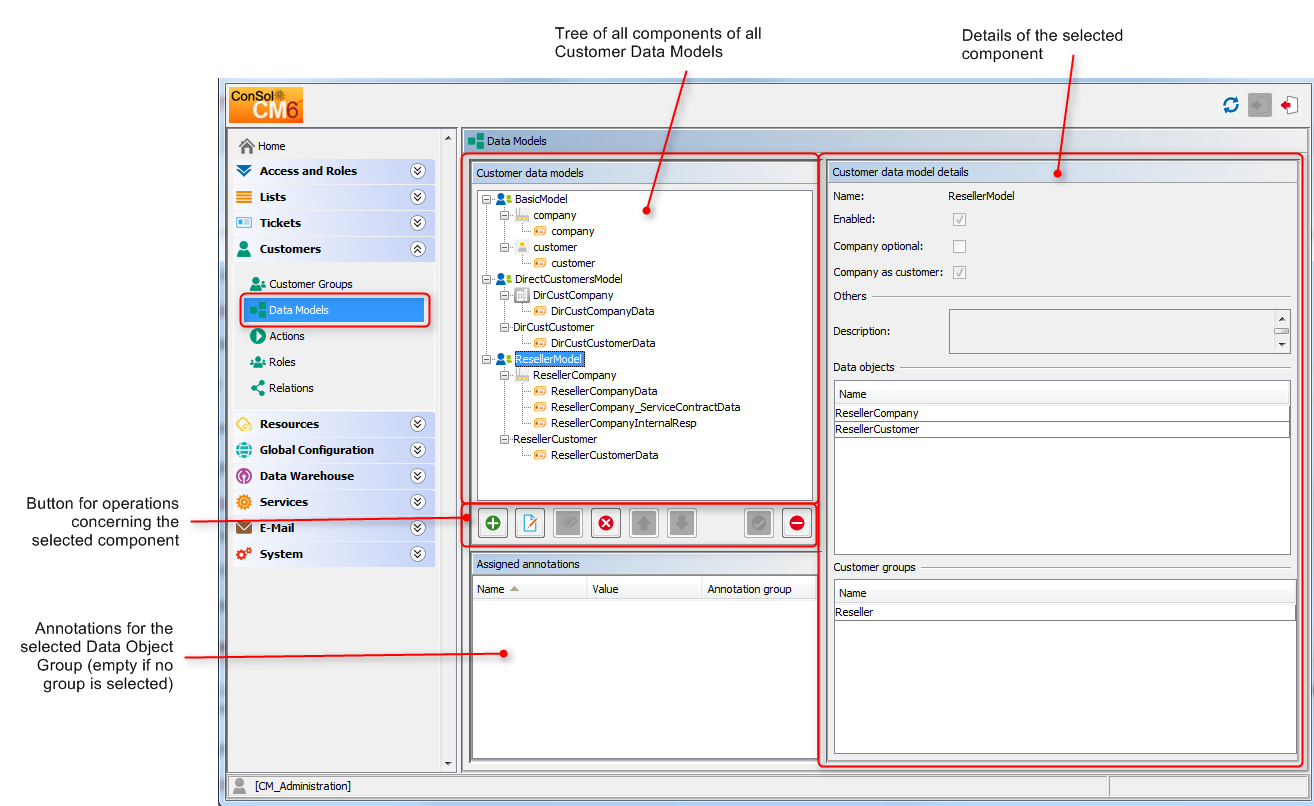
To manage components of the Customer Data Model, use the items in the navigation group Customers in the Admin Tool. Open the navigation item Data Models to set up a new data model or to edit existing models.
Figure 152: ConSol CM Admin Tool - Customer data model definition
To explain how to work with the customer data model, we will walk you through an example in the next sections.
To create a new customer data model you have to create the objects on all levels of the data model. In the following example, we will build a customer data model for partner data. We will create a customer data model with a company and a contact object, i.e., we will have to create the following objects:
After having defined an object, the parameters for this object can be (or rather should be) configured.
When you create a new customer data model, you have to add a data object and the respective Data Object Group Fields in one step.
To create a new customer data model, mark another customer data model (that way you select the level on which you want to work) and use the Add button to open the pop-up window.
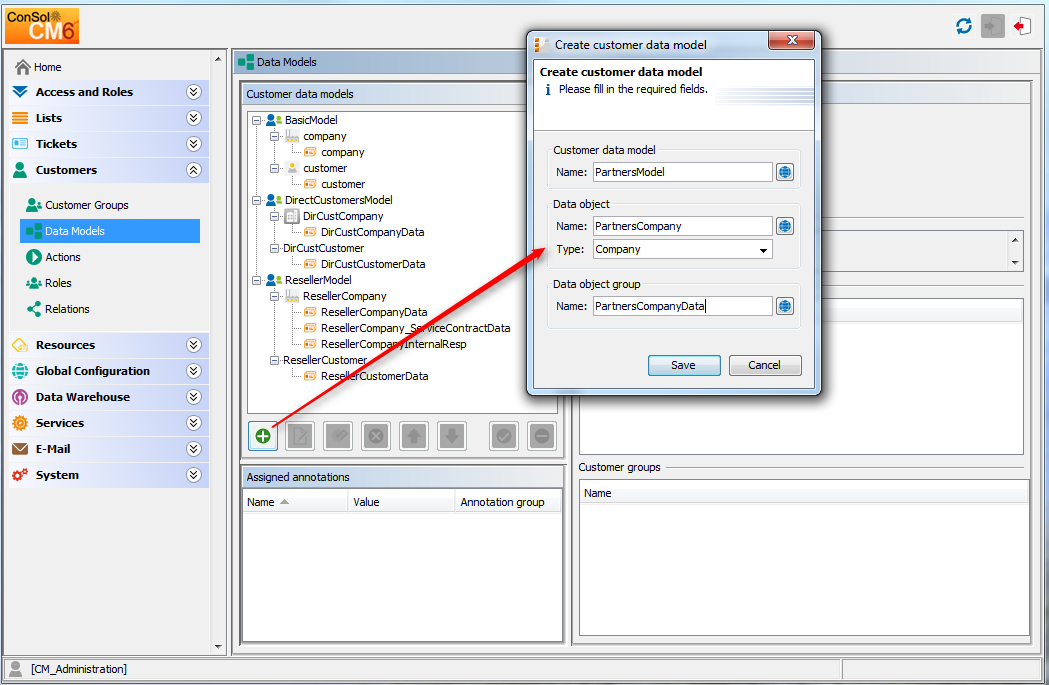
Figure 153: ConSol CM Admin Tool - Creating a new customer data model
You have to fill in the following fields:
In the next step, you have to add the contact object. Select the object PartnersCompany (to set the correct level for the following Add operation) and click the Add button to open the pop-up window.
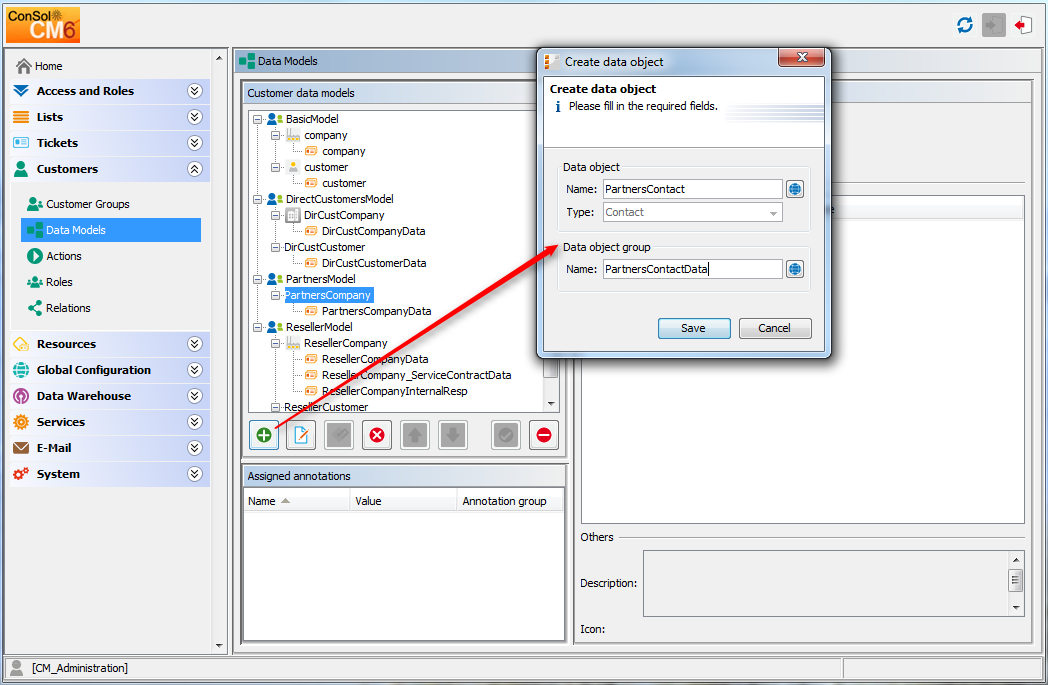
Figure 154: ConSol CM Admin Tool - Adding a new data object
You have to fill in the following fields:
Double-click on the name of the customer data model (PartnersModel in our example) or mark the customer data model in the list and click the Edit button to open the pop-up window where you can define the parameters for the model.
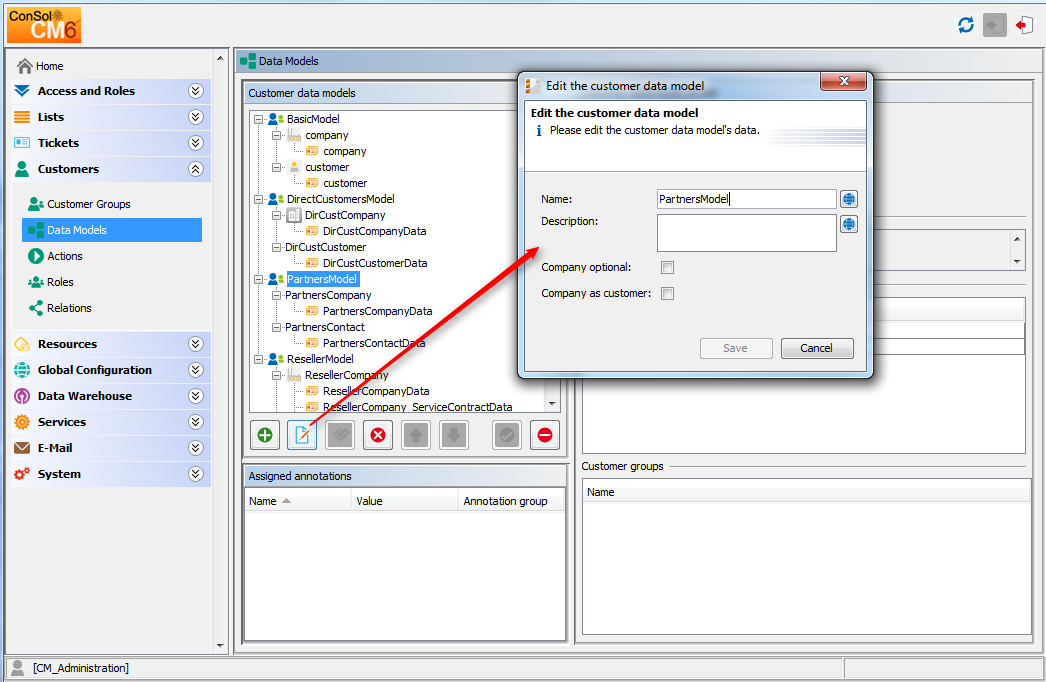
Figure 155: ConSol CM Admin Tool - Parameters for a customer data model
You can fill in the following fields:
Double-click on the name of a data object, e.g., the PartnersCompany or select the object and click the Edit button to open the pop-up menu where you can configure the parameters for this object.
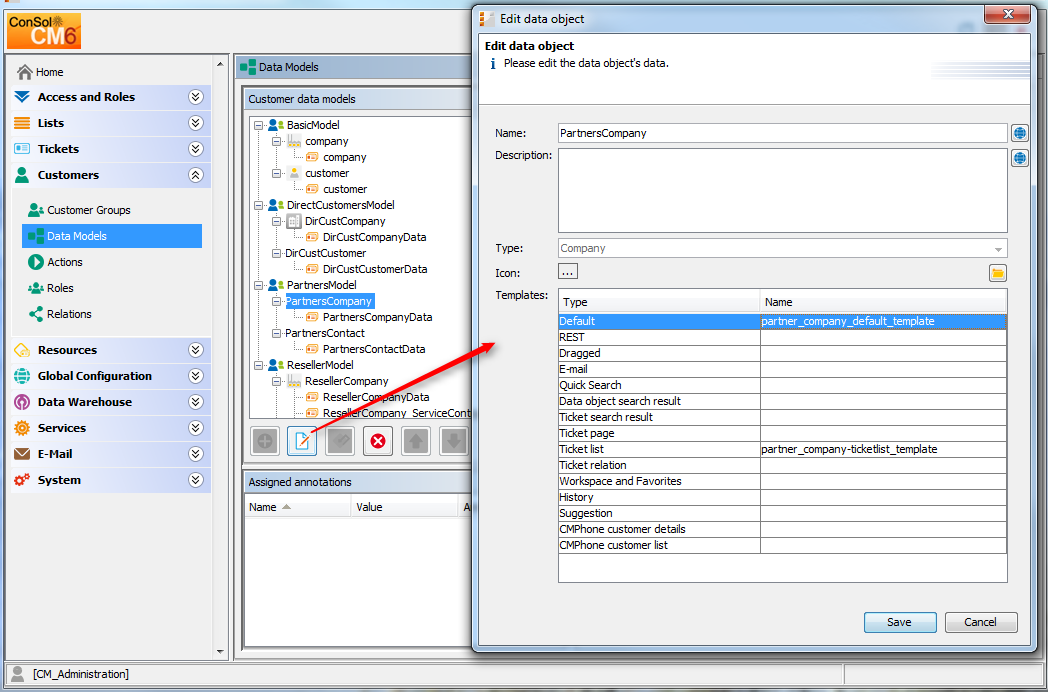
Figure 156: ConSol CM Admin Tool - Parameters for a data object
You can fill in the following fields:
Double-click on the name of the Data Object Group to change the technical and/or localized name(s) of the group.
To define the Data Object Group Fields, use the GUI elements on the right-hand side. In the following figure, an example for the definition of Data Object Group Fields for the PartnersCompany is shown. Here, only one Data Object Group (PartnersCompanyData) is used. You can use as many Data Object Groups as you need in one data object.

Figure 157: ConSol CM Admin Tool - Parameters for the Data Object Group
The definition of Data Object Group Fields within customer data models is based on the same principles as the definition of Custom Fields for ticket data. For a detailed introduction to the definition and management of Custom Fields, please refer to sections Custom Field Administration (Setting Up the Ticket Data Model) and Data Object Group Field Management and GUI Design for Customer Data.
The available Data Object Group Field annotations are listed in section Annotations. The annotation unit is a contact is no longer in use because the level of a unit (i.e., the company or contact) is defined by its unit type (company or contact).
Please make sure that the annotation field indexed is set for all fields which should be searchable. This affects the Quick Search, Detailed Search, and all auto-complete operations! See also section Search Configuration and Indexer Management.
Congratulations! When you have completed all the steps in the previous sections, you have created a new ConSol CM customer data model and can now go on to assign the model to one or more customer group(s).
When the customer data model has been defined, it can now be assigned to one or more customer groups. In the example, we will create the new customer group OurPartnerCompanies which will use the new PartnersModel.
Use the navigation item Customer Groups in the navigation group Customers of the Admin Tool to create a new customer group and to assign the desired customer data model.
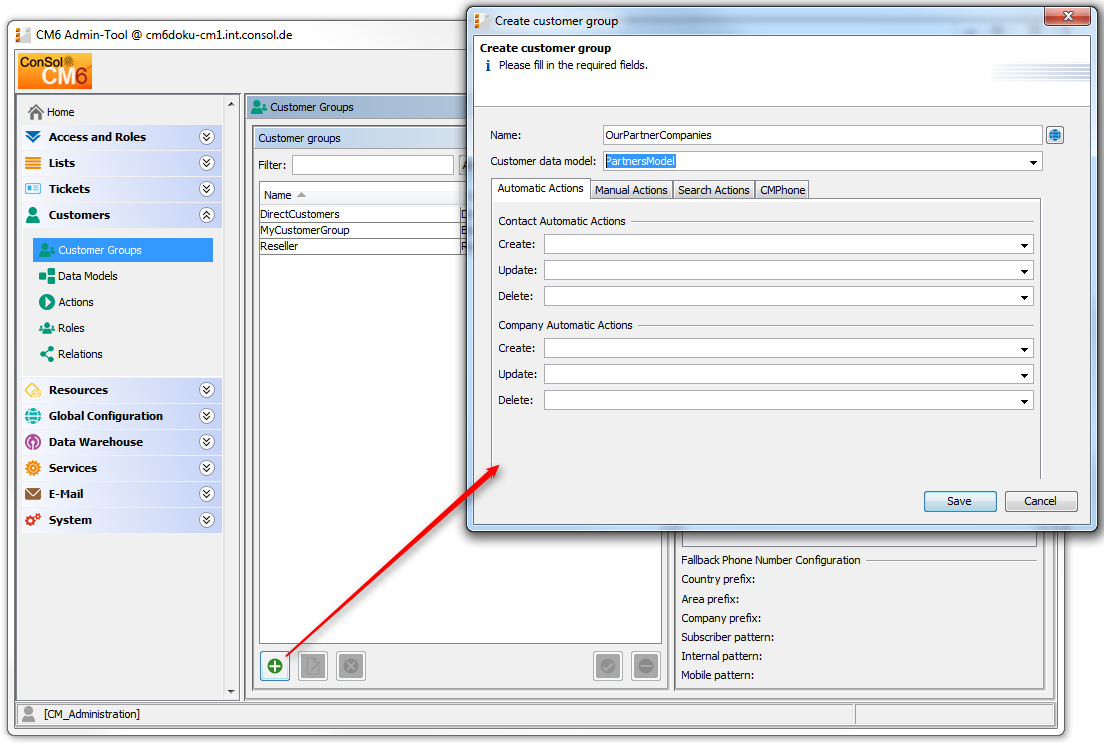
Figure 158: ConSol CM Admin Tool - Definition of a new customer group
You can fill in the following fields:
An engineer who has access permissions for four customer groups will see the following in the Web Client.
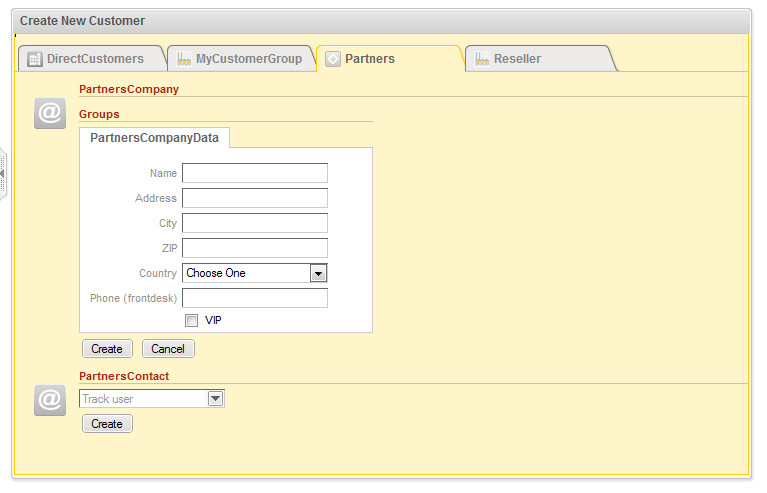
Figure 159: ConSol CM Web Client - Creating a new company and contact
In order to let engineers work with customer data from the new customer group, i.e., to create new partner data sets or to modify existing sets, you have to grant access permissions for the customer groups to one or more roles.
See section Tab Customer Group Permissions.
Please keep in mind that you have to assign the new customer group to all queues where tickets should be created for customers of this group. See section Queue Administration for details.
The following objects within a customer data model can be deactivated (this functionality is implemented only very rudimentary in current CM versions):
In order to deactivate a certain object, select the object on the desired level ( be careful to distinguish between the entire data model, the customer or company level, and the Data Object Field Groups ).
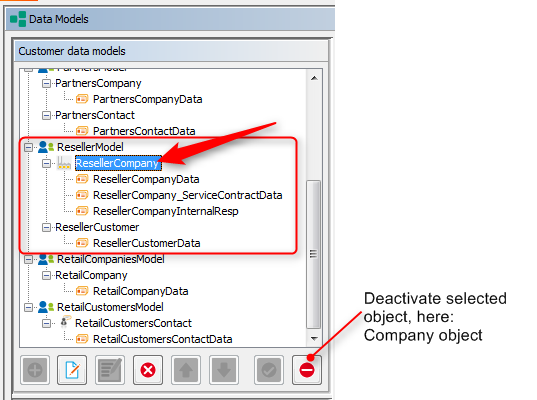
Figure 160: ConSol CM Admin Tool - Deactivate a FlexCDM object (here: company object in ResellerModel)