Even in companies where most processes are managed by IT applications, a great number of documents still have to be printed out or are required in .doc or .pdf format for other reasons. These can be, for example:
ConSol CM offers the add-on CM.Doc to print documents directly from the business management process. CM.Doc supports Microsoft Word documents and (in CM versions 6.10.1 and up) OpenOffice documents.
Templates guarantee that ...
Data from the ticket can be integrated into the template automatically, these can be:
When CM.Doc is active in ConSol CM, the engineer can select the required Microsoft Word template (or OpenOffice template) in the ticket. The document is opened in Microsoft Word (OpenOffice) automatically with all required data fields already filled in. The engineer can then work on the document and save it. It is automatically attached (as a regular attachment) to the ticket and can be opened by users who have read access to the ticket and who have installed the required software (Microsoft Word, OpenOffice) on their PCs.
With special adaptations implemented by the ConSol CM consulting team, the ConSol CM system can be extended in a way that .docx documents can also be converted to .pdf files in order to make sure no further changes can be made to the document.
On the client PC or laptop, the following requirements have to be met to use CM.Doc:
CM.Doc is available in ConSol CM version 6.7 and higher and is part of the standard function set of the application.
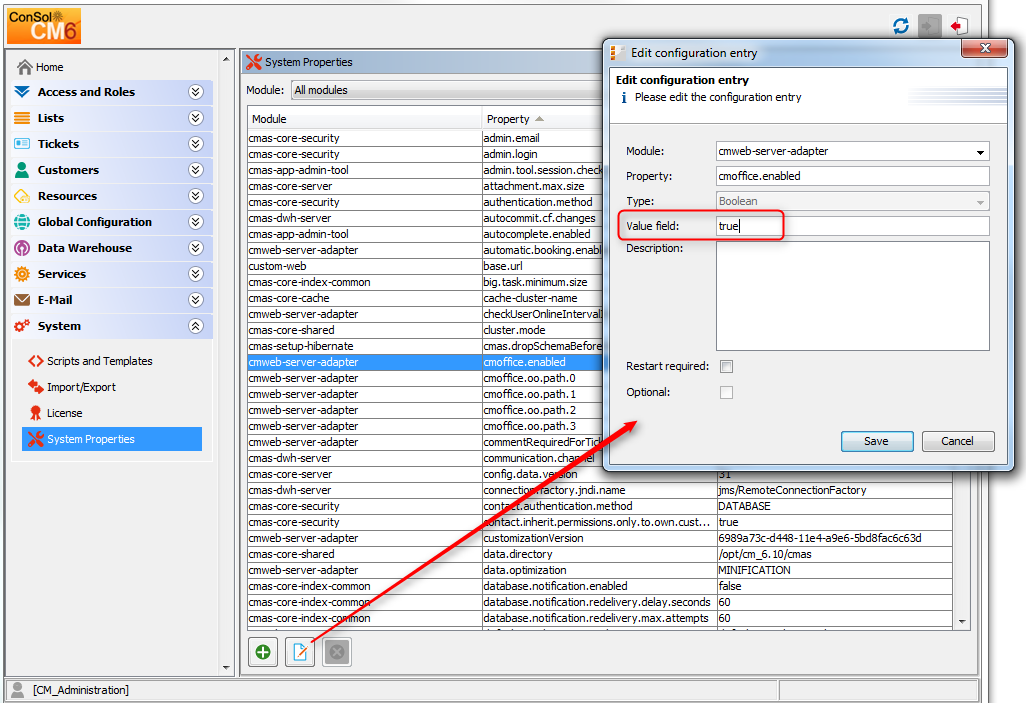
If you want to activate CM.Doc in your ConSol CM system, the first step is to set the system property cmweb-server-adapter, cmoffice.enabled to true.
Figure 384: ConSol CM Admin Tool - Configuration of system property for CM.Doc
Only an engineer who has the permission Write template (see the following figure) can start the Document Template Manager in the Web Client. So, as a second step, you have to create one or more role(s) with the respective permissions. For a detailed explanation about setting role permissions, please refer to section Role Administration.
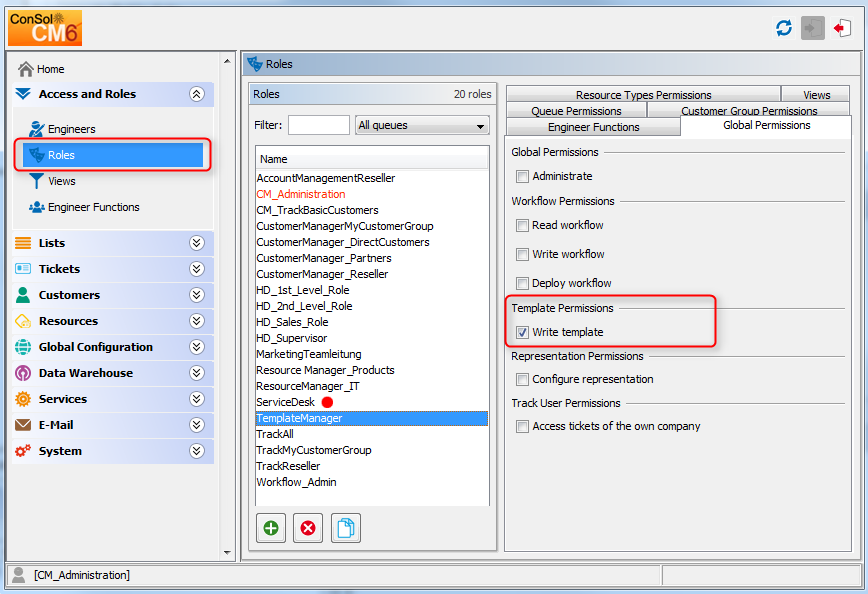
Figure 385: ConSol CM Admin Tool - Necessary template permissions
We recommend to create a role (e.g., TemplateManager) that has only the permission Write template, with no queue permissions or other permissions. Every user who should have access to the Document Template Manager can be given this role. In this way, there is no merge between regular user permissions and document template permissions and you can grant and retrieve the document template permission in a very flexible way.
However, the permission Write template also grants access to the Text Template Manager (for text templates, see section The ConSol CM Text Template Manager).
As a third step, you have to create the Microsoft Word templates. This is done using Microsoft Word. Please create .doc or .docx files as templates, not.dot files!
The OpenOffice-specific configuration is explained in section Using CM.Doc with OpenOffice. However, most of the configuration steps are identical or very similar for Microsoft Word and OpenOffice templates.
As a fourth step, you have to fill in the requested data fields as merge fields in the Microsoft Word template, i.e., you create a CM.Doc template from your regular Microsoft Word document. This is done using the ConSol CM Web Client.
To perform steps three and four, log in to the Web Client and click on Document templates in the main menu to open the Document Template Manager.
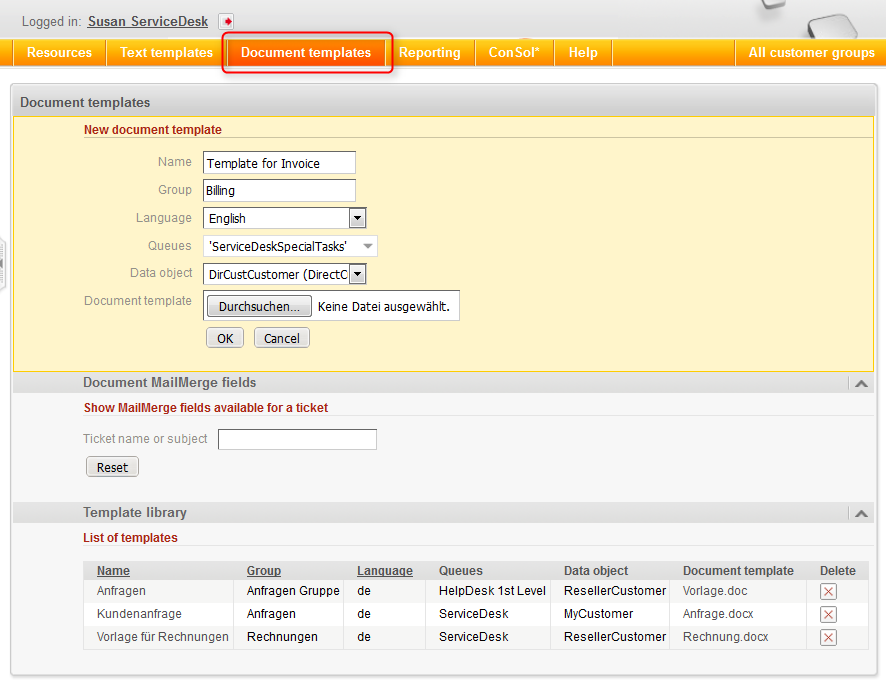
Figure 386: ConSol CM Web Client - Document Template Manager
The Document Template Manager is opened.
Enter the following data for each new template, then click on OK:
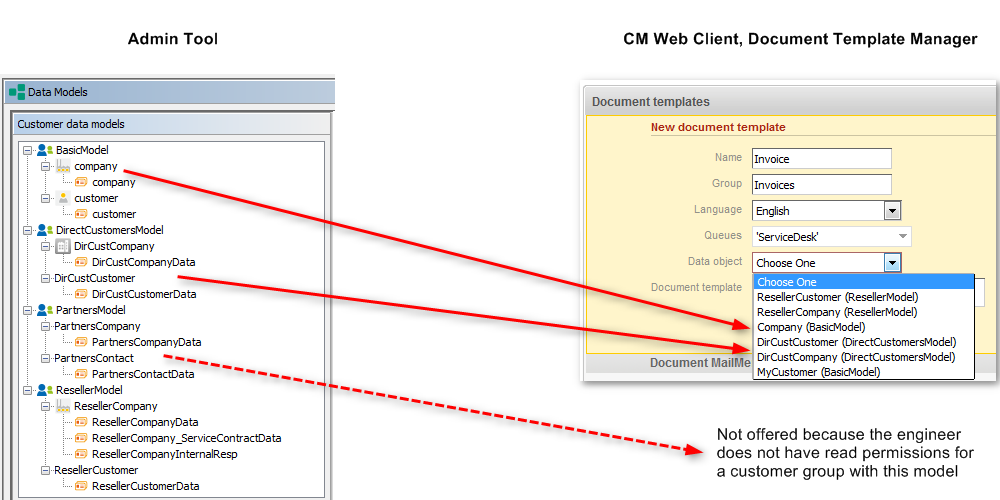
In the form where you have to fill in all fields for an Microsoft Word template, you also have to select a data object, i.e., a customer object (contact or company object) from your customer data model. If you are not familiar with the ConSol CM customer data model concept, please read section Customer Data Model Section first.
In the drop-down menu Data object, the data objects are listed in the following format:
For a data object to be listed in the drop-down menu, the following conditions have to be met:
You have to select the data object which represents the main customer of the tickets. The Microsoft Word template will only be available in tickets which have main customers from a customer group with this customer data model. This means if you want to use the same Microsoft Word template text for two customer groups with two different customer data models, you have to create two ConSol CM Microsoft Word templates, one for each customer data model. You can, of course, use the same Microsoft Word template for two or more customer groups which all have the same customer data model.
If you try to assign a data object to an Microsoft Word template which is not compatible with the selected queue (because the selected data model is not assigned to the selected queue), you will get an error message.
Please be aware that it makes only sense to select an object at company level if the parameter Company as customer has been set for this customer data model.
Please be aware that if you leave the Data object field empty, the Microsoft Word template will theoretically be available for all customer groups, but there might be run-time errors if the required fields are not found when the template is loaded. ConSol CM will display a message that field content is missing and the fields will be filled with the string 'n/a'. However, we recommend that you always select a data object to keep the system in good working order.
If the Microsoft Word template is offered in a certain ticket (see section Using Microsoft Word Templates from within the Web Client below) depends on two parameters:
Example (we anticipate the use of Microsoft Word templates in the Web Client, for details see section Using Microsoft Word Templates from within the Web Client):
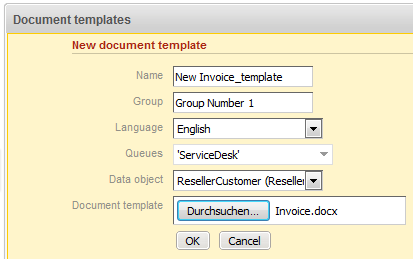
Figure 387: ConSol CM Web Client - Definition of a Microsoft Word template for One queue and for a certain data object
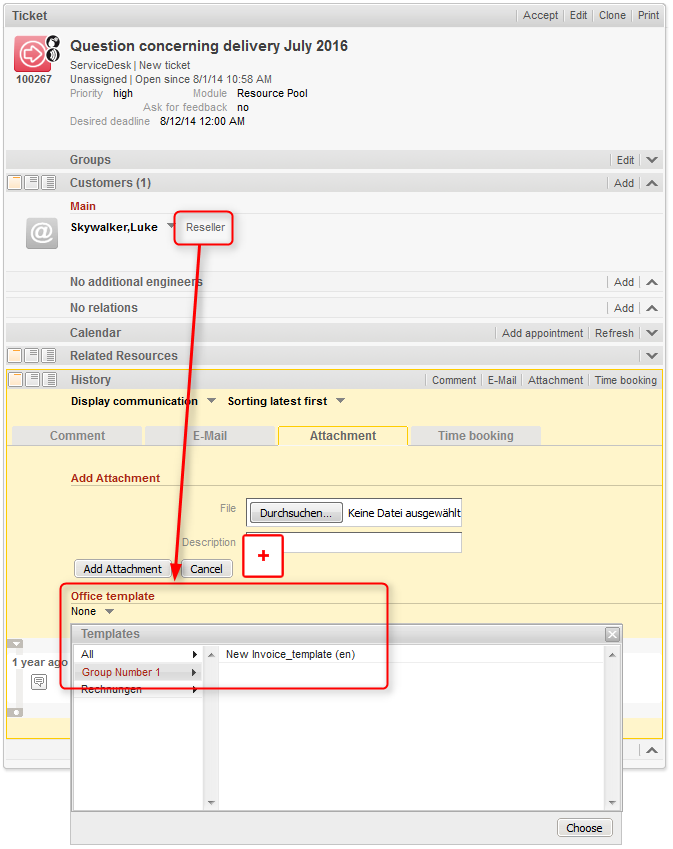
Figure 388: ConSol CM Web Client - Microsoft Word template offered because of queue and customer group
Figure 389: ConSol CM Web Client - Microsoft Word template NOT offered because of queue and customer group
When you have filled in all fields and clicked OK, the new template appears in the Template library, List of templates. After entering the new template data, you can perform the following step directly or you can click on the name of the template file (in the Document template column) to download and edit the template.
In the next step, MailMerge fields, which represent the fields of ticket and customer data, can be added to the template. Select a ticket which has all the requested fields by using the Document MailMerge fields section. Enter the ticket name or subject in the field under Show MailMerge fields available for a ticket and select the correct one from the search result list.
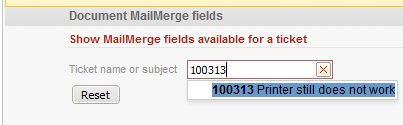
Figure 390: ConSol CM Web Client - Selection of a ticket to see all required data fields
All available MailMerge fields are displayed.
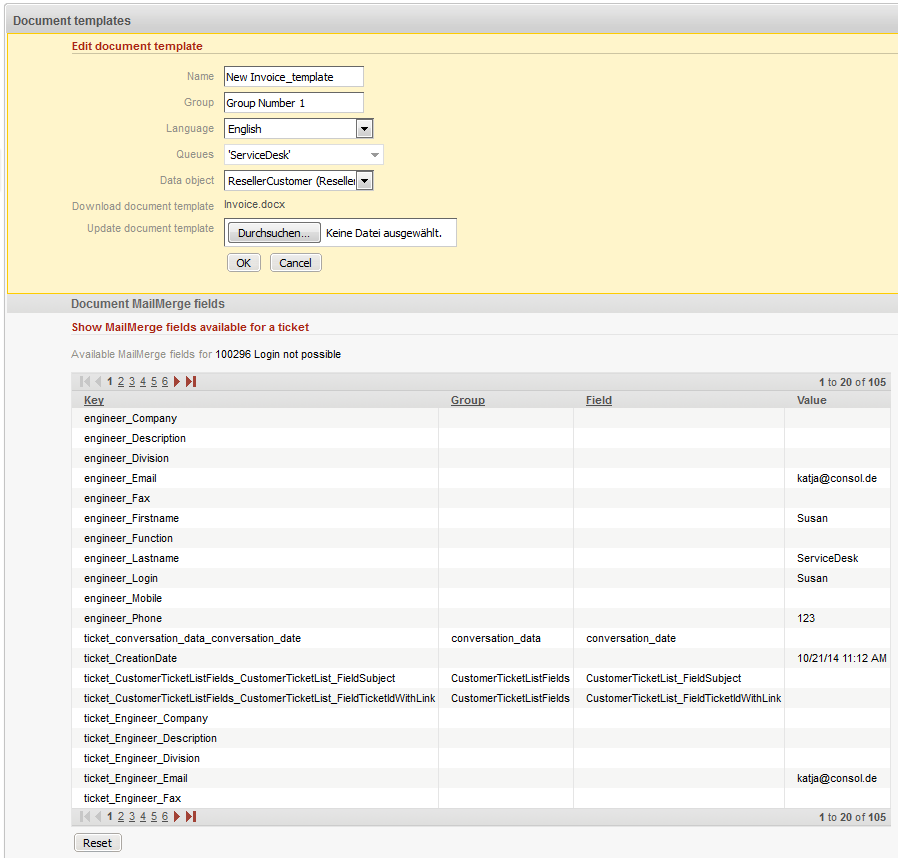
Figure 391: ConSol CM Web Client - Show available MailMerge fields
The list contains the following columns:
Download and open the Microsoft Word template from one of the following locations. In both cases, the technical file name of the template is shown:
In this document, go to the position where you want to insert the first field (in our example this will be the customer name). Use Insert -> Quick parts -> Field to insert the MergeField. Copy and paste the key of the MailMerge field you need into the respective field (Field properties, Field name) in Microsoft Word:
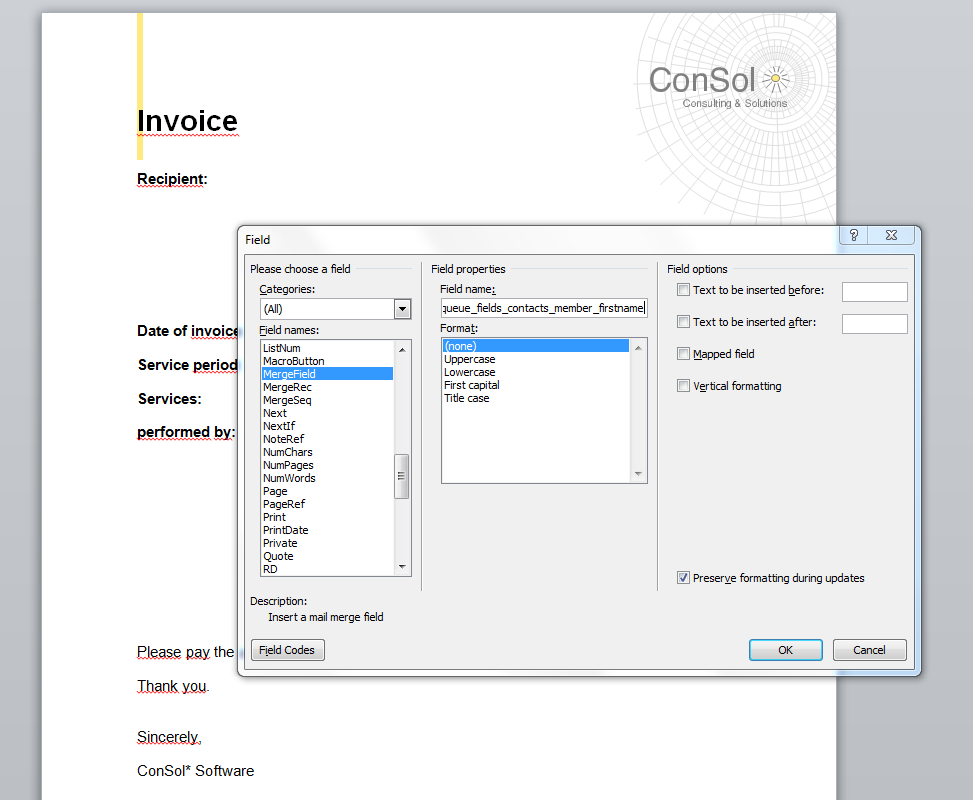
Figure 392: Microsoft Word - Insert MergeField into document
Do this with all fields you would like to have pre-filled when the Microsoft Word template is opened. In the end, your template might look like the example in the following figure.
You can use all fields which are offered in the ticket, i.e.:
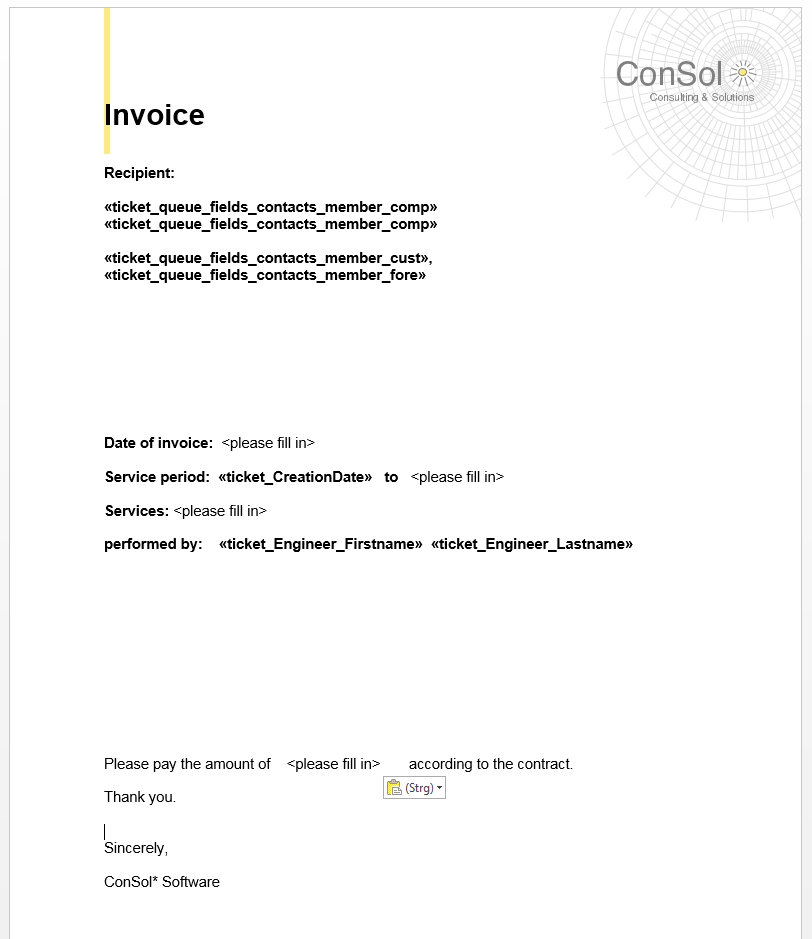
Figure 393: Microsoft Word example template
Save the Word document in the local file system and then upload it using the field Update document template. This will store the template in the Document Template Manager.
For customer data, there are always two keys for the same value, i.e., two keys which in the end retrieve the value from the same Data Object Group Field. You can always use either one - there is no difference as far as the behavior in the templates is concerned.
The two keys are:
When Microsoft Word templates are available for a queue, an engineer can use them by clicking on Attachment in the History section of a ticket and by selecting the requested template. Microsoft Word is started (if it is not already open) and a document based on the selected template is created. The document is opened, with all values/parameters filled-in at the correct positions. This might look like the example in the following figures.
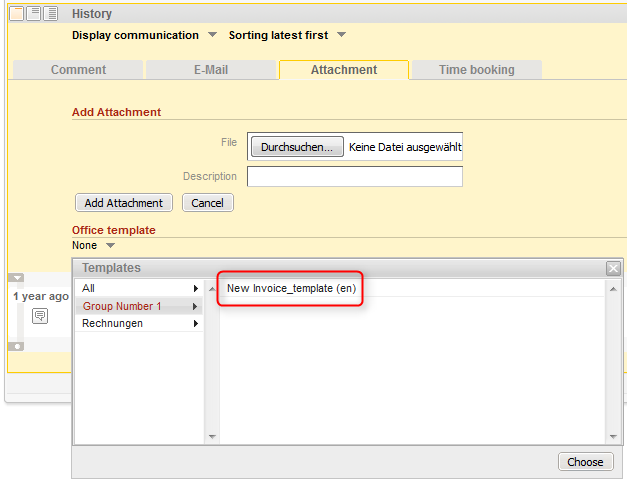
Figure 394: ConSol CM Web Client - Microsoft Word template available as attachment

Figure 395: Microsoft Word example document
The engineer can then edit the document, if required, and save it. This will automatically attach the new version of the document to the ticket.
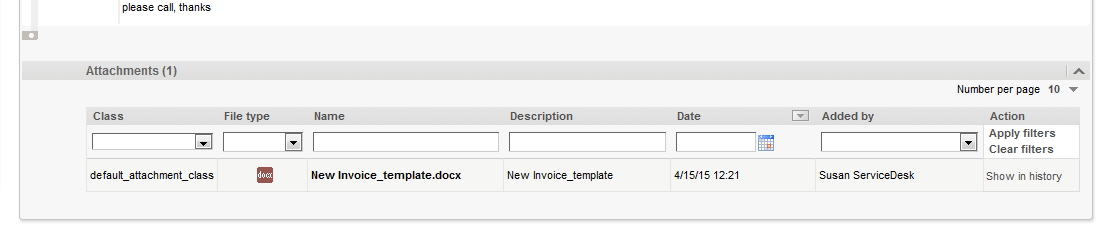
Figure 396: ConSol CM Web Client - Newly edited Word document as attachment at the ticket
From here on, working with the Word document is exactly the same as working with regular Word (.doc, .docx) attachments. See next section.
An engineer can also open a Microsoft Word document which has been attached to the ticket. As an engineer, click on the attachment name. This will open the file in Microsoft Word. Edit the document and save it. A new version of the document will be attached to the ticket automatically.
To work with CM.Doc using OpenOffice, perform the following steps:
See section Configuring the ConSol CM System for CM.Doc.
See section Creating an Engineer Role with Permissions for the Document Template Manager.
Set the following system property / properties in section System Properties, navigation group System:
The handling of OpenOffice documents in the ConSol CM Web Client is identical to the handling of Microsoft Word documents. When preparing a document template with ConSol CM data in OpenOffice the basic handling also mirrors the procedure in Microsoft Office. So, generally, the detailed explanation in the sections above (starting in section Creating Microsoft Word Templates and Making Them Available) applies here, too. When you want to add a field to the OpenOffice template, the dialog Fields can be opened by selecting the menu entry Insert -> Fields -> Other and selecting the tab Variables.
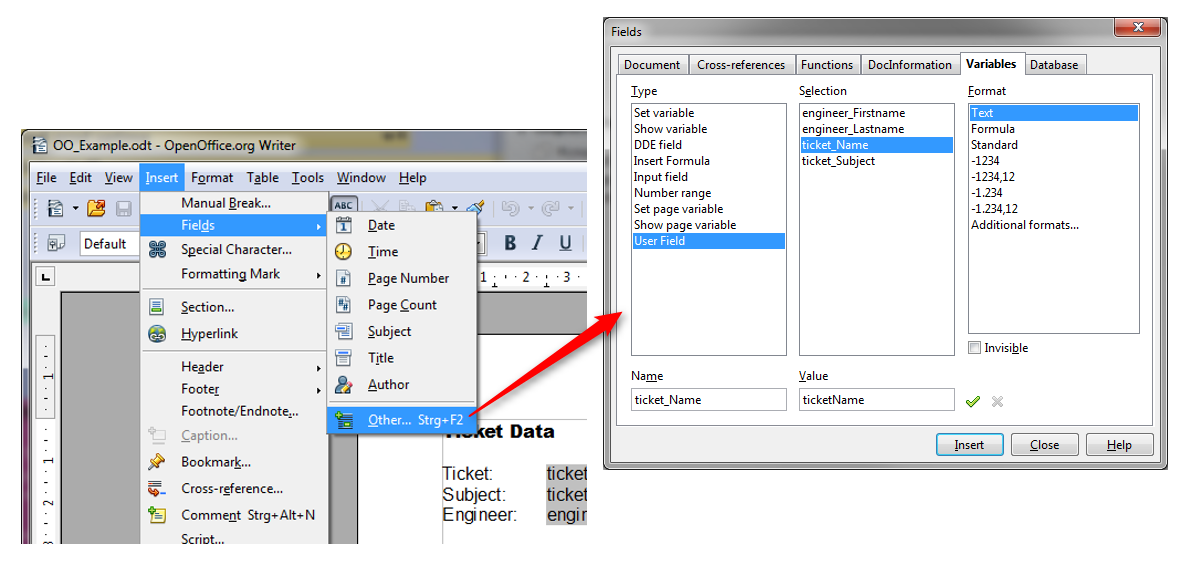
Figure 397: Creating a document template using OpenOffice
This tab allows you to add a ConSol CM field. To do so, select User Field as a Type, and Text as a Format. In the next step you enter the field name (from the Key column in the Document MailMerge fields section) in the Name field below the Type. Add a useful Value for recognizing the field in the document. Click the green checkmark to the right of the field Value, so that the field is shown under Selection in the middle, and make sure it is selected there. Click the Insert button on the bottom right side of the dialog to insert the field into the document at the current cursor position. This has to be repeated for every field that you want to use in the document.