This section explains the navigation item Email in navigation group Email in the Admin Tool. Furthermore, the email-related system properties and the configuration for email duplication are covered.
Introduction to Emails in ConSol CM
Before we explain the administration of email accounts using the ConSol CM Admin Tool, we will give you a short introduction on the subject email with ConSol CM, because this represents a core functionality of the application. ConSol CM can send and receive emails.
In this section, the focus is on general mailing with ConSol CM and on the set-up in single server environments. In case you have to configure a CM cluster, please read this section first and proceed to the ConSol CM Set-Up Manual, section Email.
Sending Emails from ConSol CM
Manual Emails
Emails can be sent manually by an engineer or automatically by the system. Manual emails are sent using the Ticket Email Editor. In most systems, by default, the ticket's main customer is the receiver of the email, but the engineer can select or type any other email address. The system-wide default value can be changed by an administrator using Page Customization, using the attribute mailToSelection in the Page Customization section. Furthermore, the engineer can use email templates and/or quote ticket text. Please see the ConSol CM User Manual for a detailed introduction about working with the Ticket Email Editor.

Figure 388: ConSol CM Web Client - Ticket Email Editor
Automatic Emails
Automatic emails may be sent by ConSol CM in situations like the following:
- Initiated by the workflow engine, e.g.,
- when the engineer to whom the ticket is assigned should be reminded to attend to the ticket.
- when customers should receive an automatic confirmation that a ticket has been opened for them.
- when customers should receive an automatic confirmation that a ticket of theirs has been closed.
- when a supervisor or approver should receive a message that a new case has to be approved.
- Initiated by the system in case of an error or for a success message, e.g.,
- system error
- email error
- DWH synchronization (error or success)
Usually, those emails are sent to the ConSol CM administrator. However, for most special error cases a special receiver email address can be configured using system properties. Please see section System Properties for details.
-
Initiated by the ConSol CM system to remind engineers
- When an engineer receives a ticket or a ticket is retrieved from the engineer, an email can be sent to this engineer. This can be configured on a per-queue basis, as described in section Queue Administration.
Receiving Emails with ConSol CM
The ConSol CM system can fetch emails from one or more mailboxes (= email accounts) on one or more mail servers. The mailboxes are configured in the Admin Tool (General Email Configuration (Navigation Item Email)). Please keep in mind that ConSol CM works with mailboxes here. Each of the mailboxes can be reached by at least one email address. In certain cases, one mailbox might be used for more than one email address. This can be significant when writing Scripts of Type Email.
As far as the mail server is concerned, ConSol CM is just a regular email client fetching emails using a standard mail protocol: IMAP(S) or POP3(S). Depending on the mail server configuration and on the ConSol CM system property cmas-esb-mail, mail.delete.read (in Mule/ESB mode) resp. cmas-nimh, mailbox.default.task.delete.read.messages (in NIMH mode), the emails are deleted from the mailbox on the mail server after ConSol CM has picked them up. The default setting is mails are not deleted after pick-up.
If you do not want ConSol CM to delete emails from the mail server, please make sure to monitor the mailbox(es) to avoid a data overflow and server or performance problems.
All incoming emails are first stored in an incoming email pool in ConSol CM and are then processed in a chain of email scripts. Please see section Scripts of Type Email for a detailed explanation of those scripts. When an email cannot be processed, the administrator will receive a notification email. The unprocessed email is listed under Email Backups.
There are different possibilities concerning the default system behavior for an incoming email:
- The subject of the email does not contain any ticket number with a valid syntax (i.e., it does not contain the pattern which is defined as regular expression (RegEx) for the ticket subject):
A new ticket is created. - The subject of the email does contain a ticket number with a valid syntax (RegEx) and the ticket is still open:
The email is attached to the existing ticket. - The subject of the email does contain a ticket number with a valid syntax (RegEx), but the ticket is closed:
A new ticket is created and a reference to the old ticket is established.
By modifying the email scripts (see section Scripts of Type Email), the default system behavior can be changed. However, this can corrupt core functionalities of the system and should not be done or only done by very experienced ConSol consultants!
Email Configuration Using the Admin Tool
IMPORTANT INFORMATION
Since ConSol CM version 6.9.4, there are two modes to receive incoming emails:
- Mule/ESB - this has also been available in all previous CM versions (This feature is deprecated in CM versions 6.11 and up.)
- NIMH (New Incoming Mail Handler) - new in version 6.9.4
For all configurations/settings which are valid for both modes, no further notes are added. For all settings which vary depending on the mode, this will be explained in separate (i.e., Mule/ESB- or NIMH-specific) sections.
General Email Configuration (Navigation Item Email)
In this navigation item you can set the parameters for the email connection.

Figure 389: ConSol CM Admin Tool - Email
The Email screen shows the following information:
- General admin email address for error messages (1)
- Email accounts (not email addresses!) on one or more email servers where ConSol CM will fetch emails (2)
- Configuration of RegEx pattern for the recognition of existing tickets (incoming emails) (3)
- Number of restarts/retries after an error with email delivery (4)
- Email address for email-related error messages (5)
- Address of outgoing email server (SMTP) (6)
Administration
Admin email:
Enter the email address which should receive general messages or warnings from the system. Using the GUI, you can enter one admin email address. Multiple addresses separated by commas are possible, but they have to be entered directly in the navigation item System Properties. Use the system property cmas-core-security, admin.email. The total number of characters (for both GUI and property) must not exceed 72. If there are many recipients, we recommend using a mailing list on the mail server system.
Incoming Email
The configuration of incoming email is divided into two areas:
- Configured accounts:
Here you can use a pop-up window to add or edit accounts from which emails are retrieved. The connection to the mailbox is checked during set-up, so it is not possible to configure an account that cannot be used when the system is in operation (provided the mail server has not changed etc.). The value(s) are saved in the system property cmas-esb-mail, mail.incoming.uri. Please see the email properties section in System Properties for detailed information. Required values are:- Protocol
The protocol used to retrieve emails from the server. Supported protocols are IMAP4, IMAP4s, POP3, and POP3s. Please keep in mind that ConSol CM behaves like a regular email client. When the secure protocol version is used, the corresponding certificate is required! This has to be stored in the security store of the application server. - Server
The DNS-resolvable name or IP address of the mail server. - Port
The port on the mail server where the mail daemon/service is listening. - User name
The user name of the email account. Password
The password of the email account.Please keep in mind that one email account can have more than one email address. So here, you are dealing with the account name, i.e., with the mailbox. When you edit the Admin Tool script(s) that process the incoming emails, it might be required to use the email address. The email address is also required when you configure the Reply-To address, the From address, and queue-specific email addresses! So be sure to use the correct parameter: mailbox or email address!
- Protocol
- Configuration:
- Incoming email subject pattern:
Describes the elements that the subject of an incoming email has to contain in order to assign this email to a certain ticket. The pattern is defined in form of a regular expression (RegEx).
Example:.*?Ticket\s+\((\S+)\).* would match every subject line that contains Ticket (<Ticketnumber>). Outgoing email subject template:
Describes the pattern which is used to create the ticket ID in the subject of an outgoing email. The template should be matchable by the incoming email subject pattern. Via the Edit button on the right you can modify the incoming email subject pattern and outgoing email subject template and verify if they match.
Example:Ticket (${ticketName}) would match the example RegEx above.You can check if the pattern for the incoming email subject pattern and for the outgoing email subject template match by using the Edit button and the editor that is opened. Please make sure that the email subject has been set correctly at all locations, e.g., also in all workflow scripts and Admin Tool scripts!
- Maximum number of restarts:
Shows the maximum number of restarts after an error when ConSol CM fetches emails. Valid for all mail pollers. - Error email address:
Email address to which messages and warnings of the mail sub-system are sent. This is usually the same as the general administrator address.
- Incoming email subject pattern:
For the configuration of incoming email you might also want to check the email-related system properties, see System Properties. Particularly, the polling interval (the time interval for fetching emails from the mail server, system property cmas-esb-mail, mail.polling.interval) might be of interest.
Outgoing Email
The connection data for outgoing emails are set here:
Outgoing email connector
Use the following format:
smtp://<IP address of mail server>:<port>
Example with standard port:
smtp://123.123.123.123:25
Example for SMTP server with authentication:
smtp://test:testpassword@ConSolMailServer2:25
The example above uses the following parameters:
- Protocol: SMTP
- User name: test
- Password: testpassword
- Host/Mailserver: ConSolMailServer2
- Port: 25
Please note: If user name and/or password which have to be provided contain the character '@', the '@' has to be coded as %40.
Email Modes: Mule/ESB Mail or NIMH
Starting with CM version 6.9.4, there are two modules for the retrieval of incoming emails:
- Mule/ESB Mail
Has been available in ConSol CM since version 6. (This feature is deprecated in CM versions 6.11 and up.) - NIMH
The New Incoming Mail Handler, available since version 6.9.4. This will be the only available incoming email module in future ConSol CM versions.
In the current ConSol CM version, you, as an administrator, can decide which module to use: you can run ConSol CM in Mule/ESB mode or in NIMH mode. Mule/ESB and NIMH use different system settings which are stored as system properties. They are explained in the following two sections. The "switch" which changes the incoming email mode is the system property cmas-core-server, nimh.enabled which can be set to true or false.
The sending of emails, i.e., the SMTP server configuration is not influenced by the incoming email mode.
Email Configuration Using Mule/ESB Mail
Mule is the internal ESB (Enterprise Service Bus) which is - among other things - used to retrieve incoming emails.
The Mule/ESB integration is deprecated in CM versions 6.11 and up. However, since you might have to perform the transition from Mule/ESB to NIMH when updating to CM 6.11, Mule/ESB will be explained in this manual.
When Mule/ESB Mail is enabled, the following mechanisms apply:
- Mule/ESB Mail runs as services, see sections CM Services and ESB Services.
- Emails are retrieved from the configured mailboxes.
- It is not possible to retrieve emails from the file system.
- Emails which could not be processed are stored in a separate directory (unparsable) in the main ConSol CM data directory and can be re-sent to the ConSol CM system, see section Management of Email Backups with Mule/ESB.
- Mule/ESB Mail system properties have to be set. Please keep in mind that you can set most of the properties using the graphical user interface of the Admin Tool, navigation item Email (see sections above).
The following figure provides an example of Mule/ESB Mail-related system properties. Please also refer to the detailed explanation of Mule/ESB Mail system properties in List of System Properties by Area.

Figure 390: System properties for Mule/ESB Mail
Email Configuration Using NIMH
NIMH, the New Incoming Mail Handler, is a proprietary module of ConSol CM. The following picture provides an overview of all components.
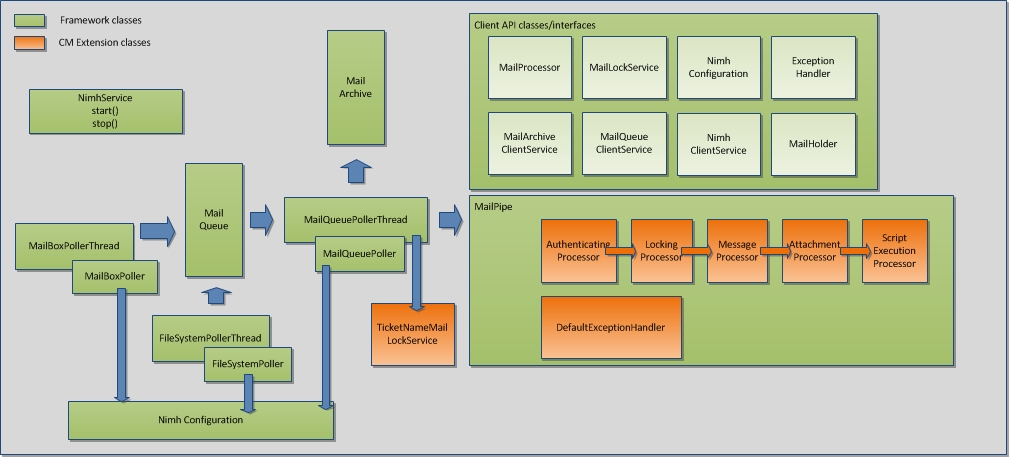
Figure 391: NIMH components
When NIMH is enabled, the following apply:
- NIMH runs as a (single) ConSol CM service, see section CM Services. When NIMH is active, the Mule/ESB Mail services are disabled.
- Emails from mailboxes on a mail server are retrieved by ConSol CM using the MailBoxPoller.
- Emails can also be fetched from a data directory using the FileSystemPoller.
- All ConSol CM emails are stored in the ConSol CM database (nothing is stored in the file system).
- The MailQueuePoller retrieves the emails from the database and forwards them to the core ConSol CM system where the emails run through the email script pipeline.
- NIMH uses email scripts very similar to the ones used by Mule/ESB Mail. See section Scripts of Type Email (NIMH).
- Emails which could not be processed are stored in a separate database table and can be re-sent to the ConSol CM system. See section Management of Email Backups with NIMH.
- NIMH-specific system properties are used (they are added automatically to the system configuration during an update to version 6.9.4 and up):
- General NIMH properties
- Default mailbox properties which are used when a property is not set as a mailbox-specific property
- Mailbox-specific properties for each mailbox which has to be retrieved
- FileSystemPoller properties
- MailQueuePoller properties
The following figure provides an example of NIMH properties. Please also refer to the detailed explanation of NIMH system properties in List of System Properties by Area).

Figure 392: System properties for NIMH, 1

Figure 393: System properties for NIMH, 2
Information about system property mail.on.error
In ConSol CM versions up to 6.9.4.1, the default value for the property mail.on.error (module cmas-nimh-extension) is false.
In ConSol CM versions 6.9.4.2 and up, the default value for the property mail.on.error (module cmas-nimh-extension) is true.
The value will be automatically set to true during an update from versions 6.9.4.1 and lower to a version 6.9.4.2 and higher. Please be aware that you may have to disable these email notifications after an update in case you previously intentionally set the property value to false.
Switching from Mule/ESB Mail to NIMH
If you want to switch from Mule/ESB ("old") mode to NIMH ("new") incoming mail mode, you have to perform the following steps (please also note the info box Step-by-step guide for a switch from Mule/ESB Mail to NIMH):
- Copy the Admin Tool email scripts to new scripts, naming each new one the same, but with a Nimh prefix. See also section Scripts of Type Email (NIMH).
- AppendToTicket.groovy -> NimhAppendToTicket.groovy
- CreateTicket.groovy -> NimhCreateTicket.groovy
- IncomingMailRouting.groovy -> NimhIncomingMailRouting.groovy
- MailToClosedTicket.groovy -> NimhMailToClosedTicket.groovy
- Adapt the new Admin Tool scripts, see also section Scripts of Type Email, NIMH. There are new Groovy classes which have to be used to replace the old ones.
- Import required NIMH classes.
- Change methods according to the table in the section Scripts of Type Email, NIMH.
- Change the section in the mailRouting script for target handlers.
- Check/Set NIMH-specific system properties for mailboxes, see section above and List of System Properties by Area.
- Set this system property to activate NIMH: cmas-core-server.nimh.enabled = true
Step-by-step guide for a switch from Mule/ESB Mail to NIMH
If you have to switch your ConSol CM system from Mule/ESB Mail to NIMH, perform the following steps in the order listed here:
- Prepare the NIMH environment:
- Create the Admin Tool scripts as described in the section above.
- Adjust the system properties. The NIMH system properties will be automatically added to the system configuration during an update from a previous version to CM version 6.9.4. Only the required values have to be set. Mailbox properties are added automatically for each mailbox which is added using the Admin Tool.
- Shut down Mule/ESB Mail (stop all ESB services using the ESB Services and stop the ESB service using the CM Services. Make sure CM finishes processing emails, review email backups and re-process or delete the remaining email backups. "Old" Mule/ESB email backups will not be displayed after the switch to NIMH (but will be displayed if you switch back to Mule/ESB Mail).
- Start NIMH:
- Set the system property cmas-core-server.nimh.enabled = true.
- Start the NIMH service.
For a mapping of ESB Mail system properties to NIMH system properties, please refer to section List of System Properties by Area.
Changed behaviour for POP3 Pollers
In Mule/ESB mode with POP3, read emails were automatically deleted on the mail server. In order to achieve the same behavior with NIMH, please set the ConSol CM system property cmas-nimh, mailbox.default.task.delete.read.messages (or cmas-nimh, mailbox.YOUR_MAILBOX_NAME.task.delete.read.messages if you want to specify it per mailbox) to true.
Running NIMH in a Clustered Environment
In a cluster, NIMH can run only on one node. On that node, a system property has to be set: cmas-core-server, nimh.enabled.CLUSTER_NODE_ID = true (for example: cmas-core-server.nimh.enabled.1 = true). This property replaces the general property cmas-core-server.nimh.enabled = true.
On all other nodes, NIMH and Mule (and ESB services) have to be disabled. Furthermore, set the system property cmas-nimh, mailbox.polling.threads.mail.log.enabled = true. Without this setting there is the chance that incoming emails may be processed several times by different cluster nodes.
Email Duplication in the ConSol CM Web Client
Please see explanations on the Page Customization page at showCloneOption and appendOrReplaceOnClone.