CM/Resource Pool - Resource Relations
Introduction
A resource can have relations to other ConSol CM objects. In contrast to customer relations, no hierarchy levels are defined. All relations are simple references. A resource can have zero or more relations to the following types of ConSol CM objects:
- Ticket
E.g., an incident ticket has a ticket-resource relation to the printer which caused a problem. - Company
E.g., a company has a company-resource relation to a specific SLA. - Contact
E.g., a contact has a contact-resource-relation to the terminal server access rights. - Customer (i.e., company or contact of a customer group)
E.g., a resource has a resource-customer relation to a customer group to reflect that customers in this customer group are all potential receivers of a newsletter. - Resource
E.g., a laptop has a resource-resource relation to all connected/configured printers.

Figure 489: ConSol CM resource relation types
For a resource relation, the multiplicity (cardinality) has to be defined, i.e., for each relation, how many objects of the selected type may participate in a relation must be defined.
The following configurations are possible for the resource relation multiplicity (cardinality):
- One-to-one
Each resource can only be related to a single target object. - One-to-many
Each resource can be related to many different target objects (e.g., one laptop can have resource-resource relation to one, two, or more printers). - Many-to-one
Many resources can be related to one single target object. - Many-to-many
Many resources can be related to many different target objects.

Figure 490: ConSol CM resource relation multiplicity
Creating Resource Relations in the Data Model Using the Admin Tool
Resource relations are always defined for a resource type, e.g., for the resource type HP_Printer.
To create new resource relations or to edit resource relations, open the resource type panel in the Admin Tool (navigation group Resources, navigation item Data Models).
Please note that you cannot create or edit resource relations using the navigation item Relations Overview. This panel is only used for the display of relations and for defining the order of relations for display in the Web Client!

Figure 491: ConSol CM Admin Tool - Resources, Data Models: Creating and editing resource relations
To define a new resource relation, click the Add button and fill in the required fields in the pop-up window.

Figure 492: ConSol CM Admin Tool - Resources, Data Models: Creating a new resource relation
- Name
The technical name of the resource relation. You can localize it using the Localize button. This name will be displayed in the Web Client when a resource relation of this type has been established. For a detailed explanation of the localization mechanism, please refer to section Localization of Objects in General, Type 1. - Anonymous
If this checkbox is selected, related will be displayed as the description for the relation in the Web Client. Use this checkbox if you do not want to have a description displayed. (Since you cannot leave the name field empty, the only other way would be to display the technical name of the relation.) - Multiplicity
Select the multiplicity (cardinality) for the relation (see the explanation of cardinality above). - Reportable
If this checkbox is checked, the relations of this type will be transferred to the DWH. - Only configurable via workflow
If this checkbox is checked, the relation can only be set / removed using workflow scripts. The relation will not be available in the respective menus in the Web Client. - Note field is available
If this checkbox is checked, a note field will be displayed for each resource when a new resource relation is established (see the following two figures)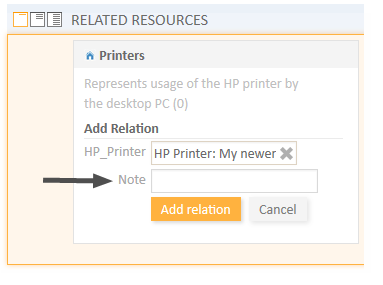
Figure 493: ConSol CM Web Client - Establishing a resource-resource relation with Note field
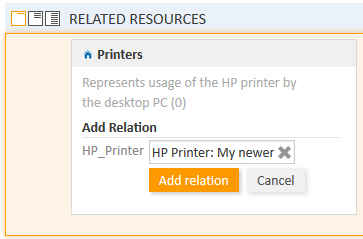
Figure 494: ConSol CM Web Client - Establishing a resource-resource relation without Note field
- Source
- Type
The current resource. The value is pre-selected and cannot be modified. - Description
The description of the relation. It will be displayed in the Web Client as a header for any relation of this type on the source side. The description can be localized using the Localize button.For a detailed explanation of the localization mechanism, please refer to section Localization of Objects in General, Type 1.
- Type
- Target
- Type
The object type of the target of this relation. For an explanation, please see the section about relation types. - Assignment table
You can assign objects of the selected type to the relation here, i.e., the resource relation will only be available for these objects. Depending on the selected target object type, there will be different objects which can be selected in the assignment table:- Target type Resource: assigned/available resource types
- Target type Customer: assigned/available customer groups
- Target type Contact: assigned/available customer groups
- Target type Company: assigned/available customer groups
- Target type Ticket: assigned/available queues
- Description
The description of the relation. It will be displayed in the Web Client as a header for any relation of this type on the target side. The description can be localized using the Localize button.
- Type


Relations Overview
The navigation item Relations Overview provides a list of all defined relations and provides the possibility to define the display order of the relations in the Web Client.

Figure 495: ConSol CM Admin Tool - Resources, Relations Overview
Use the filter (drop-down menu) in the top row to select the target object type (1). Only relations with this target object type will be displayed in the list. Please refer to the section about relation types for details about possible target object types.
Please note the filter above the list. You have to select one resource relation type:
- Resource
- Customer
- Contact
- Company
- Ticket
Only relations of this type will be displayed in the list.
Two functions are available in the Relations Overview:
- Display relation details
Select a relation. Its details will be displayed on the right-hand side in read-only mode (2). - Modify display order
Select a relation and use the Up and Down arrows to move it up/down within the list. This will define the position of the relation in the list when more than one relation is available for selection in the Web Client (3).
Creating Resource Relations Using the Web Client
Resource relations can be established on several pages in the Web Client, depending on the source object.
- Ticket-to-X relations can be created on the ticket page.
- Resource-to-X relations can be created on the resource page.
- Contact-to-X relations can be created on the contact page.
- Company-to-X relations can be created on the company page.
For a short explanation of working with resource relations, see section A Short Introduction to CM/Resource Pool Functionality in the Web Client. A detailed explanation of all resource-related Web Client functions is provided in the ConSol CM User Manual.
Configuration of Resource Relations in the Web Client
Some parameters related to the display mode of resource relations can be configured using Page Customization. These are:
- The default limit for the number of resource relations before the table filter control elements are displayed.
- The sorting strategy for resource relations.
For details about parameters affecting customer (unit) pages, please see section UnitResourceRelationof the Page Customization chapter.
For details about parameters affecting the resource page, please see section TicketRelation of the Page Customization chapter.
For details about parameters affecting the ticket page, see section resourceRelations of the Page Customization chapter.