The Ticket List
About the Ticket List
The ticket list shows you certain tickets at a glance. It serves as a to-do list for you and your team. You can select a view to determine which tickets should be included in the ticket list. In addition to the list form you can also display the tickets from the ticket list as a grid in the main working area.
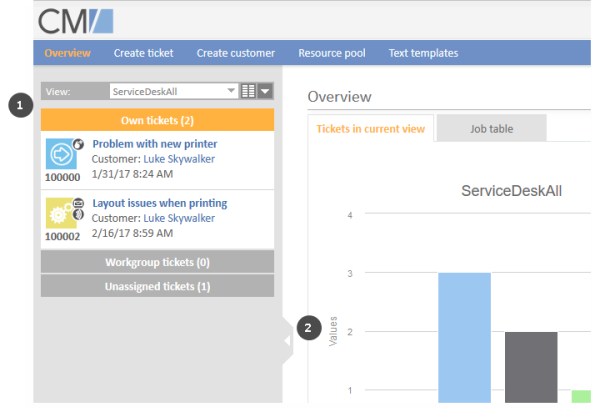
The ticket list is located at the left side of the screen (1). It can be collapsed using the little arrow (2).
Figure 47: Position of the ticket list in the Web Client
The ticket list does not contain all the tickets but a subset including only tickets which are part of the selected view and for which the current engineer has at least read permissions. These permissions are granted for queues, not for individual tickets. Therefore it can happen that an engineer cannot see a ticket anymore when it is moved to another queue. Please see Which Tickets are Visible to You? for further information.
The Ticket List in Detail
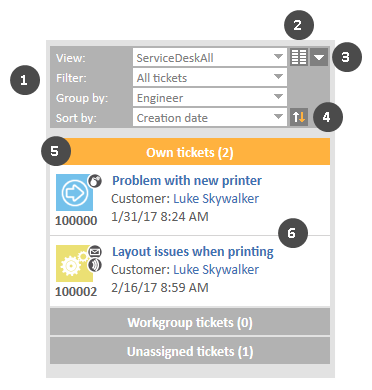
The following figure shows an example to illustrate the features of the ticket list.
Figure 48: The ticket list
If you cannot see all drop-down menus (1), click the Advanced settings button (3). The drop-down menus Filter, Grouping, and Sorting will then be visible.
- (1) Drop-down menus to choose view, filter, grouping and sorting
- (2) Show as grid button
Shows the tickets matching the criteria chosen in the drop-down menus as a grid in the main working area. - (3) Advanced settings button
Expands (and collapses) the view settings panel in order to display the drop-down menus Filter, Group by, Sort by, and the Sorting order button. - (4) Sorting order button
Switches the sorting between ascending and descending. - (5) Groups for the displayed tickets, see Grouping.
- (6) Tickets matching the currently chosen view and filter. The information displayed for each ticket depends on the selected view and grouping. You usually see the ticket customer and its creation date.
View
Views limit the tickets which are shown in the ticket list to those tickets matching specific view criteria. Most of the criteria are defined by your administrator during the creation of the view.
The following is always configured for a view:
- Queue
The view contains tickets from one or several queues. - Scope
The view contains tickets from one or several scopes.
In addition, a view can limit the tickets to those tickets which contain certain values in a specific drop-down field. The administrator has two options to define the values of the drop-down field for the view:
- Static criterion
The value or values are preset. You cannot change them. For example, your CM administrator might configure a view which shows only tickets with the priority high. - Dynamic criterion
You can change the values in your user profile (see Changing View Criteria in the User Profile). For example, your CM administrator can configure a view which allows you to choose the priority (high, normal, low) yourself.
Examples for views might be Active tickets, Active tickets with high priority, Inactive tickets, All tickets in the Sales queue.
Please bear in mind that your ticket list only contains the tickets which you are allowed to see according to your permissions.
Changing View Criteria in the User Profile
Please proceed as follows to change the dynamic view criteria:
- Open your user profile and locate the section View criteria under General Settings.
- Select the desired values by ticking the respective checkboxes in the drop-down list under View criteria. You can choose one or several values for each criterion. Depending on the individual configuration of your CM system, there might be several drop-down lists containing values for different fields.
If there are view criteria available in your user profile and you do not want to limit the display of tickets for certain views, you need to activate all available checkboxes for the view criteria. If you deactivate all checkboxes, no tickets are shown in the views that are affected by the view criteria.
The following rules always apply:
- deactivated checkbox = tickets matching this criterion are not displayed
- activated checkbox = tickets with the criterion are displayed
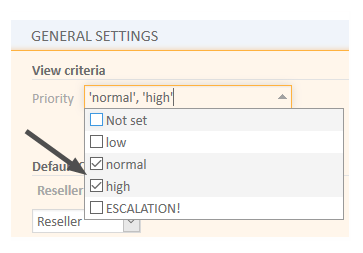
For example, you can determine that you want to see only tickets with normal or high priority.
Figure 49: View criteria in user profile
Each view can only be affected by one view criterion. This means that the different view criteria do not interfere with each other. Also, the view criterion only affects the views which your CM administrator configured to be affected by this criterion. Therefore, it is possible that some views still include tickets which do not match the value selected for a view criterion.
A criterion in italics means that the criterion is not applied anymore, e.g. because it belongs to a view which was removed from the user.
Filter
Filters limit the tickets which are displayed in the ticket list according to the selected view. Select the desired filter from the Filter drop-down list. This way you can determine which tickets should be displayed in the ticket list.
The following filter criteria are available:
- All tickets (no filter)
Tickets are not filtered. - Own tickets
The ticket list contains only tickets assigned to you. - Own and unassigned tickets
The ticket list contains only tickets assigned to you and tickets without an assigned engineer. - Own and referenced tickets
The ticket list contains only tickets assigned to you and tickets for which you have been added as an additional engineer. - Unassigned tickets
The ticket list contains only tickets without an assigned engineer.
Grouping
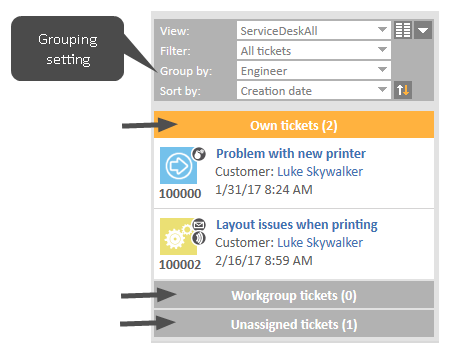
The ticket list can be divided into several groups. You can choose which groups you want to display using the grouping features. In this case, you do not change which tickets are displayed in the ticket list, but rather how tickets are displayed in the ticket list. The number of groups depends on the chosen grouping option. For example, the grouping by Engineer leads to three groups (Own tickets, Workgroup tickets, Unassigned tickets). Only one group can be opened at a time (by clicking on the group name), the other groups are collapsed automatically. The number in brackets next to the group's name states the number of tickets contained in this group.
Figure 50: Selector for the grouping
The chosen grouping applies only to the currently chosen view. This means that you can choose a grouping for each view. The Web Client saves this setting.
The following grouping options are available in every CM system:
- No grouping
All tickets are shown in one group named All tickets - Engineer
Tickets are divided into three groups. The names of the groups depend on your individual CM configuration, but the groups always serve the same purpose:- Tickets assigned to the currently logged in engineer (e.g., Own tickets)
- Tickets assigned to any other engineer but the currently logged in engineer (e.g., Workgroup tickets)
- Tickets not assigned to any engineer (e.g., Unassigned)
If you use a filter, the drop-down menu Group by no longer shows the grouping option Engineer, since this would lead to empty groups. If you are missing this grouping option, please check if you have chosen a filter. You will see the grouping option Engineer again after you have chosen All tickets from the drop-down menu Filter.
- Queue
Tickets are divided into as many groups as there are queues in your CM system, but you can only see the groups for queues for which you have at least read permission.
Whether there are further grouping options depends on the individual configuration of your CM system.
Sorting
The Sort by drop-down menu allows you to select the sorting criterion and the order of the tickets within each group of the ticket list. Therefore, you do not change which tickets are displayed in the ticket list, but rather how tickets are displayed in the ticket list.
You can adjust the sorting as follows:
- Select a value from the Sort by drop-down list to determine the sorting criterion. The following sorting options are available in every CM system:
- Scope
Sorts the tickets within the groups by the logical order of the scopes they are currently in. The logical order of the scopes is the order of the process steps in your business processes, e.g., Open Ticket - Ticket in progress - Query the technical department - Give solution to customer - Close Ticket. - Creation date
Sorts the tickets within the groups by their creation date.
- Scope
- Click the Sorting order button to determine the order of the chosen sorting (ascending or descending).
Displaying the Ticket List as a Grid
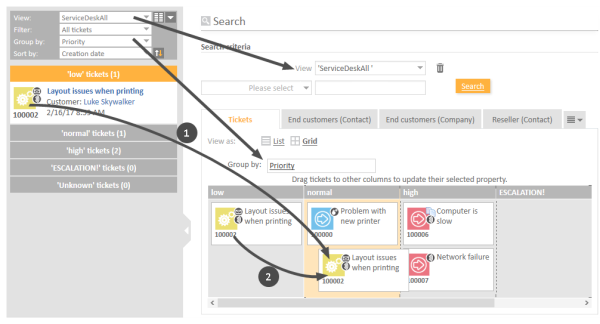
You can display the ticket list as a grid by clicking the Show as grid button. The selected view is used as a search criterion, and the selected grouping criterion is used in the Group by field to determine the columns of the grid.
Figure 51: Displaying the ticket list as a grid
You can change the value of the ticket's grouping criterion (here Priority) in two ways using drag-and-drop:
- (1) Drag-and-drop the ticket from the ticket list to the column with the desired target value on the grid.
- (2) Drag-and drop the ticket from one column of the grid to the column with the desired target value.
In the above example, the ticket's priority is about to be changed from low to normal.
You can only drag-and-drop tickets if you have the required permissions.
Additionally, you can open a ticket from the display in the grid.
