User profile
This chapter describes the features of the user profile and the related actions.
Accessing the user profile
The user profile contains your personal settings, representations, and time bookings. You access the user profile by clicking the name of the currently logged in user (above the main menu, next to Logged in):

Figure 39: Link to the user profile
Structure of the user profile
The user profile can have up to five sections:
- Password change
Change the password of your user account (not visible in case you log in via LDAP or Single Sign-On). - Representation
Set up representations. - General settings
Set the view criteria, default customer group, default process, and enable or disable CM/Doc. - Time booking
Add time bookings and view your time booking report. - Personal email addresses
Delete stored email addresses. - Downloads
Download the installers for CM/Phone and CM/Doc. - Active sessions
End one’s own active sessions.
Password change
The Password change section allows you to change your password. For security reasons the password is displayed as dots.
Changing the password
Please proceed as follows to change your password:
- Enter your current password in the field Old Password.
- Enter your new password in the two fields below.
- Click Change password.
If you log in to the Web Client via LDAP or Single Sign-On, you cannot change your password in the Web Client. In this case, the Password change section is not displayed.
Representation
About representations
Representations are temporary replacements. You can choose a colleague who should represent you, and, in some cases, you can also define yourself as a representation for a colleague. This can be useful for example during the time of your vacation. Representations have the following effects:
-
The representing user can receive a copy of the emails which are sent from the CM system to the represented user’s email address.
Please note that there are two different scenarios for sending emails and that the CM system behavior concerning sending representation mails might differ for the two scenarios. In both scenarios, it depends on the specific configuration of the CM system which users receive a copy of the email.
A user writes an email using the rich text editor
The default behavior is that the representing user does not receive a copy of the email.
If the system is configured to forward this kind of emails, the representation functionality checks if a representation rule is active for the respective email address. If a representation rule is active for a certain email address, an email sent from the rich text editor is sent to this email address as well as to the representing user of the person with this email address. Please consider this if people are registered both as persons and users in your system!
An email is sent automatically from the CM system
It might be implemented that the representing user of the user with the respective email address gets a copy, but this is not mandatory.
Please ask your ConSol CM administrator about the specific behavior of your CM system!
- Another option is added to the case list enabling the representing user to view the cases of the represented user in the case list as if they were his cases. But the representing user can still only see the cases which are accessible to him due to his permissions. If the representing user has no read permissions for a certain process, he still cannot see those cases, even if he is representing a user with read permissions for this process (see Permissions). This is why only users with similar roles (i.e., similar permissions) should be representing each other.
Representations do not have the following effects:
- When you are representing someone, you do not get his views in addition to your own views. This means that you still have the same number of views, but you can change these views in order to look at them through the eyes of the user you are representing (e.g., seeing the cases of the represented user in the case list group Own Cases).
- When you are representing someone, you do not get the permissions of the user you are representing in addition to your own permissions.
- When you edit cases, contacts, or resources, your changes are always saved in the history under your own name. Even when you are representing someone, you are still acting under your own name, you do not take on the name of the represented user.
When a new representation is set up or removed, both affected users receive an email notification informing them about the representation.
Preconditions for setting up a representation
- In order to set yourself up as a representation for a colleague, you need the permission Configure representation. Your roles, assigned to you by your CM administrator, determine if you have got this permission.
- Every user can set up a colleague as a representation for himself. You can only choose users with whom you have at least one role in common for this purpose.
Representing a colleague
If someone else set you as his representation, you will see a message informing you about this fact after logging in to the Web Client. The message contains a link to your user profile page where you can end the representation.
If you have the permission Configure representation, you can set up yourself as a representation for a colleague. Choose the user who you want to represent from the drop-down list Colleagues represented by me. To end the representation, click the little arrow next to the name of the user you are representing and click Cancel the representation. In case you represent multiple users, you can end all representations by clicking Cancel all.
Your name is displayed under Colleagues representing me on the user profile page of the user you chose. This user can end the representation any time in his user profile.
When you are representing a colleague, your case list shows the additional drop-down menu Assignee. If you choose the user who you are representing from this menu, the representation icon appears next to the drop-down menu View. The icon indicates that you are currently looking at this view from the other user’s perspective.
Example:
If Susan ServiceDesk represents Sarah ServiceDesk and chooses Sarah ServiceDesk from the drop-down menu Assignee (after clicking the Advanced settings button), Susan ServiceDesk sees the currently chosen view as if she were Sarah ServiceDesk. For example, in the case list group Own cases she now sees the cases that are assigned to Sarah ServiceDesk. When Susan ServiceDesk chooses herself from the drop-down menu Assignee, she sees her own cases (cases which are assigned to her) in the case list group Own cases.

Figure 40: Susan ServiceDesk - Viewing the cases of Sarah ServiceDesk
Being represented by a colleague
Every user can set up a representation for himself. You do not need special permissions in order to set up a representation for yourself. Just choose the user who should represent you from the drop-down list Colleagues representing me. To end the representation, click the little arrow next to the name of the user representing you and click Cancel the representation. In case there are multiple users representing you, you can end all representations by clicking Cancel all.
Your name is displayed under Colleagues represented by me on the user profile page of the user you chose for representing you. The representing user can end the representation any time in his user profile.
If another user represents you, you see a message informing you about the representation after logging in to the Web Client. The message contains a link to your user profile page where you can end the representation.

Figure 41: Sarah ServiceDesk - Notification that she is currently represented by a colleague
General settings
The General settings section includes settings regarding View criteria, Default customer group, Default process, and Document generation via CM/Doc.
View criteria
The view criteria allow you to configure whether one or more views should be limited by certain criteria. This means that the case list will show only cases that match the defined view criteria in these views, please see Changing view criteria for further information.
Default customer group
The default customer group determines which customer group tab is initially selected when creating or choosing a contact. You can still select the other customer groups though. This is the main difference between setting the default customer group and choosing a customer group from the customer group filter, which hides the other customer groups.
To set a default customer group, choose the desired customer group from the drop-down list Default Customer Group. If you do not want to set a default customer group, select Choose One.
Default process
The default process determines which process is preselected when you create a new case. You need to have Create Case permissions for more than one process to be able to choose a default process. If you do not have this permission for multiple processes, there will be no drop-down menu for you to choose from, but rather the process for which you have Create Case permissions will be displayed in this section. You can choose the desired process from the drop-down list Default process. If you do not want to set a default process, select Choose One.
Document generation via CM/Doc
If CM/Doc is enabled in your CM system, you can enable or disable CM/Doc in your user profile. If you select Enabled in this section, the Document tab is displayed in the case history section. If you select Disabled, the Document tab is hidden and you cannot use CM/Doc.
Time booking
Whether the Time booking section is shown in your Web Client depends on the individual configuration of your CM system.
The Time booking section consists of two parts:
- Add Time Booking (1)
Enables you to add time bookings. - Time booking report (2)
Shows your time bookings.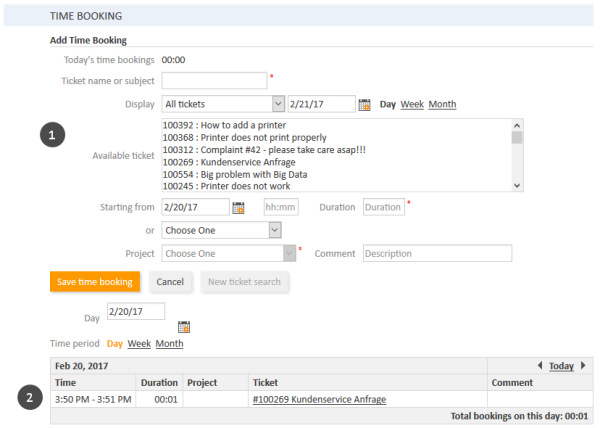
Figure 42: Time booking and time booking report in the user profile

About time bookings
With time booking, working hours can be booked and reports of those working hours help gain an overview of time spent on certain tasks, e.g. on a certain project.
There are two types of time bookings:
- Manual time bookings
You can perform manual time bookings. With manual time bookings, working hours are always booked on projects, i.e. for each time you book on a case you have to select the project the time should be booked on.
The bookings are listed in the report on the user profile page.To be able to book time on projects, the following preconditions have to be met:
- Your CM administrator created the project in your CM system and assigned it to at least one process.
- The case you want to book time to is currently in a process to which the project is assigned.
There are two locations where you can add a time booking manually:- The Time booking section in the user profile: Adding a time booking
- The Time booking tab in the History section of the case: Adding a time booking within a case
Time booking in the user profile and time booking within cases can be disabled separately by your CM administrator. Therefore, it is possible that time booking in your Web Client is not possible in one or both of the locations.
- Automatic time bookings
Automatic time booking can be activated in a CM system by the CM administrator. If it is activated, times are booked automatically on cases (not on projects!) when you work on them. You do not have to book the working hours yourself.
The bookings are listed in the report on the user profile page.
Adding a time booking
To enter a new time booking click the Add button in the Time booking section. Now, you have to select the case which you want to book the time on. There are two ways to do so:
-
Select a case in the Case name or subject field. Start typing the case number or subject and choose one of the suggestions provided by the Autocomplete Search.
Only cases on which you can book time due to your permissions are displayed. If a case changed to another process after you worked on it and you lack permissions for this new process, the case is not displayed.
If you want to select another case, you have to click the New case search button first in order to empty the field.
-
Select a case from the Available cases list below. In the Display field, you can choose to see:
- All cases
Cases you worked on and cases assigned to you. - Cases worked on
Cases you worked on during the time frame defined by the date you pick in the date picker and the period you choose (Day, Week, or Month containing the date). In this case "worked on" means that you have carried out one of the following actions for the case: added a comment, entered or changed data, executed a workflow activity, added a time booking, added or removed an additional assignee, sent an email to or from the case. - Currently assigned cases
Cases to which you are assigned as the case assignee or an additional assignee.
The case selection might show you cases which you cannot book time on, e.g., because the case you worked on has been moved to another process for which you lack permissions. If you do not have permissions to book time on this case, you will get a message in the Web Client and your time booking will not be saved.
- All cases
The case is displayed in the Case name or subject field.
Now you have to fill out the duration of the time booking. There are two ways to do so:
- Enter the duration manually:
Select the date from the Starting from field, enter the starting time (optional), and enter the duration. - Plain numbers are automatically interpreted as minutes (e.g., 20 is interpreted as 20 minutes and 120 as 2 hours).
- Minutes can also be indicated by m or min (e.g., 20 m or 20 min).
- Hours are indicated by h (e.g., 2 h).
- The format 01:05 (one hour and five minutes) or 00:25 (25 minutes) is also possible.
- Combinations of hours and minutes (e.g., 2 h 25 min is not possible).
- Decimal numbers or fractions are not possible (e.g., 1,5 h or 1.5 h is not possible).
- Choose an action:
Select the action from the or field (below the Starting from field). The menu might show you, for example, the duration since you logged in (action Login) or since you added the last time booking (action Last booking). The date, time, and duration fields are filled out automatically with the respective time period. - Now, you have to choose a project from the drop-down list Project. You can enter a comment (optional).
Data entry formats for the field Duration
Proper data entry formats for the field Duration:
Improper data entry formats for the field Duration:
If you cannot see the drop-down menu for action selection, it has been deactivated by your CM administrator. In this case, you need to enter the starting time and duration manually.
It is not possible to change or delete a submitted time booking, but you can correct an incorrect time booking by a correction booking. To do so, you create a normal time booking and add a - (minus) in front of the duration of the booking. The correction booking subtracts the booked amount of time from the overall time booked on the regarding day.
About the time booking report
The time booking report shows you all time bookings you added on your user profile or within cases. You can select the day using the date picker and the time period (Day, Week, or Month). If you display the day, you see the details of each booking (time, duration, project, case, comment) and the sum of the bookings. In the week and month view, you see the sum of the bookings of the week or month containing the day picked with the date picker.
When you click on a date in the month or week view, you immediately jump to the Day mode for this day and see all the details of this date's bookings.
Personal email addresses
The email addresses which you manually introduced in the email editor, i.e. email addresses which do not belong to contacts or users but to other people who you sent emails using ConSol CM are stored. They are displayed in the suggestions when you select the recipients of an email in the email editor, see Emails.
You can remove email addresses which are not needed anymore from the suggestions. To do so, expand the section and click the X icon of the entry which you want to remove.
Downloads
The Downloads section includes the installers for the ConSol CM add-ons CM/Doc (see Document templates (CM/Doc)) and CM/Phone. You can download the desired installer by clicking the name of the add-on in the Download column. The Description column shows a short description of the add-on.
The installers are available for Windows operating systems.
Before installing a new CM/Phone version, you need to manually uninstall the previous version.
Active sessions
The Active sessions section shows a list of all your open sessions, including your current session. Normally, only one session should be displayed in the list. Nevertheless, it can happen that you have several open sessions, for example if you accidentally close your browser while working with the Web Client, or if you log in to the Web Client in more than one browser. You consume one license for each open session.
You can end the other active sessions by clicking the X icon in the row of the respective session, or close all active sessions except for the current one by clicking the End other Web Client sessions button below the table.