Contact-contact relations
Introduction
ConSol CM provides comprehensive CRM (Contact Relationship Management) functionalities which allow you to create links between your contacts. These links are called relations and they can be established between contacts of the same customer group and between contacts of different customer groups. This way you can structure your contact base in ConSol CM to better reflect your real contacts.
Examples for contact-contact relations (for greater readability called contact relations in this section) are:
- You want to map your contact's organizational chart, so you introduce directional relations (supervisor of and supervised by) between his persons.
- You have two customer groups (resellers and end contacts) and you want to reflect which reseller sells products to which end contacts. To achieve this, you create directional relations (sells products to and buys products from) between contacts from the customer group Reseller and contacts from the customer group End contacts.
The relations provide additional information about the contact and enable you to quickly access the pages of the related contacts. You can create relations based on the relation models which are configured in your CM system. The following is defined for each relation model:
- The relation type determines whether the relation is hierarchical (directional relation) or on the same level (reference relation).
- The customer group which the contact has to belong to.
- The level determines the type of contact used in the relation. This can be:
- Company
- Person
- Any (either a person or a company)
- Whether the relation is editable, i.e., whether it can be added, edited, and deleted in the Web Client.
Display of contact relations
The contact relations are displayed in the section for related contacts of the contact page. There is a table for each relation model. The heading states the name of the relation model, the target customer group, and the type of contact, which can be either company, or person, or any (1). If no name has been configured for the relation, Related is displayed instead of the relation name.
The table contains the relations which were created for this relation model. You can configure the displayed column using the tool icon (2). The table usually contains a link to open the contact page (3), a link to edit the note of the relation (4) and an icon to delete the relation (5).
You can add a relation by clicking the Add link (6).
Figure 101: Display of available contact relations
You can also show a relation graph in this section.
If the type of contact is any, i.e., either a company or a person, there are two tabs: one for relations to persons and one for relations to companies.
Figure 102: Tabs for contact relations
The relations are displayed on the contact pages of both affected contacts. Depending on the relation type, the name may be different on each side:
- Reference relations
The tables on both contact pages have the same name.
Example: A reference relation between two contacts could be Partner. Both contacts are on the same level and the relations table has the same heading on both contact pages (see example above). - Directional relations
The tables have different names on each contact page.
Example: A directional relation between two persons could be Buyer and SalesRep. One contact represents the purchaser of goods and the other contact is the sales representative. The headings of the relations tables reflect this, so you can see the role of each contact (see example below).
Configuring the columns
You can resize the table columns by dragging each column to the desired width.
Open the context menu next to the wheel icon to configure the table columns. The default columns (Person/Company, Date, Note, Actions) cannot be removed, but you can add additional columns by entering the column name and selecting one of the suggestions from the Autocomplete Search. You can remove additional columns by clicking the cross next to their name.
Adding a contact relation
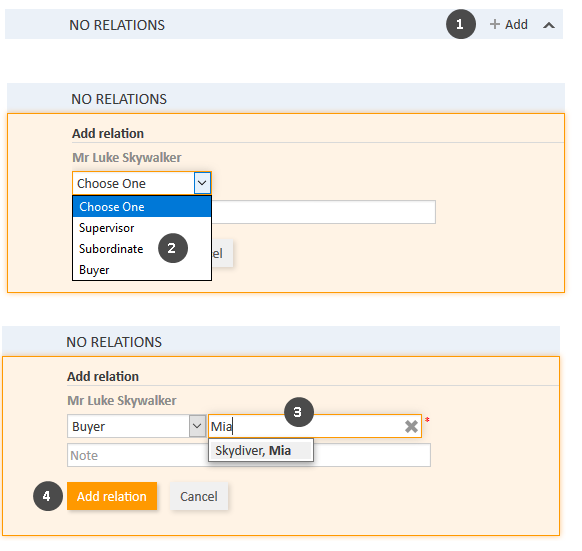
Please proceed as follows to add a new contact relation.
Figure 103: Adding a contact relation
- Click Add in the header of the section for related contacts of the desired contact page (in this example, Luke Skywalker).
- Select the type of relation from the drop-down list.
- Select the target contact using the Autocomplete Search in the field Unassigned. Optionally, you can enter a note in the field below.
- Click Add relation to create the relation to the selected contact. The relation is automatically created for both affected contacts, i.e., the current contact and the selected target contact.
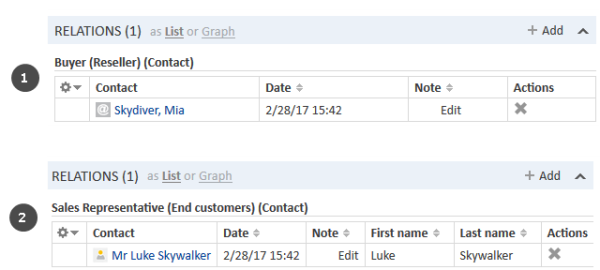
The following figures show the resulting relation:
- On the contact page of Luke Skywalker, you can see the relation of type Buyer to the person Mia Skydiver from the customer group Reseller (1).
- On the contact page of Mia Skydiver, you can see the relation of type Sales Representative to the person Luke Skywalker from the customer group End contacts (2).
Figure 104: Contact relation added
The action of adding or deleting a relation can trigger additional changes, e.g., the value of a data field can be updated. This depends on the individual configuration of your CM system.
Editing the note of a contact relation
Click Edit in the Note column of the relation to add or edit its note. The note is optional.
Switching to the related contact
You can switch to the contact page of the related contact by clicking his name in the column named Person or Company. If you click another column, a preview window is opened where you can choose to open the contact page.
Deleting a contact relation
Click the cross in the Actions column to delete the relation. Then, click OK in the red field to confirm the removal. Note that the relation is also removed from the page of the related contact. You cannot undo the removal once you confirmed it.
The action of adding or deleting a relation can trigger additional changes, e.g., the value of a data field can be updated. This depends on the individual configuration of your CM system.


