Attachments
Attachments are files that are attached to a case. You can find a list of all attachments in the attachment section below the history section.
Figure 74: Attachment list in a case
The list of attachments provides the following information. You can filter the list using the drop-down boxes and text fields in the header.
- Class
Indicates the class of text applied to the attachment. You can click the icon of the current class of text to select a new one (1). - File type
Indicates the file type of the attachment. - Name
Indicates the file name of the attachment. Click the file name to download the corresponding attachment (2). - Description
Indicates the description provided when the attachment was added, if any. - Date
Indicates the date when the attachment was added. - Added by
Indicates who added the attachment. This can be either a user (who uploaded the file) or a technical user (in case the file was attached to an incoming email). - Action
Provides links to the available actions. These are:- Apply filters
Filters the list according to your selections in the header. - Clear filters
Removes the filter, i.e., displays all entries. - Show in history
Jumps to the history entry of the attachment, where you can perform additional actions. This option is only visible if the respective history entry is displayed based on the selected visibility setting.
- Apply filters
Adding an attachment
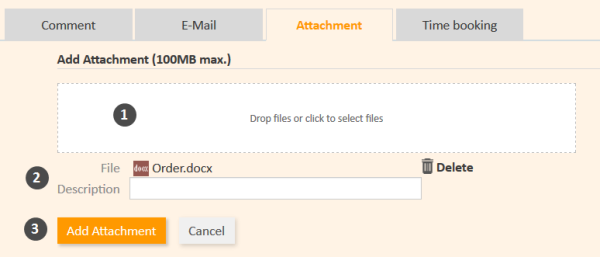
To add an attachment, click the Attachment link in the header of the history section. The background of the history section turns yellow to indicate that it is in edit mode. If the section is already in edit mode, you can also add an attachment by clicking the Attachment tab.
Figure 75: Adding an attachment
Please proceed as follows to add an attachment:
- Specify the files to be uploaded by either:
- Dragging and dropping them into the white area.
- Clicking into the white area to open a file browser dialogue and selecting the files.
The maximum size which is allowed for files is displayed above the white area.
- The selected files are displayed in a list below the white area. Optionally, you can add a description in the Description field. Click the Delete link to remove a file from the list.
- Click the Add Attachment button to upload the files to the case.
Depending on the configuration of your CM system, only specific file types might be allowed as attachments. If you try to upload a non-allowed file type, a corresponding message will be displayed next to the upload field.
The attachments are then displayed in the attachment section and in the corresponding history entry (only shown when Extended or Detail is selected as visibility level).
Once an attachment has been added to a case, you can use it in an email.
Working with attachments
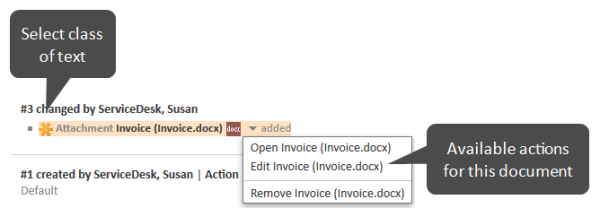
The history section contains both manually added attachments and attachments from incoming emails. You can perform additional actions for these attachments.
Figure 76: Actions for attachments
- Select class of text
Click the class of text icon to select another class of text. - Open
Downloads the attachment. - Remove
Removes the attachment (may be deactivated for attachments from incoming emails). - Edit (only CM/Doc)
Downloads the attachment and opens it. You can edit the file. The edited file is uploaded automatically once you click Save in Microsoft Word or OpenOffice.
You need the necessary applications installed on your computer to be able to open attachments, e.g., Adobe Reader for PDF documents or Microsoft Word for DOCX documents.
It depends on the individual configuration of your CM system if CM/Doc is available.


