Case-resource relations
Introduction
Case-resource relations (for greater readability called resource relations in this section) can be used to link cases to resources. For example, you can link an incident case to the printer which caused the problem or a service case to the contact's SLA. Resource relations are displayed in the section for related resources of the case. If no resource relations are set for the case, the section is collapsed. You can expand it to add a relation by clicking the arrow icon in the section header. If there is at least one relation, the Show filter is displayed, where you can choose to see all possible relations (All relations) or only the relations which are set for the case (Only assigned relations).
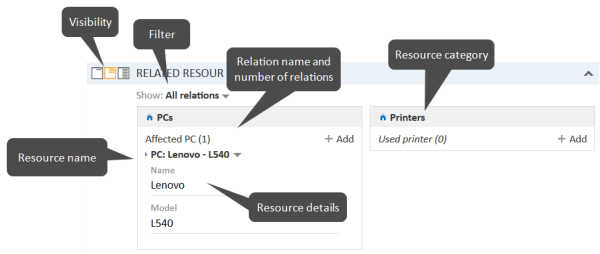
The layout depends on the selected visibility setting. The following figure shows the section for related resources with the visibility setting Extended. Each resource category is displayed in a box which contains the relations configured for this resource category. The resources are arranged below the name of the relation. Click the relation name to display the related resources. You can display further details about the resource by clicking the resource name. Click the small arrow button next to the resource name to open the context menu of the resource which allows you to delete the relation and jump to the resource page.
Figure 85: Resource relations
You can also show a relation graph in this section.
You can create relations based on the relation models which are configured in your CM system. The following is defined for each relation model:
- The resource type, i.e., which kind of resources can be linked to the case.
- The process which the cases have to be in.
- The cardinality of the relation, i.e., if you can link several resources of the same resource type to the case, and if the same resource can be linked to several cases.
- The availability of the Note field.
Resource relations are only available if your CM system uses CM/Resource Pool. The available relations and their configuration depend on the individual configuration of your CM system.
Adding a resource relation
Please proceed as follows to add a new resource relation.
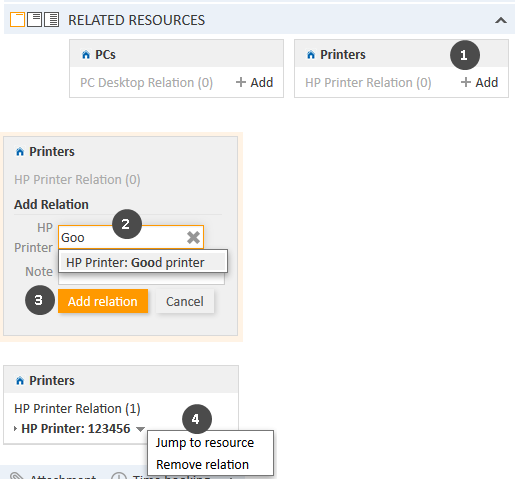
Figure 86: Adding a resource relation
- Click the Add link next to the required relation name.
- Start typing the name of the resource and select the desired resource from the suggestions of the Autocomplete Search. Optionally, you can enter a note.
- Click Add relation.
- The resource is now linked to the case. You can click the link with the resource name to display further details about the resource. The amount of detail varies depending on the selected visibility level.
Editing the note of a resource relation
Click Edit next to Note to edit the relation's note. The Edit link is only displayed if you have selected the visibility level Detail (see visibility level).
Switching to the related resource
You can view the corresponding resource page by clicking Jump to resource in the context menu.
Deleting a resource relation
Click Remove relation in the context menu to delete the relation. Then, click Yes to confirm the removal of the relation. Note that the relation is also removed from the page of the related resource. You cannot undo the removal once you confirmed it.

