Taking advantage of user interface features
This section describes features of the user interface which can increase your efficiency when working with the ConSol CM Web Client.
Basics
Favorites
You can save cases, contacts, resources and detail searches in the Favorites box on the right by clicking the Save as favorite button in the object header. Alternatively, you can drag the respective icon to the box. For detail searches, you need to enter a name. You can rearrange the items in the favorites using drag-and-drop.
The favorites are saved independently of your session: you can still access them after logging out and logging in again.
Workspace
The Workspace box on the right serves as a temporary storage for cases, contacts and resources which you have modified without saving the changes. This either happens automatically when you switch to another object or click the browser’s back button without saving the changes of the current object, or manually because you drag an item to the workspace or you click the Save draft to workspace button when creating an object. The content of the workspace is deleted when your session ends.
Advanced
Case list settings
You can modify the case list in the following ways:
-
View: Choose a view to determine which cases are displayed.
-
Filter: Limit the displayed cases according to their assignment status, e.g. only display cases assigned to me.
-
Grouping: Decide which groups are available, e.g. groups for the assignment status or process. On some systems, empty groups are hidden.
-
Sorting: Determine how the cases are sorted within each group, e.g. by creation or modification date or scope.
The view always determines which processes and scopes the cases belong to. In addition, it can show cases which contain certain values in specific data fields. If a view includes dynamic filter properties, you can select these values in your user profile, in the section My view filter properties under General settings. Select the desired values by ticking the respective checkboxes for each field. All the cases which contain the selected values are displayed in the view.
If a view has a dynamic filter property and you do not select any value, the view is empty.
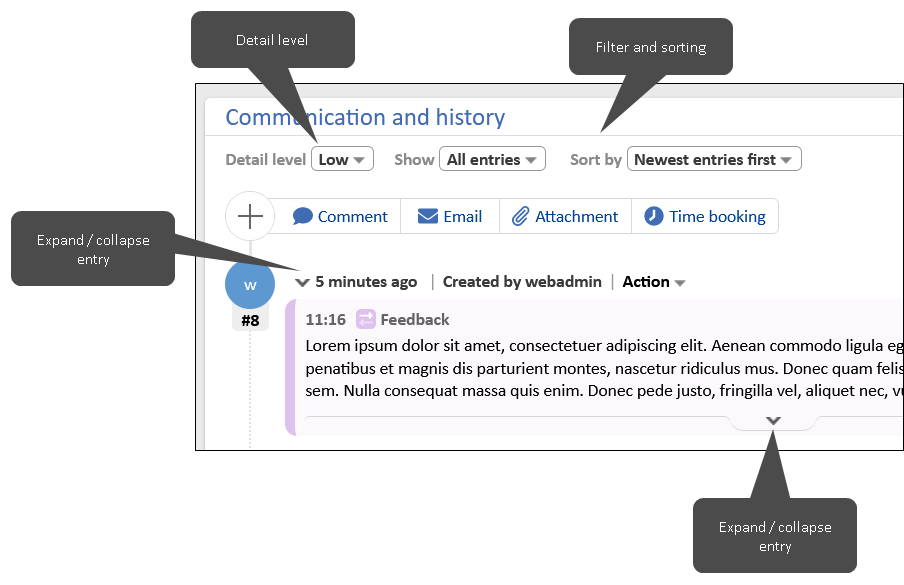
Case history settings
Below the header of the case history, you can choose which kind of entries you want to see. There are three options:
-
All entries: Display all changes made to the case, i.e. communication entries and all the other entries, such as changes to the case data or the execution of workflow activities.
-
Only emails and comments: Display only emails, comments and attachments.
-
Text class: Display only emails and comments with a specific text class
You can sort the entries either by date (options Newest entries first or Oldest entries first) or by alphabetically by the user who originated them (option Assignee (A-Z)).
The detail level determines how much details are displayed for each entry. Depending on the system configuration, some history entries might be folded or cut off. You can display the complete entry by unfolding it.
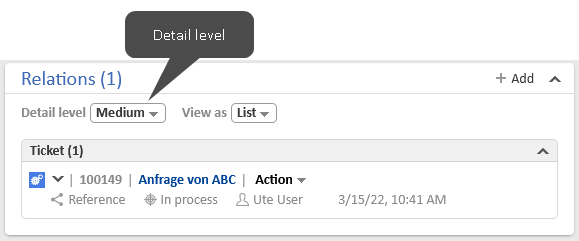
Object sections
Cases, contacts and resources are structured in several sections. You can expand and collapse these sections using the arrow button in the right part of the section header.
For some sections, the level of detail can be selected in the left part of the section header.
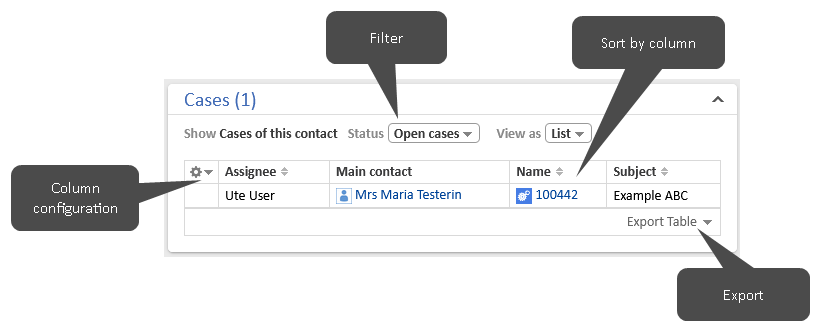
Tables
Tables are used in several places of the Web Client, for example to display the results of a detail search or the cases of a contact. You can adapt tables in several ways.
-
Configure the table columns: Click the little arrow next to the wheel icon. To remove a column, click the cross next to the column name. To add new columns, click in the white space next to the names of the displayed columns to see a list of all available columns, or start typing the column name, and click one of the suggested columns. You can rearrange the columns within the table by dragging-and-dropping the column to the desired position.
-
Sort the table: Click the header of the column which you want to use for sorting.
-
Select the number of entries per page: If the table exceeds a predefined number of entries, it is split among several pages. You can select the number of entries per page at the bottom of the table and click the arrow buttons and page numbers to navigate the table.
-
Filter the table: If filters are displayed above the table, you can select a filter option to display only certain table entries, e.g. display only open cases on the contact page.
You can export the table content in CSV format by clicking the Export Table option in the lower right corner of the table.
Grids
The grid is an alternative way of viewing the cases found in a detail search or contained in a view of the case list. In the Group by field, you can choose the grouping criterion, i.e. the field which determines the columns. Afterwards, you can add or remove specific columns.
You can change the value of the case’s grouping criterion by dragging the case from one column to another.
User profile
You can open the user profile by clicking the blue circle with your initials. The user profile allows you to make several settings:
-
Upload an image to be displayed as avatar in the object history
-
Change your password (only if you have a CM-specific password)
-
Define representations
-
Define filter properties for views of the case list, see Case list settings
-
Set a default process which is preselected when you create a new case
-
Set a default customer group which is preselected when you create a contact or add a contact to a case
-
Decide if the Document tab used for CM/Doc is displayed
-
Decide if large case history entries should be folded by default
You can perform the following actions in the user profile:
-
Download the CM/Doc or CM/Phone applications
-
Remove unneeded personal email addresses
-
End unneeded active sessions
Customer group filter
If you have access to contacts from several customer groups but only work with contacts from one of them, you can select this customer group in the filter in the main menu. Only contacts from the selected customer group will be found in the search and you can only use contacts from this customer group in cases.