Working on cases
This section explains how to work on cases, your main task within the ConSol CM Web Client.
Basics
Working on cases is your main task in ConSol CM. This usually includes the following:
-
Locate an existing case (see Finding an object) or create a new one (see Creating a case).
-
Modify the case (see Modifying a case) and move it through the process (see Moving a case through the process). This usually includes writing emails to communicate with the customer and the colleagues, tracking the case progress by adding comments (see Communicating about cases), and attaching documents (see Adding attachments).
-
Close the case once all work is completed. Closed cases can still be found in the search, but they cannot be modified anymore, unless they are reopened.
It depends on your permissions which cases you are able to see and which actions you are allowed to perform. All actions performed on a case are recorded in the case history.
Creating a case
You can start the creation of a case in several places:
- Main menu:
Click the Create case button to create a new case. - Case:
Click the Clone button to copy the case, see Cloning a case. - Contact:
Click the Create case button to create a case for the given contact.
Some systems allow to create cases using activities.
Fill out the required fields in the three sections:
-
Header and details:
Select the process by clicking the corresponding tab. Fill out the data fields, which depend on the selected process. -
Contacts:
Select the contact for the case or create a new contact. If there is more than one customer group, you can choose the customer group by clicking the corresponding tab.-
Select an existing contact: Enter a keyword, such as the name or email address, in the corresponding data field and select one of the contacts suggested by the autocomplete search. In a two level data model, you can select a company first by entering a keyword in the company selector and choosing one of the suggestions.
-
Create a new contact: Fill out the data fields with the contact information. In a two level data model, you can either select a company by entering a keyword in the company selector and choosing one of the suggestions, or create a new company by clicking the Create link.
This section is not present if contacts are not required in the selected process.
-
-
Content:
Write a comment describing the purpose of the case. Optionally, you can add attachments.
Required fields are marked with a red asterisk.
Modifying a case
The following aspects of a case are usually modified during its life cycle:
-
Assignee: This is the user who is taking care of the case at the moment.
You can change the assignee by clicking the Edit data button in the case header and selecting a user in the Assigned to field using autocomplete search. If the case is not assigned yet, you can assign it to yourself by clicking the Assign to me button in the case header or the checkmark in the case list.
In some processes, the assignee is set automatically when executing certain workflow activities.
-
Case data: This is the information included in the case subject and the data fields.
You can modify case data by clicking the Edit data button in the case header or details section.
-
Communication: These are emails written to customers or users, and comments about the case progress. They are saved in the case history.
You can write emails and comments using the buttons Email and Comment above the case history, see Communicating about cases.
-
Case history: This is the history of all the changes which have been made to the case. It is located at the bottom of the case.
You cannot modify the history, but you can change its display to locate information more easily, see Case history settings.
The following aspects of a case can be modified during its life cycle:
-
Main contact: This is the contact for whom the case was opened. There is always one main contact.
You can change the main contact by clicking the Change main contact button in the Contacts section header.
-
Additional contact: This is a contact who is interested in the case. There can be several additional contacts.
You can add an additional contact by clicking the Add button in the Contacts section header. Optionally, you can select a role for the additional contact by clicking the role selector next to the contact name. The role usually reflects why the contact was added to the case.
-
Participant: This is a user who has a specific role defined in your business process. Participants are used for example in approval processes.
You can add an participant by clicking Edit data in the case header and clicking in the Additional participants field. Type the name of the user in the Participant field and select a role to indicate his function. Then you need to click the Add button, close the popup window and save the changes to the header section of the case by clicking Save changes.
For both the main contact and the additional contact, you can either select an existing contact using the autocomplete search or create a new one, see Contacts.
It is possible to edit the contact data by clicking the Edit person / Edit company option in the action menu next to the contact name. Editing contact data is a global action, so the changes are visible in every case which the contact is added to, and on the contact page.
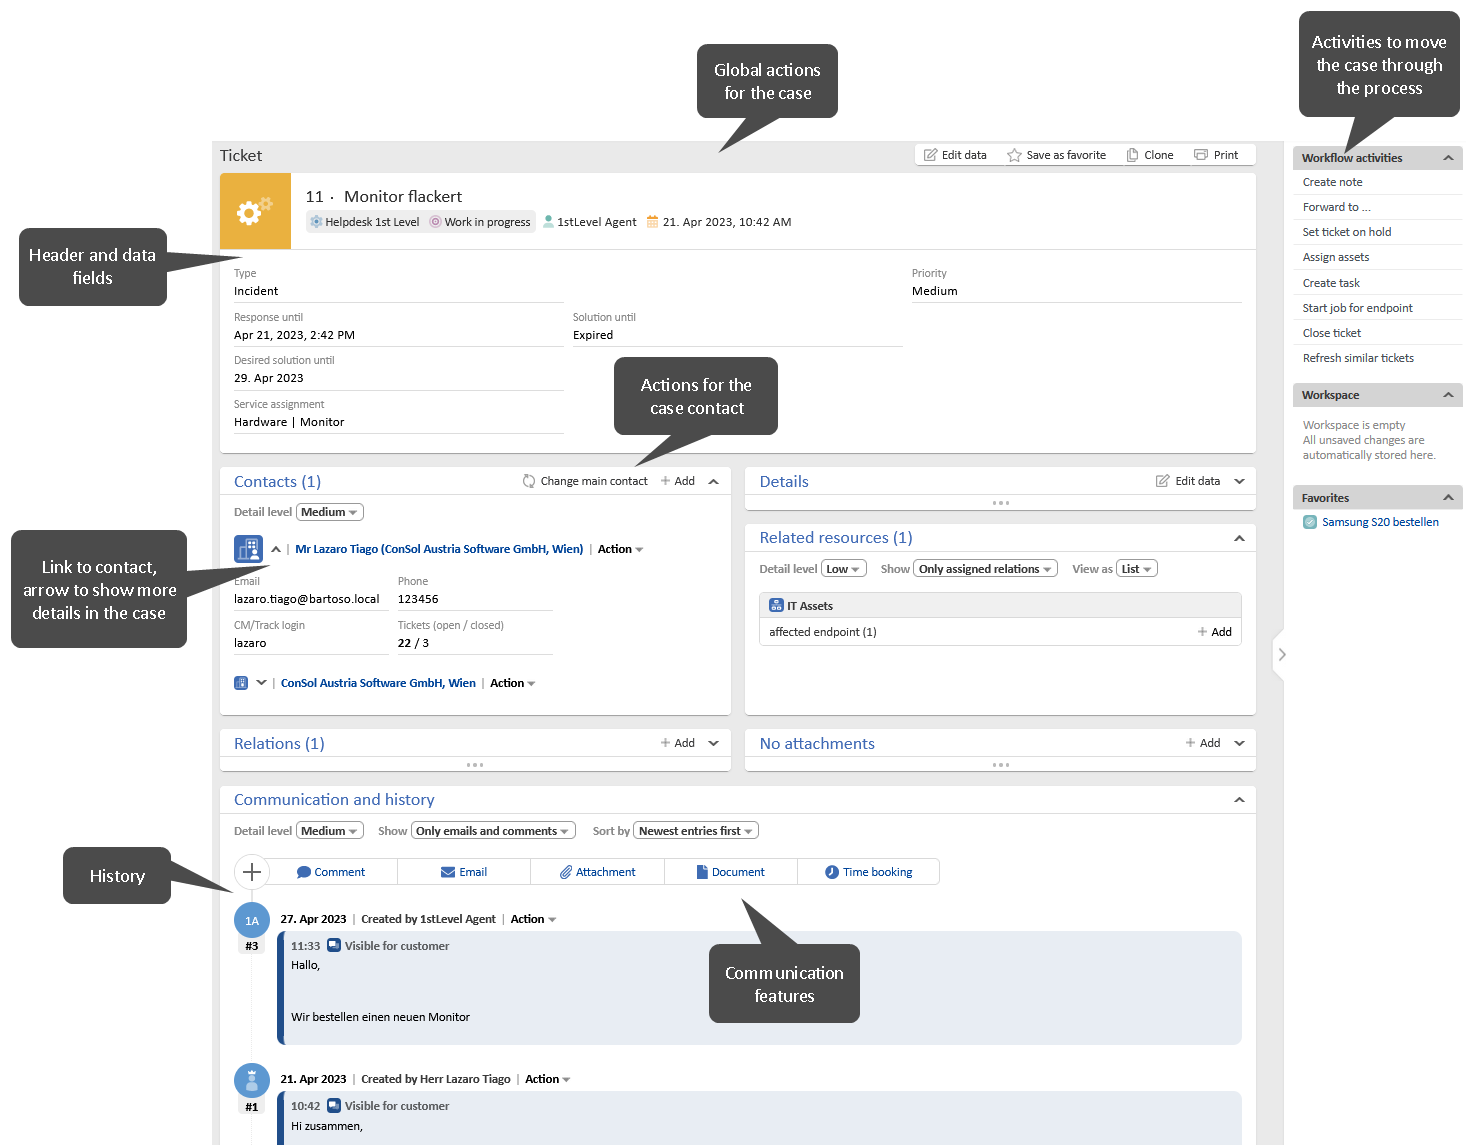
Moving a case through the process
You move the case through the process by executing workflow activities. They are located in the upper part of the right panel. The available activities depend on the position of the case in the process. Activities are either executed right away or open a form above the case. If a form is displayed, you need to fill out the form and click the Save and continue button to proceed. If you cancel the form, the workflow activity is not executed.
When you click a workflow activity, it can happen that a validation message with a red background is displayed above the case. The message usually indicates that certain criteria must be fulfilled to execute the activity.
Once work on the case is finished, there is an activity to close the case. Closed cases serve as a knowledge base and future reference of the communication with the customer. They can still be found in the search, but you cannot modify them anymore. Sometimes, closed cases can be reopened by clicking an activity or when an email for the case is received.
Adding attachments
There are three ways to add an attachment to a case:
-
Click the Attachment button in the Communication and history section. Select or drop the files which you want to upload, and click the Add Attachment button.
-
Click the Add button in the Attachments section. Select or drop the files which you want to upload, and click the Add attachments button.
-
Drag a file to the case in the view mode. An upload area is shown and when you drop the file, the Attachments section is opened.
-
When writing a new email, click the Upload button next to the Attachments selector or drag the attachment to the editor. Newly uploaded attachments are indicated by the text (new) after the file name.
The maximum allowed file size is displayed above the upload field. If you try to upload a file with a non-allowed file type, an error message is displayed next to the upload field.
You can download attachments in the Attachments section by clicking the link in the Name column of the table, or using the Download all or Download selected buttons. Alternatively, you can download the attachment from the history entry where it was added.
Advanced
ConSol CM provides some additional actions for working with cases.
The following actions are generally available:
-
Cloning a case: Create a new case based on an existing case.
-
Printing a case: Create a PDF document with the case content.
-
Case-case relations: Add a link to another case.
-
Case-resource relations: Add a link to a resource.
The following actions are available if the related components are used in your system:
-
Sharing information with customers via CM/Track: Decide which comments should be shown to a customer using CM/Track.
-
Using document templates with CM/Doc: Create and attach Microsoft Word or OpenOffice documents using CM/Doc.
Sharing information with customers via CM/Track
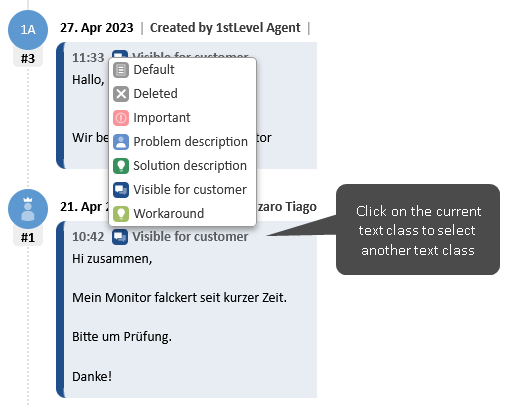
You can share information from the case history with customers who use CM/Track. This is done using text classes.
Click the text class icon of a comment, email or attachment entry to set a text class which makes the entry visible in CM/Track.
Depending on the business process, text classes can also be applied automatically by the system. Usually, the customers can see their own comments, attachments and emails automatically.
Using document templates with CM/Doc
Document templates allow to create Microsoft Word or OpenOffice documents based on a template. The documents usually contain some predefined text and are filled with data from the case (case data, contact data or assignee data).
Your computer has to meet the following requirements to use document templates:
-
Microsoft Windows operating system
-
CM/Doc application installed, see Installing CM/Doc
-
Microsoft Word / OpenOffice application installed
To use a document template, click the Document button in the Communication and history section and select the desired template in the Office template field. CM/Doc is started and the document is opened in Microsoft Word or OpenOffice. Edit the document and click the Save button in the office application. The document is automatically attached to the case.
You can open .docx or .odt documents from the case history by clicking Edit in the context menu of the history entry. CM/Doc is started and the document is opened in Microsoft Word or OpenOffice. Edit the document and click the Save button in the office application. An updated version of the document is automatically attached to the case.
Saving the document
-
Only use the Save command. Do not save the document using Save as... under a new name or to a new location. If you change the name or location of the document, it cannot be added to the case as an attachment.
-
Your ConSol CM system can be configured in a way that a new document is attached to the case with each save operation. Otherwise, the attachment is added in the first save operation and updated with each subsequent save operation as long as the document is not closed.