An engineer account is the basic access object which allows an engineer or administrator to access the Web Client, Admin Tool, or Process Designer. During system set-up an administrator account for the first access to the Admin Tool is created. Using this account, you can set up further accounts.
Newly created engineer accounts do not have any permissions. These permissions have to be assigned through one or more roles displayed in the Roles tab. If you have not created any roles yet, you only see the administrator role (see Tab Roles - Assign Roles to an Engineer Account ).
Views define which tickets engineers will see in the ticket list (to-do list) of the Web Client. They are created in the View Administration and assigned via roles. On the engineer administration page you can preset dynamic view criteria for specific engineers (see Tab View Criteria - Define Engineer-Specific View Criteria).
We would recommend that you create at least one role and one view first before you create any engineer accounts.
To open the Engineer Administration, open the navigation group Access and Roles in the Admin Tool and click the navigation item Engineers.
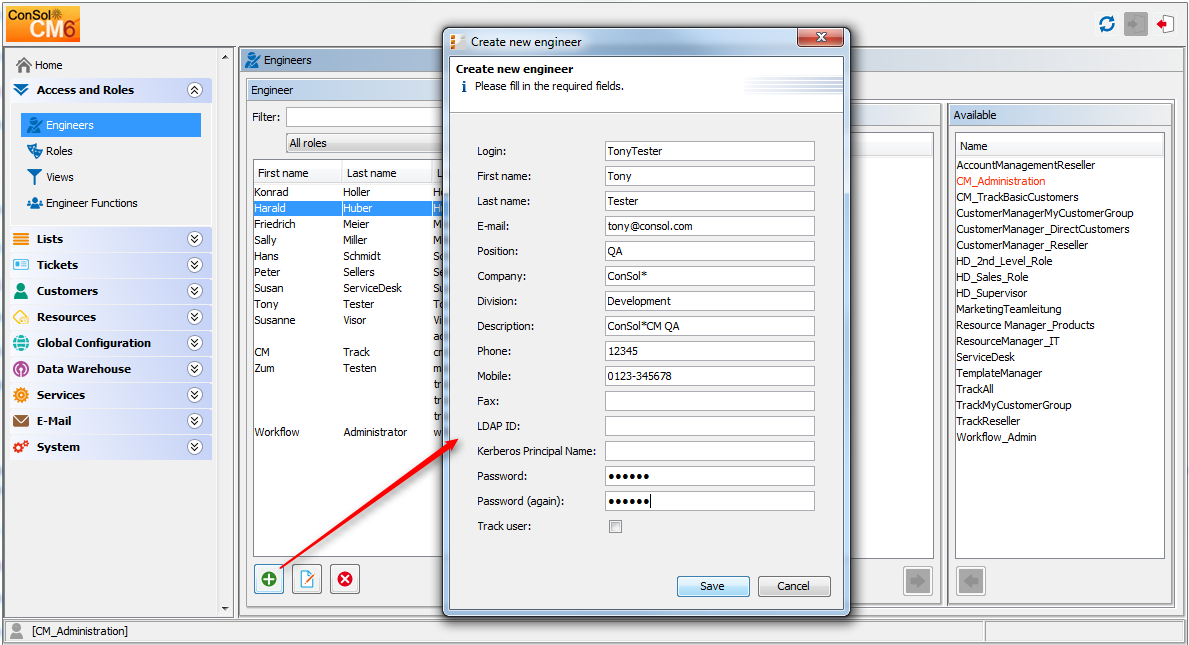
To create an engineer account click the Add icon below the account list. Or click the Edit icon if you want to edit the settings of an existing account. The same pop-up window appears:
Figure 10: ConSol CM Admin Tool - Edit an engineer account
The window shows the parameters describing an engineer account:
Several fields which contain engineer data (like Company, Division, or Phone) are optional fields. However, if you work with text templates which contain engineer data fields (see section The ConSol CM Text Template Manager) the e-mails or comments will not be formed correctly if the data is missing. For example, the field ticket-engineer, phone cannot be filled-in in the template if it has not been set for the engineer in engineer administration! So please make sure all data which will be required later on is filled-in correctly in the first place!
If you do not enter an LDAP ID here, the login will be used as authentication login parameter for the LDAP server (if LDAP authentication is activated)!
This field will only appear if the engineer authenticates against the Web Client via the CM database, i.e. if LDAP or Kerberos authentication is used, the field is not visible.
Click Save afterwards to store your entries and to close the window.
This configuration is optional.
The following system properties can be used to implement a certain password policy. All following system properties are located in the module cmas-core-security. (For details about system properties, please refer to the section System Properties.)
If an engineer has forgotten his/her password, he/she can request a new password by using the link Forgot your password on the initial login page. An e-mail with a link to a URL where the engineer can set the new password is sent to the engineer.
Please note that this can only work if a valid e-mail account is available for this engineer and if the respective value has been entered as e-mail for the engineer in the engineer data!
The e-mail which is sent to the engineer is based on the template password-reset-template which is stored in the Templates section of the Admin Tool. Please see section Admin Tool Templates for a detailed explanation of templates in general and section Password Reset Template for Engineers in the Web Client for details about the engineer password reset.
The password reset in the Web Client is only possible if the standard authentication mode is used. It is not possible if LDAP or Kerberos authentication is in operation. See section Authentication Methods for Engineers in the Web Client for an explanation of all possible authentication modes.
To delete an engineer account, select the account in the list and click the Delete button. Since an engineer account can only be deleted if there are no tickets (open or closed) for it anymore, you have to assign its tickets to another engineer. The name of the deleted engineer is still displayed in all history entries in tickets and customer pages which were performed by this engineer.
In case you do not want to transfer any tickets to another engineer, you can deactivate the engineer account. See next section.
If engineers should not have access to the system for a certain period of time (e.g. because they have taken a sabbatical), an account can be disabled. There will be no change regarding the tickets of these engineers, but they cannot log in anymore and other engineers cannot assign any tickets to their accounts.
To disable an engineer account, select the account and click the Deactivate button. The entry in the list is shown in gray italics afterwards. It is not possible to create new tickets or to edit existing tickets for this account. To re-enable the account, just click the Activate button at the bottom of the page.
On this tab you can assign roles to an engineer account. Select the account on the left and then the desired role(s) in the list of available roles on the right. Click the Assign button to move the selected roles into the list of assigned roles. Now an engineer with this account can act in the system according to the permissions set in the role(s) (see also Role Administration).
From the list of assigned roles you can choose one role as the main role for each engineer account. Select the desired role in the list and click the Activate button below the list. Afterwards the main role is marked with a red dot. Now the views of the main role always appear at the top of the view list in the Web Client for this engineer account.
Each role in the list of roles of an engineer offers a context menu with two items:
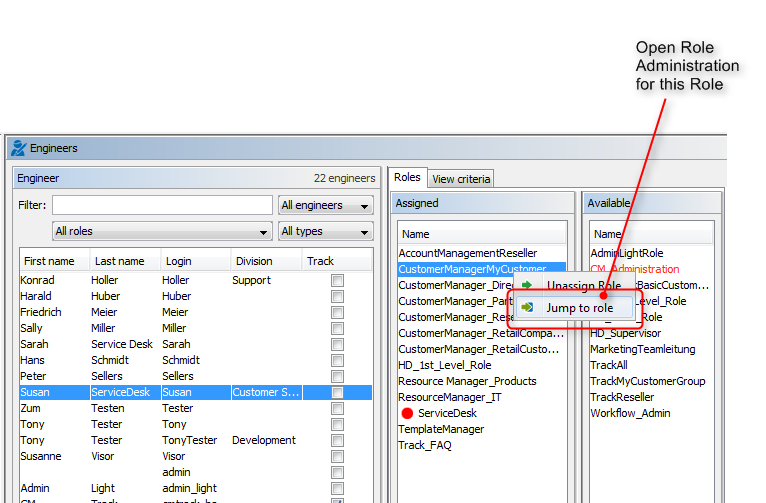
Figure 11: ConSol CM Admin Tool - Context menu of a role in engineer administration
Here you can change the dynamic view criteria for an engineer. Dynamic criteria are used to give the engineer the possibility to adjust a view interactively in the Web Client (see also View Administration).
This tab only shows view criteria if you have created a view with dynamic criteria and assigned it to the engineer's role.
Select the engineer account on the left and then the desired criterion in the list of available view criteria on the right. Click the Assign button to move it to the list of assigned view criteria. You will see the possible values below the criterion in the list. Tick the checkboxes of the values you want to change or preset. The engineer can change these settings in the Web Client (profile page) and changes you have made in the Admin Tool are immediately visible in the engineer's profile page.
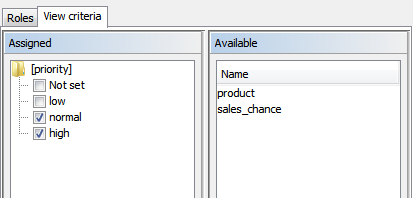
Figure 12: ConSol CM Admin Tool - Define engineer-specific view criteria
Example:
You have assigned the dynamic criterion priority. The list shows the values Not set, low, normal, and high. If you tick the values normal and high the engineer will only see tickets with normal and high priority after logging in to the Web Client. If you do not tick any values the engineer will see no tickets for this view. See section View Administration for details.
Please note that in a view with a dynamic criterion, only the tickets are displayed which match this criterion. So if engineers have not selected any criteria in their engineer profiles or if the administrator has removed all selections using the Admin Tool, the engineer's view will be empty! Make sure your users know about this fact and make sure you as an administrator are always aware of that fact.