Open topic with navigation
Deployment (Import/Export)
Introduction
ConSol CM offers the option to export the system configuration with or without run-time data into a file and to import this file into another ConSol CM system. The transfer file is called a scenario (sometimes also called a scene). It can contain various data - details are explained in the following sections.
Usually a scenario with configuration data is used to transfer data from a test to a staging or production system.
Since ConSol CM works with transfer keys for all objects it is highly recommended to transfer test to staging or production environments by using a scenario, and not to implement the same functionality in both systems. In case a transfer (export/import) is performed later on, there will be duplicate objects! Please read the detailed explanations below.
Scenarios
A scenario is a file in a proprietary ConSol CM format (similar to .zip, .jar, and .tar) that contains the data of a ConSol CM installation. It can be exported from one ConSol CM system and imported into the same or another system. This can be very helpful, e.g., when a test scenario is built on a test system which can then be transferred to a production server.
When an export file is created (see detailed explanation in the sections below) the administrator can decide which data should be included.
A scenario will always contain:
- all customer-specific system properties,
i.e., system properties where the module name starts with custom-
- all page customizations
A scenario can contain, depending on the selection of the administrator (see figure below):
- run-time data
- configuration data
A scenario will never contain:
- general (not customer-specific) system properties (e.g., mail server, LDAP directory, etc.)
Deployment (Import/Export) Using the Admin Tool
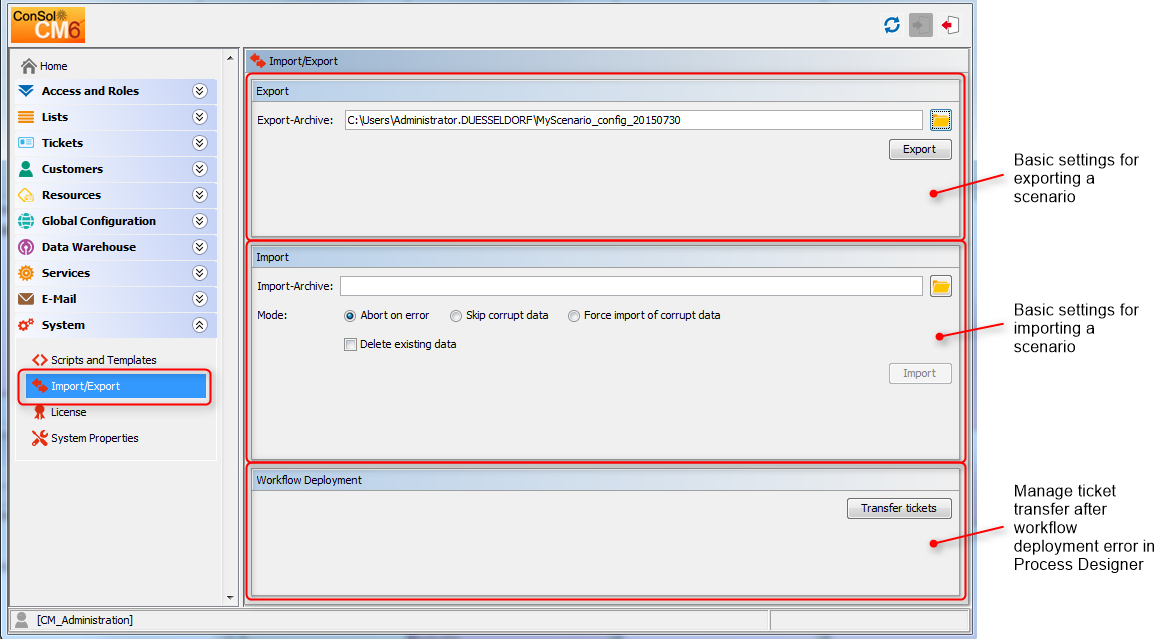
In the Admin Tool, the deployments are managed using the navigation item Import/Export in the navigation group System. In this navigation item you can import or export scenarios (i.e., the whole configuration or part of it) in an application-specific format. You usually do this to transfer data between different ConSol CM installations. A typical example is transfer of the configuration from a test system to a production system.
Figure 348: ConSol CM Admin Tool - Import/Export
The import of external data can modify, overwrite, or delete existing data irrecoverably. Although the user is prompted for confirmation at critical points during deployment, this cannot prevent erroneous handling. Use this function only if you are very sure what you are doing. In case of doubt please ask the ConSol CM support team or a ConSol CM consultant for assistance.
Export
- Export-Archive:
Path to the export archive. When you open the navigation item Import/Export, the default path for the export (<home directory of the admin user>/cm_export.zip) will be set. Use this value or enter the path and name of the file you want to create. Alternatively, you can click the Folder button to open the file browser.
Click on Export afterwards to start the data export.
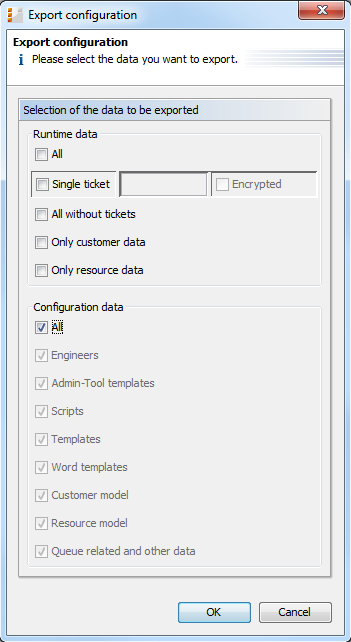
You will have to select the data that should be included in the export file (scenario):
Figure 349: ConSol CM Admin Tool - Import/Export: Export configuration
- Runtime data
This refers to data that is stored as operating data, e.g., tickets, resource data, and customer data.
- All
Ticket data and customer data is exported completely and the complete configuration is exported. When you select the checkbox All, all other checkboxes are selected automatically. - Single ticket
If the checkbox Single ticket is ticked, you have to insert the ticket name in the input field. (The ticket name is indicated below the ticket icon in the Web Client.)
Tick the checkbox Encrypted to anonymize (hash) the exported data. In this way, no real customer, engineer, or resource information will be transferred to the importing system. The following data will be anonymized:- Content of Custom Fields
- Content of Data Object Group Fields
- Ticket attachments
- Unit attachments
- Ticket history
- Unit history
- Resource data
The Single ticket option is not supposed to be used for regular system operation, but it is a functionality which is offered to facilitate bug-tracking. The export produces a .zip/.jar file containing the ticket data in XML files. All data required for the ticket (i.e., all related objects) are exported with the ticket, so be careful when the ticket is imported into another system - data might be changed here!
- All without tickets
The complete installation beside the tickets is exported, i.e., the customer data and the complete configuration. When you select the checkbox All without tickets, all other checkboxes except for All are selected automatically. - Only customer data
Only customer data (i.e., the customer data model and the actual customer data) is exported. Nothing else. (The checkbox Customer model is checked automatically.) - Only resource data
Only resource data (i.e., the resource data model and the actual resource data) is exported. Nothing else. (The checkbox Resource model is checked automatically.)
- Configuration data
This refers only to the configuration in the Admin Tool, no run-time data is exported.- All
The complete configuration is exported. When you select the checkbox All, all other checkboxes under Configuration data are selected automatically. - Engineers
Only the engineers with their data are exported. This also includes the roles the engineers have been assigned. - Admin Tool templates
Only the Admin Tool templates (see section Admin Tool Templates for details) are exported. - Scripts
Only the Admin Tool scripts are exported (see section Admin Tool Scripts for details). - Templates
Only the templates that are stored in the Text Template Manager (see section The ConSol CM Text Template Manager for details) are exported. - Word templates
Only the Microsoft Word, OpenOffice, or LibreOffice templates are exported, this is only relevant when CM.Doc is in operation (see section CM.Doc for details). - Customer model
Only the Data Object Group Fields that are used to define the customer model are exported. No run-time customer data is included. - Resource model
Only the Resource Fields that are used to define the resource model are exported. No run-time resource data is included. - Queue related and other data
Only queue configuration and general configuration settings are exported (workflows, queues, Custom Fields, enum values, MLAs, roles, views, system properties, ...), in short: everything which is not included above.
If you would like to export the complete configuration, select All in the Configuration data section. The export/import of subsets (e.g., templates only) is usually applied when selected data (e.g., from a test environment) has to be transferred to another (e.g., live) system.
Import
The general principles of ConSol CM scenario import are:
- If the checkbox Delete existing data has not been selected, the scenarios are merged, as described here:
- Data are only added, nothing is deleted.
- If the imported scenario contains the same field/parameter as the original scenario, the value from the imported one overwrites that of the original scenario.
Example: For the field priority, the imported scenario has the annotation position = 0;2. The original scenario contains the value position = 2;2 for the field priority. Thus, in the resulting scenario after the import, the value for position is 0;2. - If the imported scenario contains more parameters than the original scenario, the parameters are added to the original one.
Example: The imported scenario has the annotation visibility = none for the field PersonID. In the original scenario, the field PersonID is present, but does not have the annotation. Thus, in the resulting scenario after the import, the field PersonID will have the annotation visibility = none and will thus be invisible. - If the imported scenario contains less data/fewer parameters than the original one, the original data will be present in the resulting scenario. Nothing is deleted.
Example: If the field PersonID in the imported scenario no longer contains the annotation visibility = none, but the original scenario does contain the annotation, it will remain. Thus, in the resulting scenario the field PersonID is still invisible. - For scripts and templates, the latest version (according to the time stamp) is used, no matter from which scenario.
- Objects are identified by an internal key (transfer key).
When an imported scenario contains an object with the same name but another transfer key, technically, these are two objects, and the new object will be added from the import to the original scenario (e.g., when a user Mr. Miller exists in both scenarios, there will be one user Mr. Miller and one user Mr. Miller (1) in the resulting scenario after the import.
To make sure you can transfer another import scenario from the same source (test system), you can delete the original Mr. Miller user and transfer the tickets to Mr. Miller (1), an operation that is supported by the ConSol CM Web Client. Then rename Mr. Miller (1) to Mr. Miller. Now, the Mr. Miller user has the transfer key that originated in the import scenario and during the next import there will be no problem.
The general use case is: The transfer key is created by the ConSol CM system and allows the re-import and/or the update of the configuration data.
- If the checkbox Delete existing data has been checked, the entire system is deleted, i.e., all existing data are deleted. All data means:
- Configuration data
- Run-time data
That means if Delete existing data has been selected, it is not possible to preserve anything from the original scenario. Everything is deleted! Only system properties are not deleted.
The following parameters have to be set for an import operation:
- Import-Archive:
Enter path and file name of the archive from which the data shall be imported. Alternatively, you can click the Folder button to open the file browser.
- Mode:
Here you can choose what the import should do if an error occurs:- Abort on error
This mode is recommended for production systems. - Skip corrupt data
This mode is recommended for imports into test systems. It might even be reasonably applied to production systems, because an unexpected error can lead to a corrupt system, but the import continues even if an error occurs. The problem can be probably handled quickly afterwards, whereas a new import might take longer to perform.
Example: A referenced object is not found during the import of a view which references a queue which cannot be found. - Force import of corrupt data
Choose this mode only if you want to clone a system with corrupt data, e.g., on a development server or if the support team is performing error analysis.
Click on Import afterwards to start the data import.
Workflow Deployment (for Deployment Error Recovery Only)
Usually, all operations concerning workflow design and deployment are performed using the Process Designer. However, if an error occurs during workflow deployment, you can transfer the tickets that could not be transferred into the new workflow using the following options.
First select the queue(s), then choose the transfer mode:
- Remain at last activity
The ticket will try to stay at its position in the process:- If the activity and scope have not been changed, i.e., no change in position for the ticket.
- If the activity is no longer present, i.e., the ticket goes as far back in the process as necessary to find the last consistent position in the process.
- Restart process
The ticket goes back to the START node of the process/workflow.
Please also read the detailed explanation of the workflow deployment process in the ConSol CM Process Designer Manual.