Scripts are stored in the Scripts and Templates section of the Admin Tool. They are written in Groovy and should only be edited by experienced ConSol CM consultants and administrators.
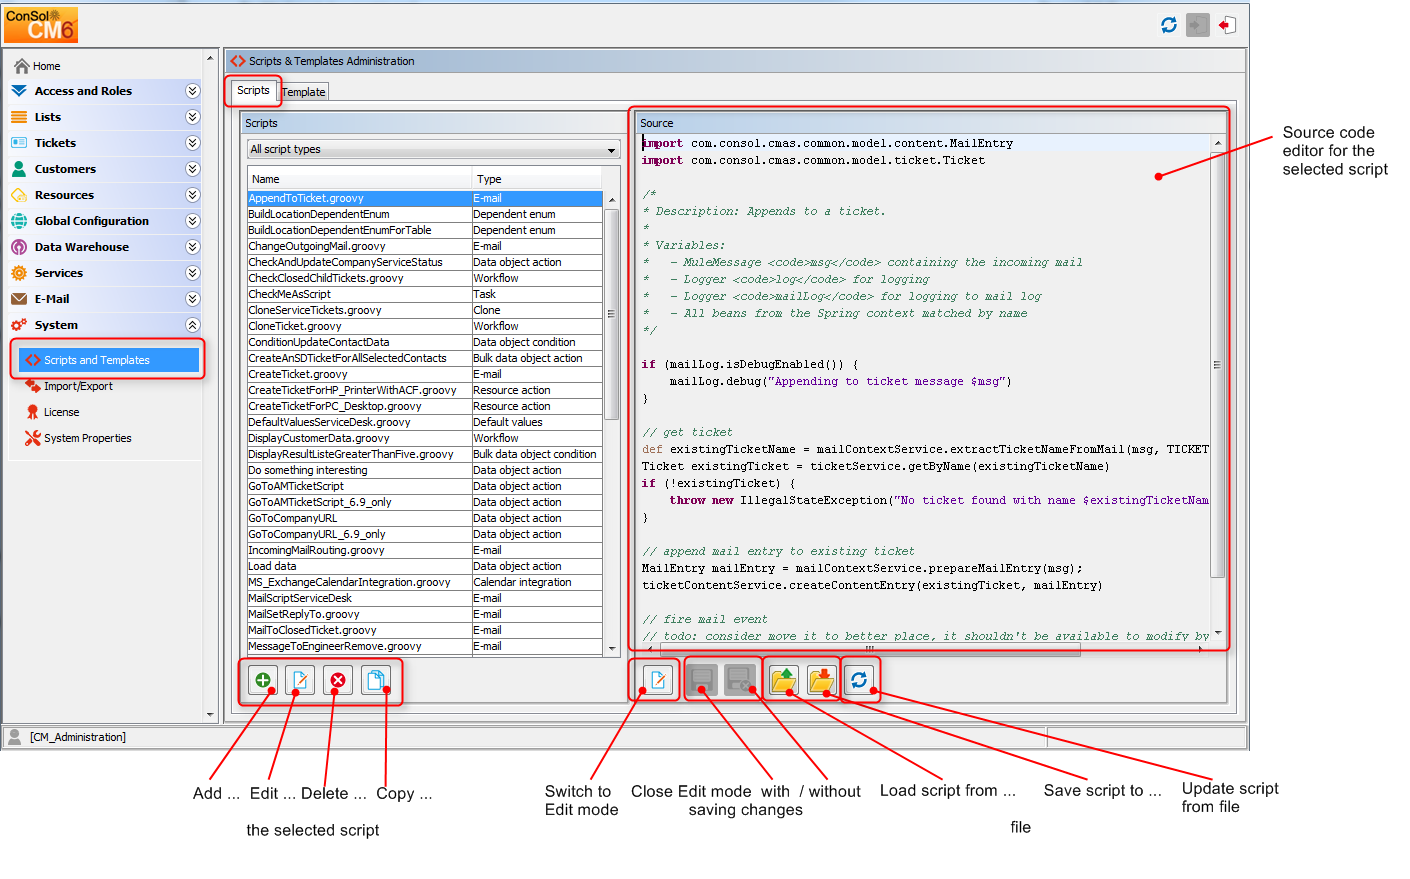
To work with scripts, open the navigation item Scripts and Templates in the navigation group System in the Admin Tool. The tab Scripts will be shown.
Figure 315: ConSol CM Admin Tool - Scripts & Templates Administration
On the left you see the list of all scripts. The list can be filtered using the drop-down menu where the script type can be selected. Two parameters have to be set for each script:
The buttons below the list offer the standard Admin Tool functionalities:
On the right you see the Source Code Editor. The script which is selected in the list on the left is displayed. Here you can write/edit the script source code when using edit mode.
The Source Code Editor provides an editing panel with syntax highlighting, but it does not perform any code validation. You have to check the code for correctness yourself.
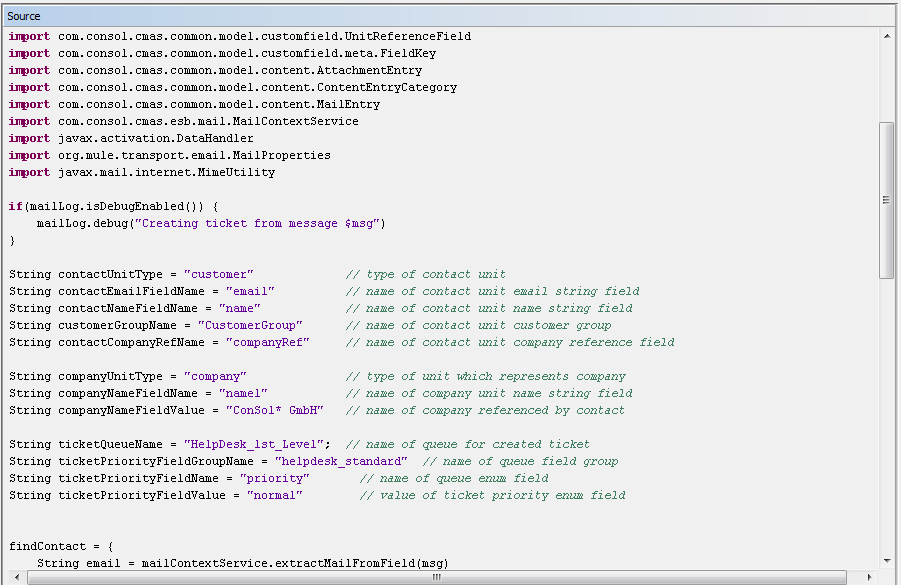
Figure 316: ConSol CM Admin Tool - Scripts: Source Code Editor
The lower section of the Source Code Editor has the following buttons:
In the following section, the available script types are explained. Some examples are provided to give you an idea of potential uses for scripts.
The following script types are explained here in this section. Please refer to the links provided in the list above for a complete overview of all script types with links to their respective documentation.
In the Web Client, a ticket can be cloned (duplicated) using the Clone option in the ticket menu. You can do this with or without a script.
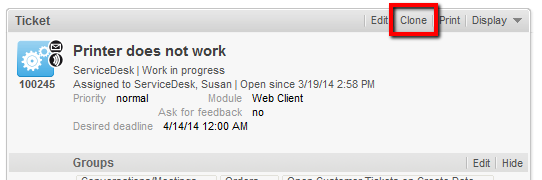
Figure 317: ConSol CM Web Client - Clone option in ticket menu
The following two pictures show the cloning of a ticket without a clone script.
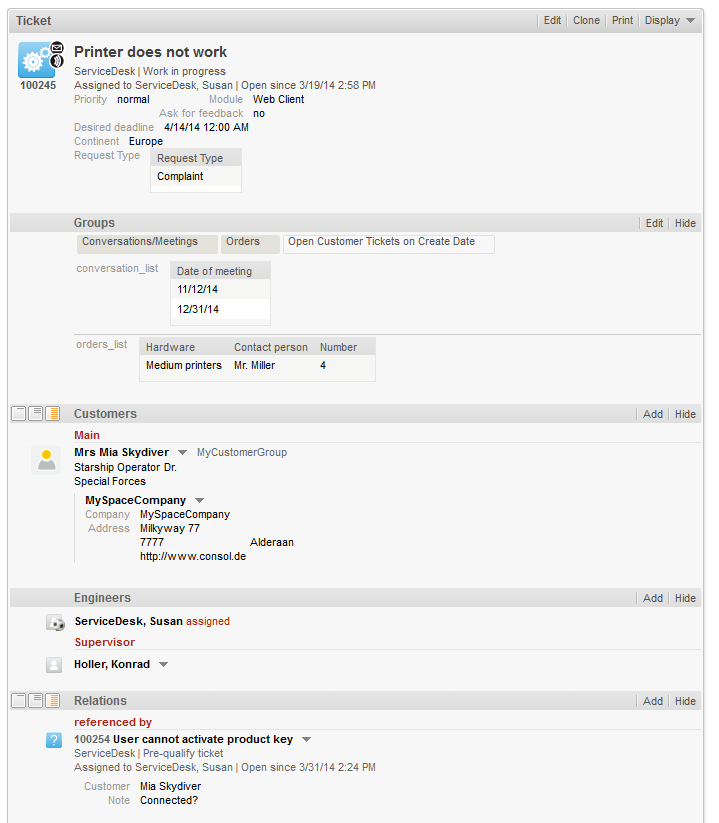
Figure 318: ConSol CM Web Client - Original ticket
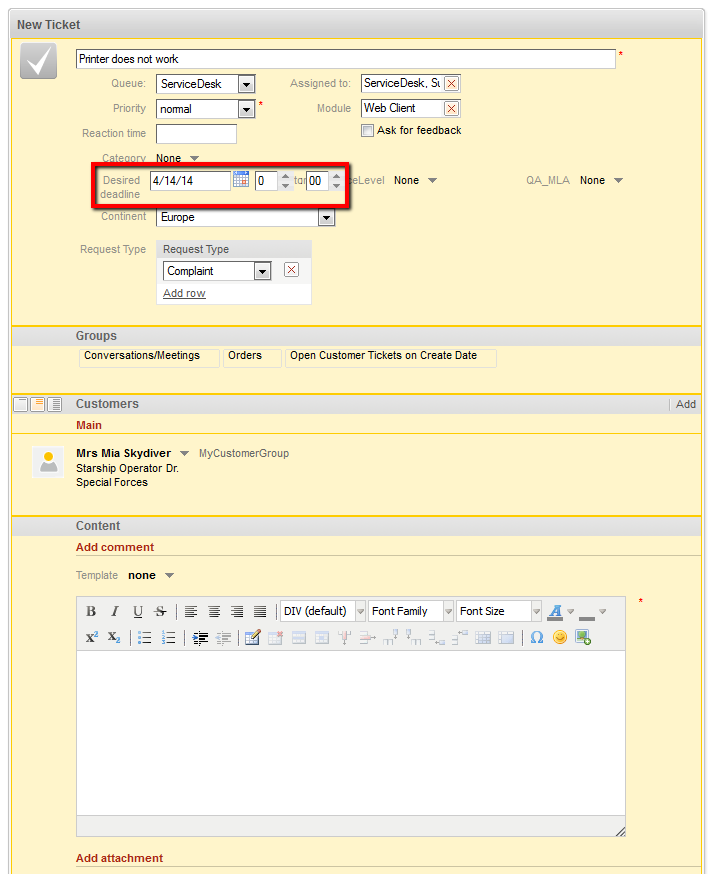
Figure 319: ConSol CM Web Client - Cloning the ticket (without Clone script)
When a ticket is cloned, the following data is transferred from the original ticket (compare the two images above):
When a ticket is cloned, the following data is not transferred from the original ticket (compare the two images above):
If the queue where the ticket is located uses a Clone script (see section Queue Administration), this script will be executed when the engineer clicks on Clone. The script can be used similarly to a Default values script (see respective section below): you can preset values in the newly-created ticket. In the cloning process the values are pre-filled in the Custom Fields in the Web Client, i.e., before the ticket is generated. The engineer can change the values if required.
Please keep in mind that in a Clone script, you do not work in the workflow context! That means the workflowApi object (implementation of WorkflowContextService) is not available!
In the following example, the Clone script is used to reset the data field Desired deadline to avoid having incorrect service dates in (cloned) Service Desk tickets.
ticket.set("serviceDesk_fields.desiredDeadline", null)
Code example 57: Clone script to reset Custom Field for desired deadline
When the script is assigned to the queue (ServiceDesk, in the example), the field for the desired deadline is empty when the cloned ticket is opened by the engineer (see following image).
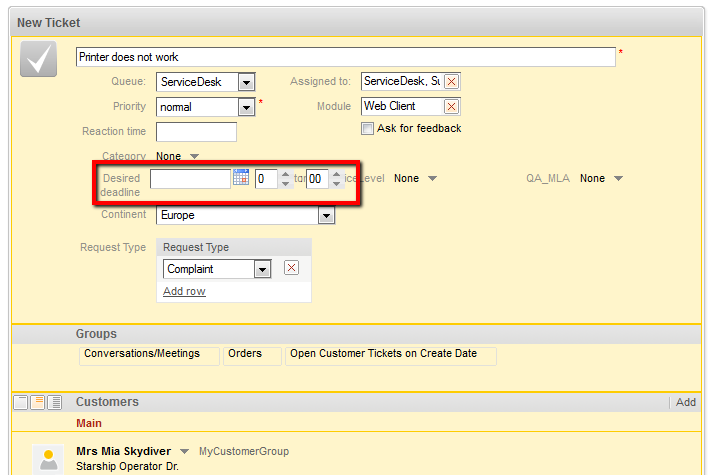
Figure 320: ConSol CM Web Client - Cloned ticket (with Clone script assigned to the queue)
Sometimes it is required that a data field of a ticket has a certain value when the ticket is initially created, i.e., when the engineer clicks New ticket and the respective form is opened in the Web Client, one or more values should be preset. This saves the engineer from having to set the value every time, e.g., when the default priority is normal, this can be preset. In case high or low is required, the engineer can switch to another value.
This ConSol CM behavior can be achieved by using one or more Default values scripts. The default values can be individually defined for each queue. For each queue, exactly one Default values script can be assigned. Please see the following example.

Figure 321: ConSol CM Web Client - New ticket without default values
Without a Default values script, no value is set for the priority when an engineer creates a new ticket in the Web Client.
To define a default value, a script of type Default values has to be created. First, we have to look up where the respective Custom Field is to be found (in which Custom Field Group and under which name) in the Custom Field Administration. See section Custom Field Administration (Setting Up the Ticket Data Model) for details.
Please keep in mind that in a Default values script, you do not work in the workflow context! That means the workflowApi object (implementation of WorkflowContextService) is not available!
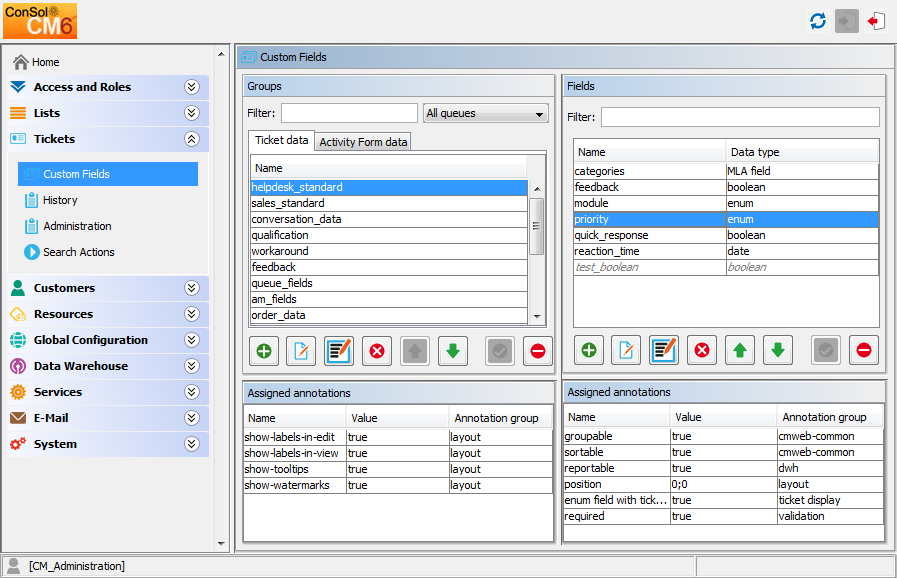
Figure 322: ConSol CM Admin Tool - Custom Field administration
Since priority is an enum field (i.e., an ordered list), we have to check the possible (technical) values which can appear in the list and we have to look for the required default value in the Enum Administration.
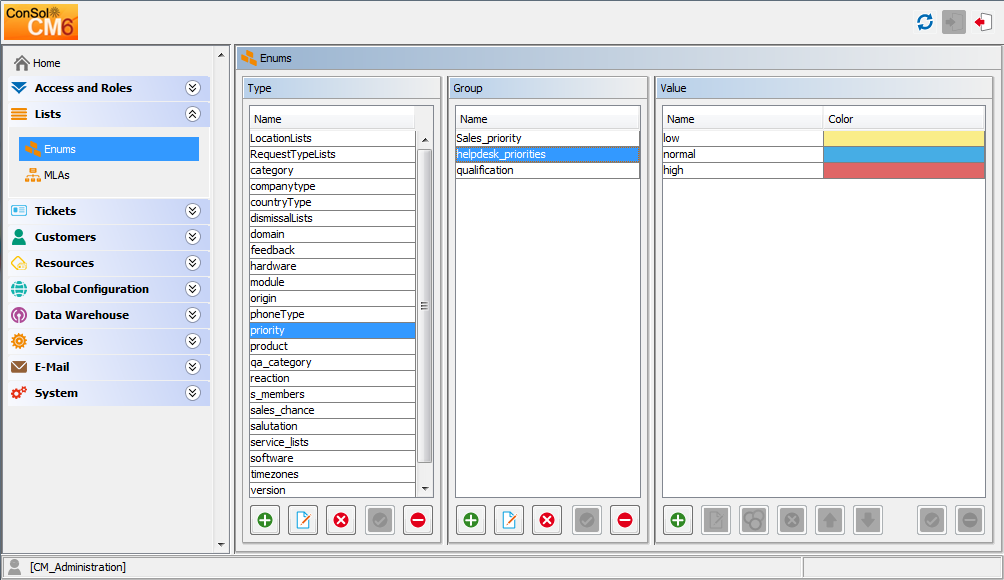
Figure 323: ConSol CM Admin Tool - Priority values in Enum administration
The group, the field, and the correct value can then be used in the respective Groovy method in the new script.
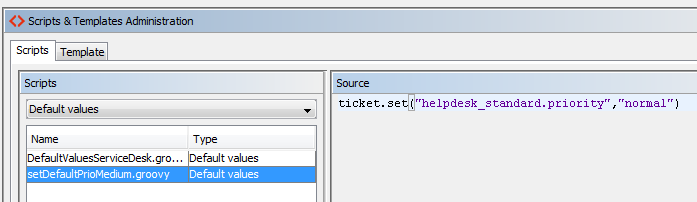
Figure 324: ConSol CM Admin Tool - Include group, field, and value in script
In the Queue Administration we have to assign the script to the queue where the default value should be used.
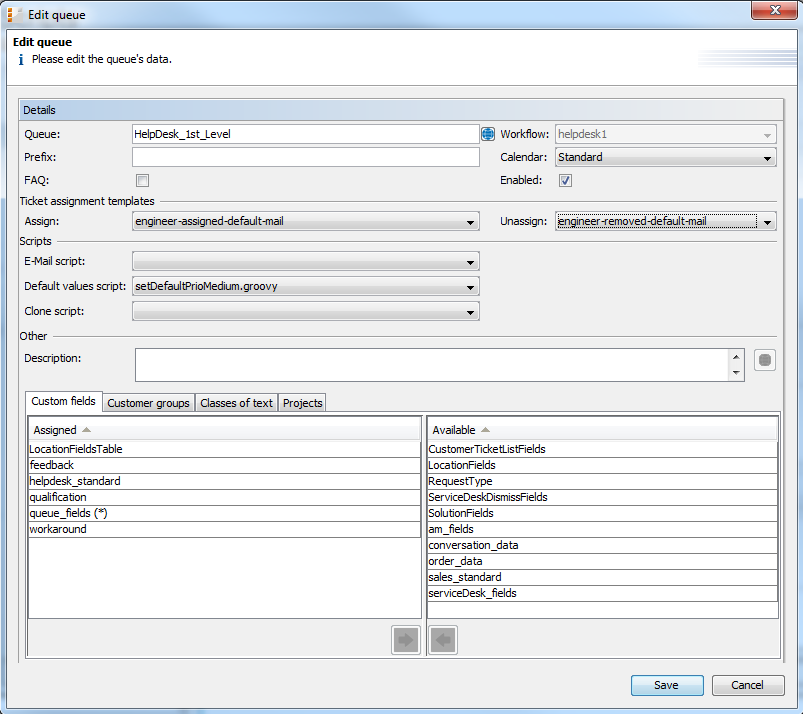
Figure 325: ConSol CM Admin Tool - Assign Default values script to queue in queue administration
When the engineer subsequently starts the create ticket operation in the Web Client, the default value normal will be set in the Priority field.
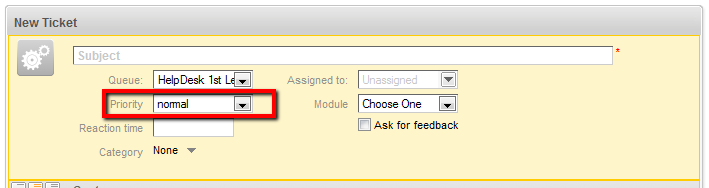
Figure 326: ConSol CM Web Client - New ticket with default value
Please keep in mind that for every queue there can be only one Default values script. If you have to define various default values, they have to be defined in one script. You might want to adapt the script name in this case, to better convey its intent.
If the same default value has to be set in different queues and is set together with other default values, this also has to be coded in one script for each queue.
By default, the fields of a ticket that are pre-filled by a Default values script are not overwritten, i.e., when the ticket is sent to another queue that has a different Default values script assigned, this second script will try to set fields that were already filled by the first script. Since this is not possible, the default value(s) from the first script are left intact.
If a Default values script should overwrite existing values, overwrite mode has to be activated. To activate this mode insert the following code at the beginning of your Default values script:
import com.consol.cmas.common.model.ticket.TicketPrototypeContext
TicketPrototypeContext.enableOverwriteMode()
Dependent enums are hierarchical lists which provide a data structure similar to the one provided by MLAs (see section MLA Administration). In contrast to MLAs, with dependent enums only one level at a time is displayed. Depending on the value the user has selected in the list on this level, another list, the one in the sub-level, is opened. There do not have to be sub-lists for every list entry, so in graph terminology, the list might be a combination of nodes and leaves. A dependent enum script is assigned to the Custom Field Group, Data Object Group, or Resource Field Group where it is required.
Please see the following example:
In Help Desk tickets a location can be selected. First, the user selects the continent. Depending on the selected continent, a sub-list with sub-continents or a sub-list with countries is displayed. All Custom Fields have to be defined as regular enum fields first. In the script, the value of the first level list is checked and, depending on this value, another list is displayed in the second level. This can be used for as many levels as required, but please keep in mind that the editing of the script will become more complex with each level.
The Dependent enum script is placed in the Admin Tool. Please feel free to ask our ConSol CM consultants for support when creating and/or editing the script, as this is a rather complex task.
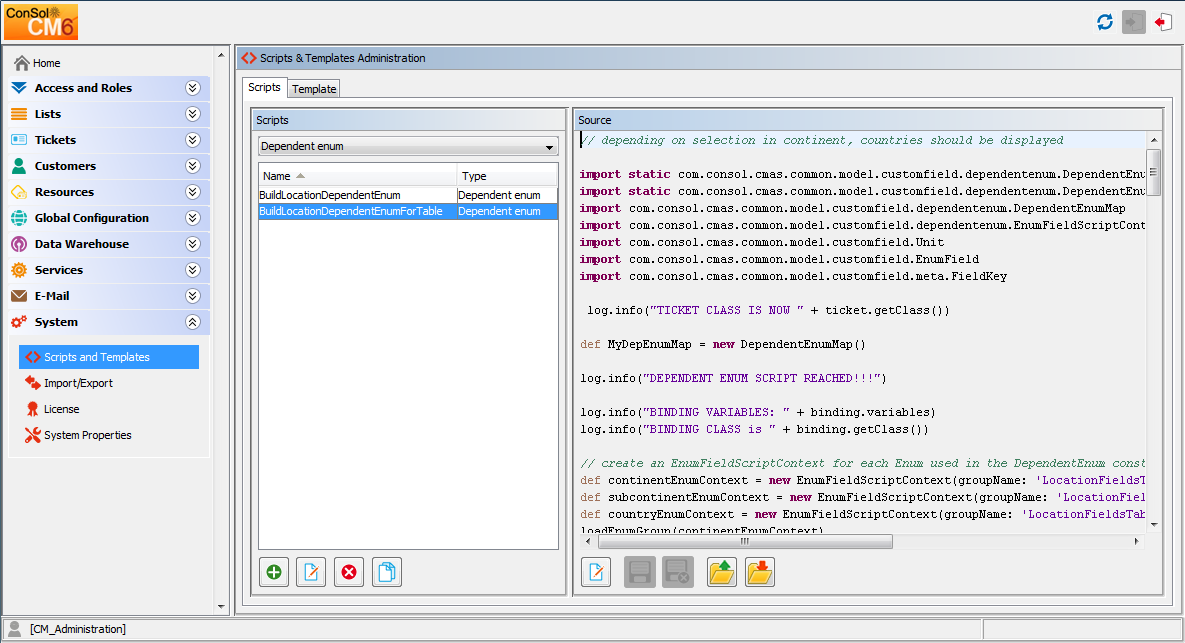
Figure 327: ConSol CM Admin Tool - Dependent Enum script
The Dependent enum script is assigned to the Custom Field Group, Data Object Group, or Resource Field Group where it is required.
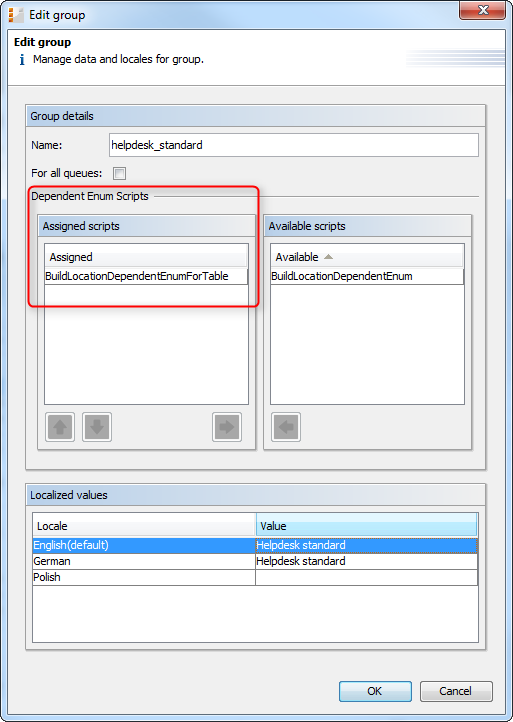
Figure 328: ConSol CM Admin Tool - Assign Dependent Enum script to Custom Field Group
In the Web Client the engineer only sees the sub-list of the value selected in the first level list.
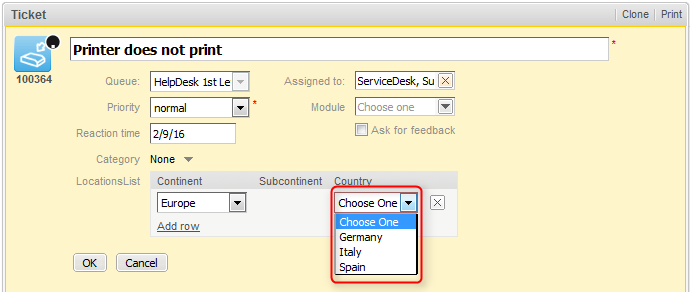
Figure 329: ConSol CM Web Client - Sub-list of continent Europe
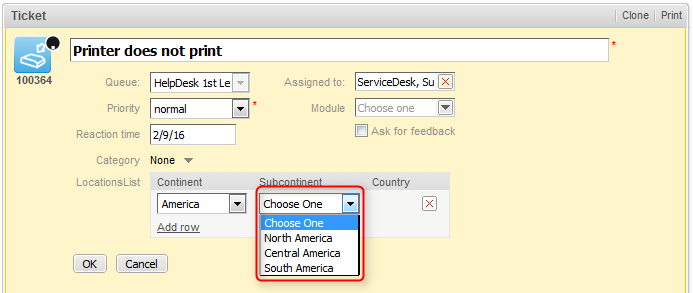
Figure 330: ConSol CM Web Client - Sub-list of continent America
Scripts of this type are used for several features. Some of the scripts are part of the default system configuration and have to be modified according to the customer-specific system configuration. You can also add your own scripts.
IMPORTANT INFORMATION
Since ConSol CM version 6.9.4, there are two modes to receive incoming e-mails:
For all configurations/settings which are valid for both modes, no further notes are added. For all settings which vary depending on the mode, this will be explained in separate (i.e., Mule/ESB- or NIMH-specific) sections.
When an e-mail is received by ConSol CM, it is processed by several scripts, see following figure.
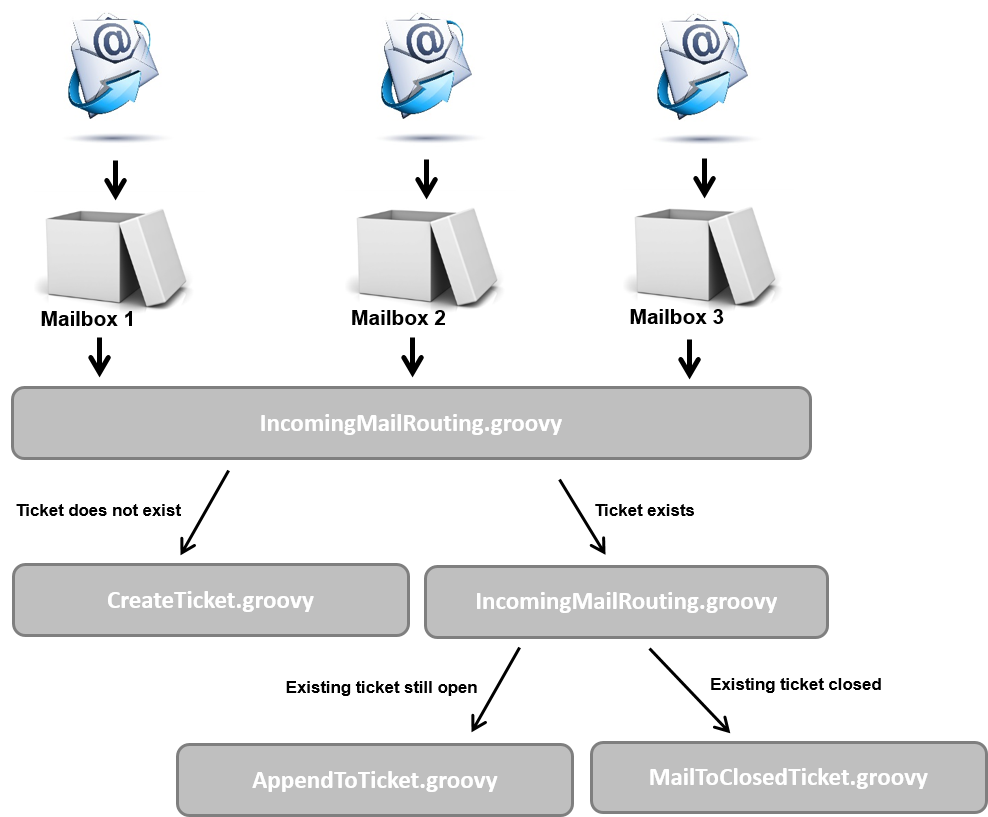
Figure 331: ConSol CM Admin Tool - E-mail scripts (Mule/ESB Mail)
When an e-mail is received by ConSol CM, it is processed by several scripts, see following figure.

Figure 332: ConSol CM Admin Tool - E-mail scripts (NIMH)
When NIMH is enabled, different Groovy classes have to be used in the e-mail scripts than when using Mule/ESB Mail mode. Please see the mapping in the table below.
|
Mule |
NIMH |
|---|---|
|
where required:
|
where required:
|
|
|
|
|
with respective methods, example:
|
with respective methods, example:
|
|
|
|
|
spring cm services |
spring cm services |
|
all places where mailHolder is used Example: see Example OLD below |
pipeContext (used as parameter in mailSupportService invocations) Example: see Example NEW below |
|
esb endpoints in mail routing script ("target handlers"):
|
script endpoints in mail routing script ("target handlers"):
|
Example OLD:
String email = mailContextService.extractMailFromField(msg)
Example NEW:
String email = mailSupportService.extractMailFromField(mailHolder, pipeContext)
The steps you have to perform when you want to switch your ConSol CM system from Mule/ESB Mail mode to NIMH mode are described in section Switching from Mule/ESB Mail to NIMH.
For every queue, an E-mail script can be configured. Please see section Queue Administration for an explanation how to configure this. An e-mail which is written from a ticket in this queue (automatically by the workflow or manually by an engineer) passes through this script before it leaves the ConSol CM system. So in this E-mail script you can change or set queue-specific settings for the outgoing e-mail. A common use case is the setting of a queue-specific REPLY-TO address in order to use team-specific REPLY-TO addresses.
An example of an outgoing E-mail script is the following script which is part of the ConSol CM default application:
Within the outgoing E-mail script, the Java object mailEntry is implicitly available as the object mail. You have to set all required attributes for the outgoing e-mail using the mail.setAttribute() or mail.setAttributes() methods.
def queueReplyAddress = "serviceteam@mycompany.com"
// you might also use system properties for the queue-specific e-mail addresses and fetch an
// address using the configurationService!
mail.setAttribute('Reply-to', queueReplyAddress)
Code example 58: E-mail script
Common e-mail attributes are:
For a very detailed description of the e-mail format, please refer to RFC 5322.
When you work with the configuration of the REPLY-TO e-mail address, please note the following technical behavior of ConSol CM and adapt your system accordingly!
The technical background:
There are four potential REPLY-TO addresses which you deal with:
In the Web Client, in the ticket history, the REPLY-TO address which was really used is always displayed for outgoing e-mails. So even in case there should be a difference between the address which was displayed in the Ticket E-Mail Editor (the mail.reply.to property) and the REPLY-TO address which was really used (the REPLY-TO in the queue-specific outgoing e-mail script), the effective address is displayed. This would be the one from the script in this case.
What we recommend:
A system REPLY-TO address should always be set! You can decide if you
or
However, since the e-mail communication should take place via ConSol CM and not using personal e-mail addresses, one of the two system settings mentioned above should be used to prevent CM from using personal e-mail addresses as REPLY-TO. The latter would automatically lead to customer e-mails being sent to an engineer's personal e-mail account instead of CM.
What that means for your system configuration:
What that means when you work with workflow scripts which send e-mails:
(A detailed explanation is provided in the ConSol CM Process Designer Manual!)
If neither the system property nor the queue-specific outgoing e-mail script is used, i.e. when the REPLY-TO address is not set, usually the FROM address will be used as REPLY-TO by the e-mail client.
Scripts of this type are stored in the Admin Tool because they are used in numerous workflow scripts, i.e., the code in the Admin Tool script is needed more than once in one or more workflows. It is easier, less error-prone, and less time-consuming to store the scripts in one central location (Admin Tool) and just reference them in the workflows than to edit the same code in different locations in every workflow where it is used. Furthermore, during workflow development the Admin Tool script can be modified easily and the change is propagated immediately whereas when editing a workflow changes have to be deployed first.
Please see the ConSol CM Process Designer Manual for a detailed introduction to workflow programming. A short example will be provided here.
This code in a workflow activity will only reference the script, e.g.:
scriptExecutionService.execute(scriptProviderService.createDatabaseProvider("DisplayCustomerData.groovy"))
In the Admin Tool, the respective script is stored:
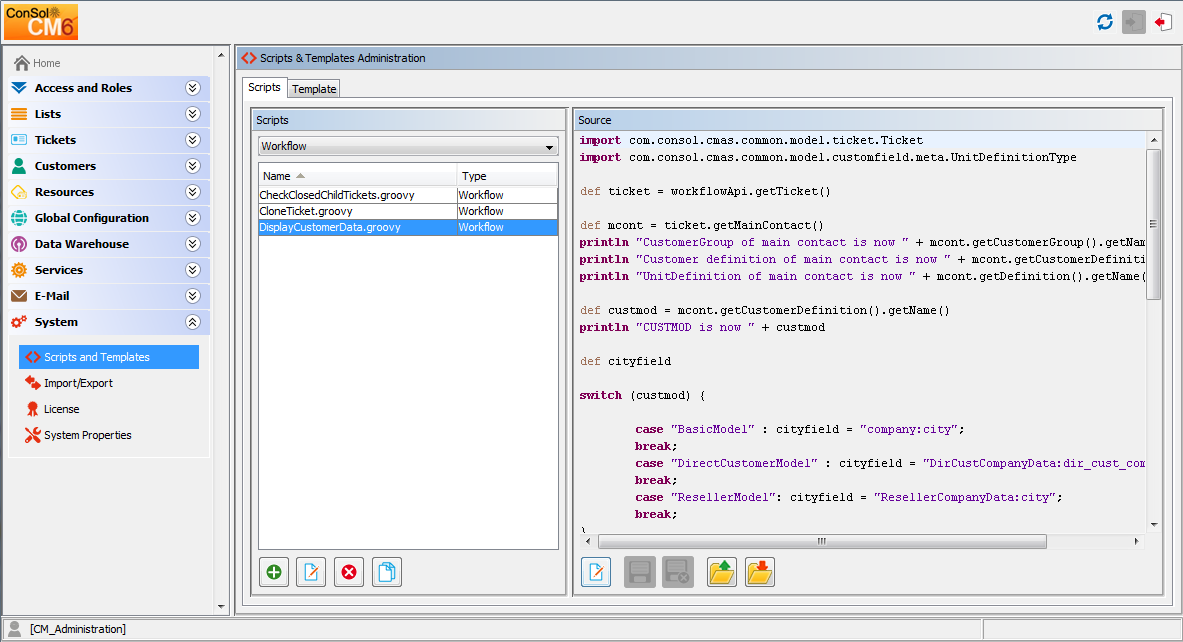
Figure 333: ConSol CM Admin Tool - Workflow script
It is also possible to pass parameters (key/value pairs) to the Admin Tool script. This is explained in detail in the ConSol CM Process Designer Manual.
For certain use cases it might be required to execute a script when a ticket has run through a workflow activity. You might want to use this, for example, to display another ticket in the Web Client after the workflow activity has been executed. From a user's (engineer's) point of view, the Web Client jumps to the next ticket. The latter can be a child ticket or the next ticket in a list, depending on the use case.
The system behavior is defined in an Admin Tool script, the PostActivityExecutionScript (sometimes also called Default Workflow Activity Script). The name of the script has to be set in the system property cmweb-server-adapter, postActivityExecutionScriptName, see System Properties.
This script is executed after every manual workflow activity. That means you have to insert all control mechanisms and intelligence into the script:
Starting with version 6.10.2, ConSol CM can open one of four different page types (in read mode) coming from the PostActivityExecutionScript:
The script just has to provide the respective object as return value. The following code shows an example for each of the four types.
switch(activity.name){
case 'defaultScope/Goto_ticket':
return ticketService.getByName("SUP-11")
case 'defaultScope/Goto_contact':
return unitService.getById(123)
case 'defaultScope/Goto_company':
return unitService.getById(456)
case 'defaultScope/Goto_resource':
return resourceService.getById(890)
}
Example: Jump to the next ticket in a list.

Figure 334: ConSol CM Admin Tool - Property for definition of postActivityExecutionScriptName
The PostActivityExecutionScript can also jump to a unit page (i.e., a company page or a contact page) or to a resource page simply by returning the unit or resource within the script.
Please see the following example script:
switch(activity.name){
case 'defaultScope/Goto_the_ticket':
return ticketService.getByName("SUP-11")
case 'defaultScope/Goto_the_contact':
return unitService.getById(123)
case 'defaultScope/Goto_the_company':
return unitService.getById(456)
case 'defaultScope/Goto_the_resource':
return resourceService.getById(890)
}
Code example 59: PostActivityExecutionScript
Another example, which also shows the Web Client behavior:
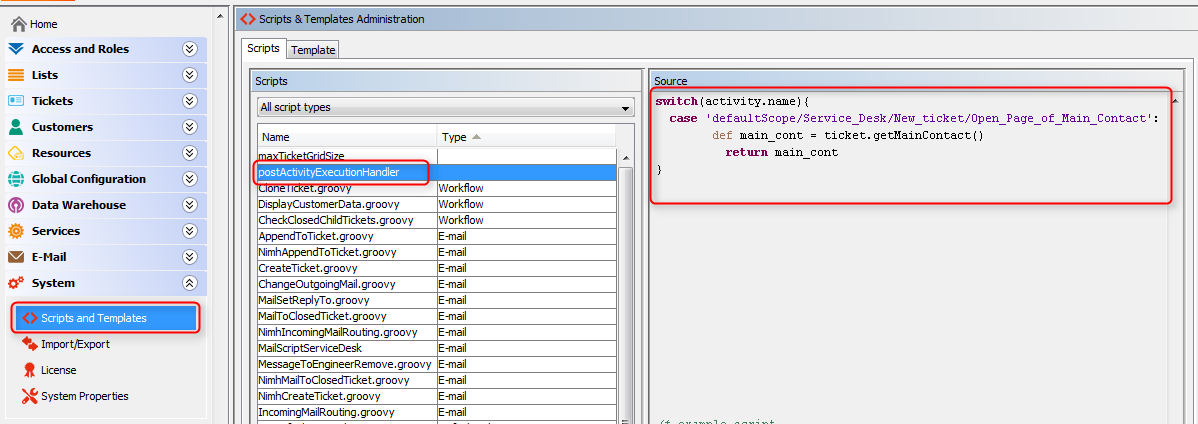
Figure 335: ConSol CM Admin Tool - PostActivityExecutionHandler script
switch(activity.name){
case 'defaultScope/Service_Desk/New_ticket/Open_Page_of_Main_Contact':
def main_cont = ticket.getMainContact()
return main_cont
// ( ... )
}
Code example 60: PostActivityExecutionHandler
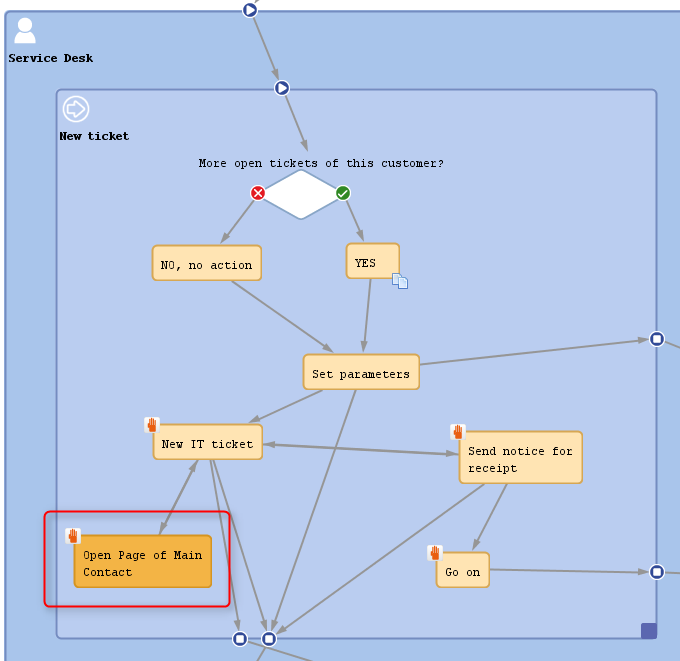
Figure 336: ConSol CM Process Designer - Activity which will be controlled using the PostActivityExecutionScript
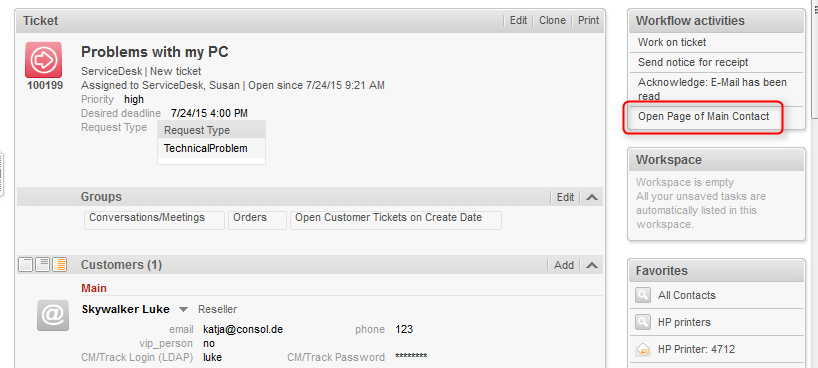
Figure 337: ConSol CM Web Client - Ticket with workflow activity which will jump to contact page
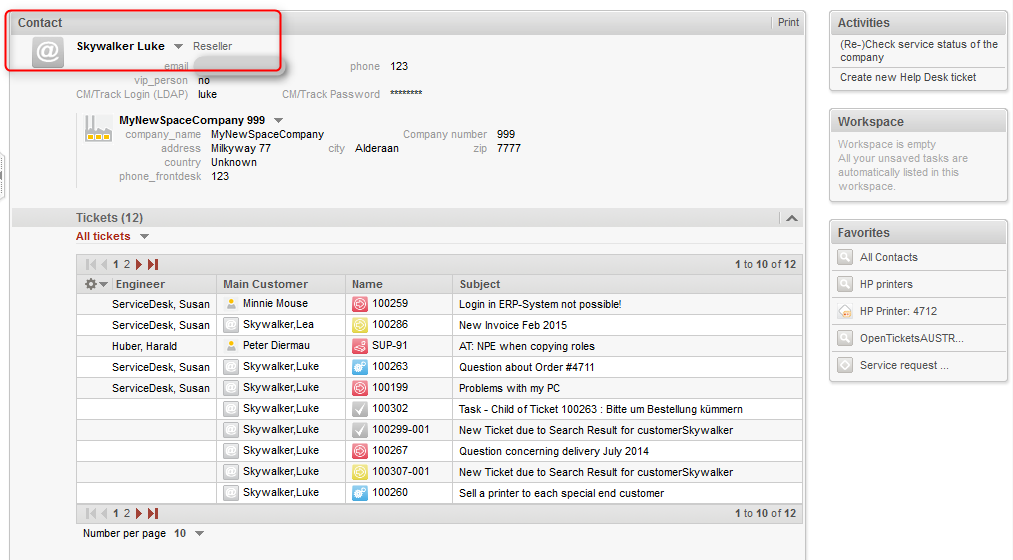
Figure 338: ConSol CM Web Client - Contact page which has been opened directly from ticket