On this tab, you can define groups and fields for ticket data.
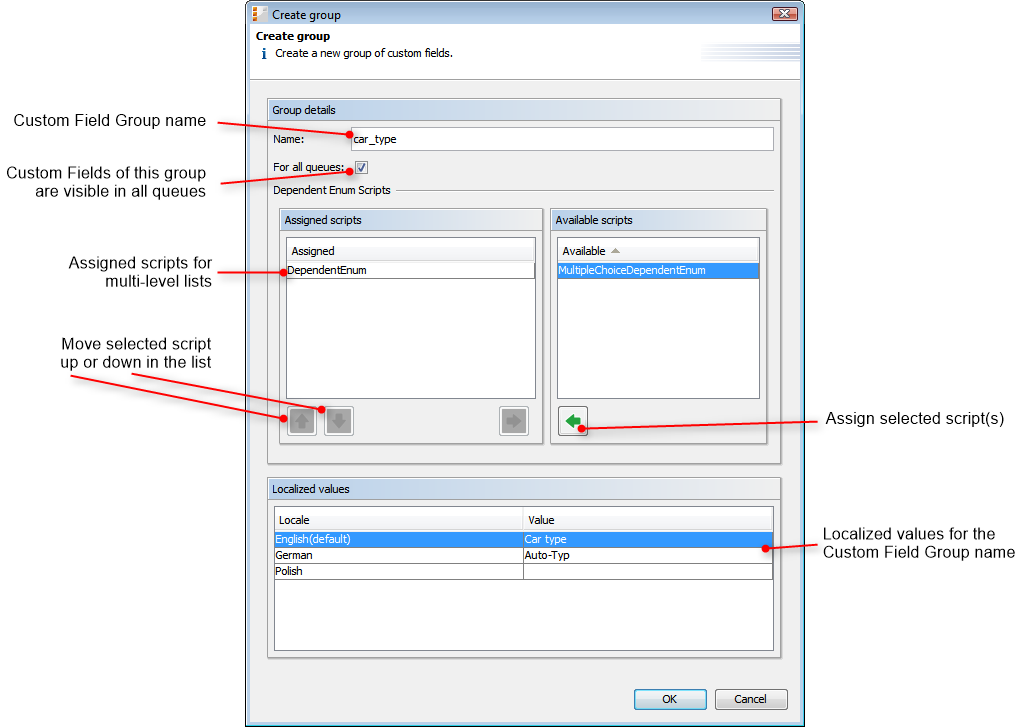
To create a new Custom Field Group just click the Add button below the list on the left side of the page. The following pop-up window appears:
Figure 3: ConSol CM Admin Tool - Custom Field administration: Creating a Custom Field Group
If you want to edit a Custom Field Group, select it in the list and click the Edit button. The same window as described above for creating a Custom Field Group will appear. You can modify all fields and save your changes by clicking OK.
Custom Field Groups are annotated to define their characteristics, e.g., where a group is displayed in the Web Client, if a group is indexed, or if it should be visible. You can define, e.g., whether a group is visible in the Web Client (annotation group-visibility) or whether it is shown in the Groups section of the Web Client (annotation show-in-group-section). To assign annotations select a group and click the Annotate button. The following pop-up window appears:
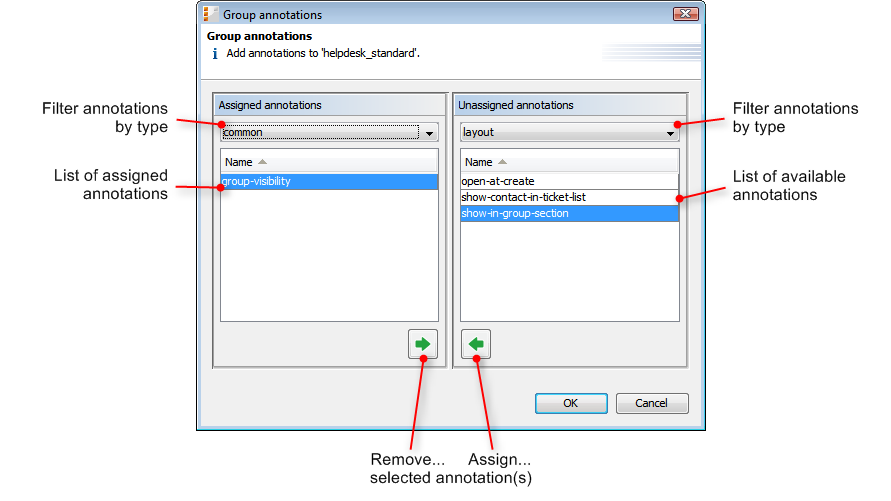
Figure 4: ConSol CM Admin Tool - Custom Field administration: Assign Custom Field Group annotations
The right part of the window contains the available annotations. Using the selection field above the list you can filter the display by annotation type (e.g. common or layout). Select the desired annotations and move them to the Assigned annotations list on the left by clicking the Assign button. This list can also be filtered by annotation type. Click OK to assign the annotations to the Custom Field Group and to close the window. See Annotations, section Group Annotations for detailed information.
The annotations are now shown with a default value (if available, e.g., true or false) in the bottom left-hand corner of the administration page. The value can be modified by double-clicking into the corresponding Value field and typing the desired value. Press the Enter key afterwards.
Custom Field Groups will appear in the Web Client as they are ordered in the list. Select a group and use the Move upwards and Move downwards buttons and if you want to change the position of this group in the list.
A Custom Field Group can only be deleted if it is not assigned to a queue or a ticket. Otherwise you get a warning stating you can only disable this group (see below). In order to delete a Custom Field Group select it in the list and click the Delete button. If you confirm the following dialog with Yes, the group with its corresponding fields is removed from the list and the system.
If you cannot delete a Custom Field Group, or if you do not want to delete it because you might need it again, you can disable it. To do so select the group and click the Deactivate button. The entry in the list is shown in italics afterwards. Disabled Custom Field Groups are not displayed in the Web Client. Just click the Activate button below the group list if you want to enable the group again.
Custom Fields contain the data for tickets, e.g., priority, service level, deadline, or hardware module. The fields of a Custom Field Group are created in the right part of the page. Select the desired group first on the left and then click the Add button below the Custom Field area on the right. The following pop-up window appears:
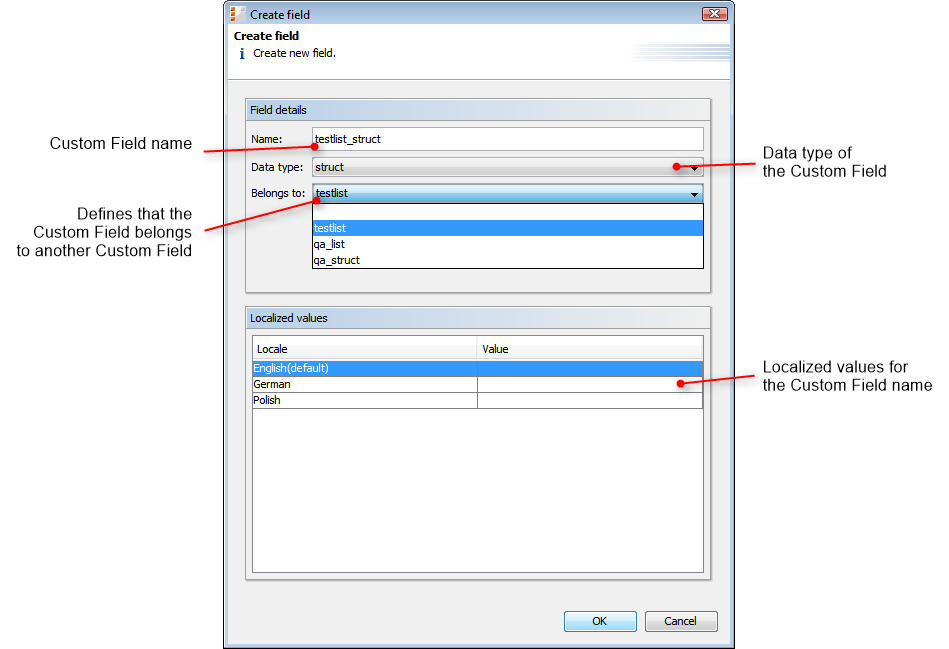
Figure 5: ConSol CM Admin Tool - Custom Field administration: Create a Custom Field for ticket data
Fill out the following information:
The following data types are available for Custom Fields, Data Object Group Fields and Resource Fields.
If you work with scripts, either in CM workflows or in the Admin Tool, please note that the behavior of boolean fields which are represented as checkboxes, i.e. with annotation boolean-type = checkbox (default) is different depending on the CM version!
Fields which have already been filled with values in the database will not be changed during an update from a version prior to 6.9.4.0 to a version 6.9.4.0 and up.
Boolean fields represented as radio buttons (annotation boolean-type = radio) or drop-down menu (annotation boolean-type = select) are always shown and behave as described for versions 6.9.4.0 and up, i.e., with NULL value if untouched.
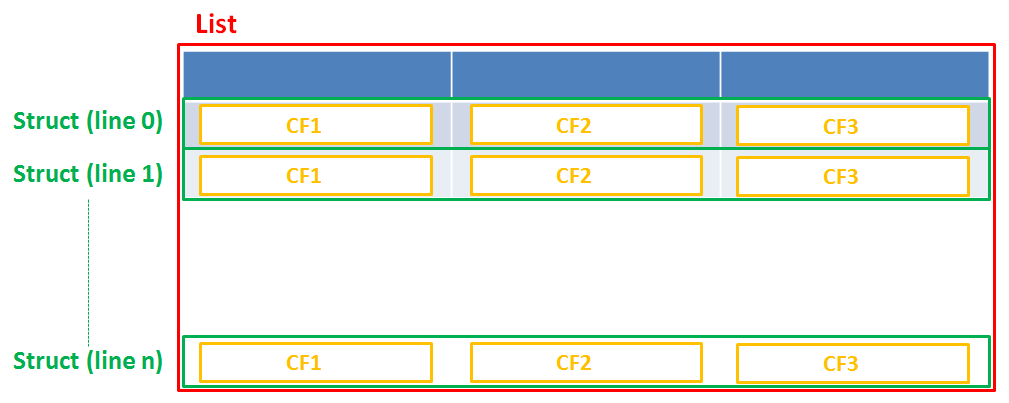
Figure 6: Scheme: List of Structs
Technically spoken, the list is an array which contains a map (= key:value pairs) in each field.
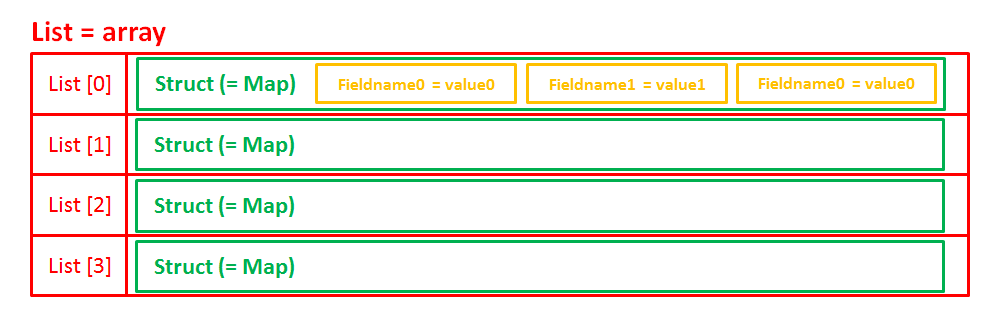
Figure 7: List of structs, tecnical principle
Restriction when using an Oracle database: at most 4000 bytes can be saved in UTF encoding. Starting with Oracle12c.
For long strings the limit depends on the database system used for ConSol CM: MS SQL Server: 2 GByte; MySQL: 4 GByte; Oracle: 16 - 64 GByte (depending on page size of tablespace).
For string fields, you can use specific annotations to fine-tune the field definition. For example, a string field can be defined to contain a URL which will automatically be displayed as hyperlink. Please read the following section.
The data type you choose on creating a data field cannot be changed afterwards!
String fields are widely used for customer, ticket, and resource data and strings can be used to contain various content, for example, a text box with a comment, a simple input field with only 20 characters, a URL or a password. The fine-tuning of string fields is implemented using specific annotations which are all listed on the Annotations page. However, since work with these annotations is an every-day task of CM administrators, the most important and most commonly used annotations will be explained here as well.
Value for annotation text-type: textarea
The size of the text box can be adjusted, displayed as standard text box depending on web browser. Use the field-size annotation in case a specific size of the text box is required.
Value for annotation text-type: password
Only dots will be displayed. This annotation does not define the field to contain a password! It only defines the display mode! Use the password annotation to define a string field to contain the CM.Track password.
Value for annotation text-type: url
Input will be displayed as a hyperlink in view mode. String has to match a specific URL pattern:
First part of the string is the link (url), second part is the name which should be displayed.
Example: "http://consol.de ConSol"
Value for annotation text-type: file-url
Input will be displayed as a link to a file on the file system. The web browser has to allow/support those links!
Example: Enabling file:// URLs in a Firefox browser
Add the following lines to either the configuration file prefs.js or to user.js in the user profile. On a Windows system usually in a folder like C:\Users\<USERNAME>\AppData\Roaming\Mozilla\Firefox\Profiles\uvubg4fj.default
Alternatively a Firefox browser add-on like Local Filesystem Links can be installed for better access to the referenced files and folders.
The link will also be displayed as tooltip.
The URL is correctly formed if the following conditions are met:
Example URLs:
Value for annotation text-type: label
This will be a read-only field which is displayed in gray, use the label-group annotation to link label and input fields which belong together.
Value for annotation username: true
Will be used for authentication against CM.Track server. Only for Data Object Group Fields in a contact object.
Value for annotation password: true
Will be used for authentication against CM.Track server (in DATABASE mode). Only for Data Object Group Fields in a contact object.
Value for annotation email: true
The field may only contain valid e-mail addresses. Input will be validated according to standard e-mail format <name>@<domain>.
If you want to edit a Custom Field, select it in the list and click the Edit button. The same window as described above for creating a Custom Field will appear. Except for data type, enum type, and enum group you can modify all fields and save your changes by clicking OK.
Just like Custom Field Groups, Custom Fields are annotated to define the properties of the field, e.g., is it read-only, should it be indexed, and where it should be displayed on the Web Client GUI (please see section Annotations for a list of all available annotations). Select a field and click the Annotate button below the list. The following pop-up window appears:
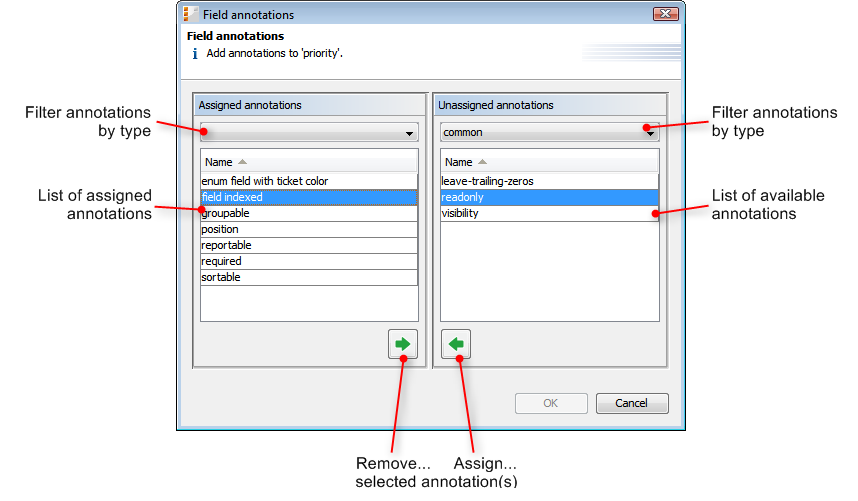
Figure 8: ConSol CM Admin Tool - Custom Field administration: Assign Custom Field annotations
The right part of the window contains the available annotations. Using the selection field above the list you can filter the display according to annotation type. Select the desired annotations and move them to the Assigned annotations list on the left by clicking the Assign button. This list can also be filtered according to annotation type. Click OK to assign the annotations to the Custom Field and to close the window.
The annotations for the selected field are now shown with a default value (if available, e.g. true or false) in the bottom right-hand corner of the administration page. The value can be modified by double-clicking the corresponding Value field and typing the desired value. Press the Enter key afterwards.
Custom Fields will appear in the Web Client as they are ordered in the list unless you have assigned a layout via the position annotation. You can change the position of a field in the list by using the Move upwards and Move downwards buttons below.
Note on the layout of the ticket data:
You can define several columns of data fields on each line, e.g., the position annotation can end with 0, 1 or 2.
| 0;0 | 0;1 | 0;2 |
| 1;0 | 1;1 | 1;2 |
A Custom Field can only be deleted if it is not assigned to a queue or a ticket, otherwise you get a warning stating you can only disable this field (see below). In order to delete a Custom Field, select it in the list and click the Delete button. If you confirm the following dialog with Yes, the Custom Field will be removed from the list and the system.
If you cannot delete a Custom Field, or if you do not want to delete it because you might need it again, you can disable it. To do so select the field and click the Deactivate button. The entry in the list is shown in italics afterwards. A disabled Custom Field is not displayed in the Web Client. Just click the Activate button below the Custom Field list, if you want to enable the field again.