Enums, also called sorted lists, are lists with predefined list values. You define an enum in the navigation item Enums from the navigation group Tickets. Enums are defined once and can be used in several places:
You only define the lists, i.e., the structures with various list values, in the enum administration. To display the enum in the Web Client (as Custom Field values, Data Object Group Field values, or Resource Field values), you have to complete one of the following steps:
Examples:
A list of country names (Germany, Italy, France, etc.) is used in the Data Object Group Field Country belonging to an address data set. The same list can also be used in the ticket data Custom Field Machine location and in other data fields. Priority lists (high, normal, low, etc.) are other typical examples.
Depending on the value of the enum-type annotation, an enum field is displayed in the Web Client as follows:
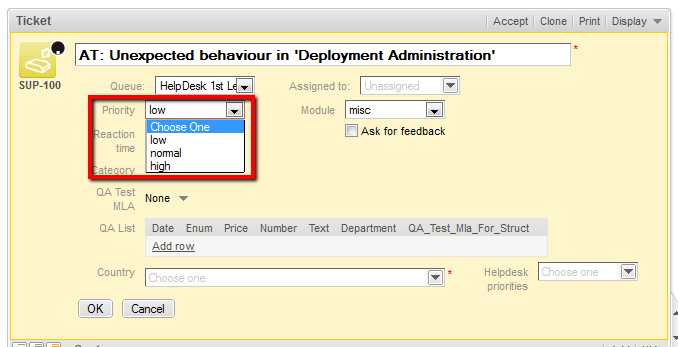
If the annotation enum-type is not set, a drop-down menu is displayed by default (see example in the picture below).
Figure 16: ConSol CM Web Client - Enum for Priority (localized enum values displayed as list items)
Enums are organized in three levels:
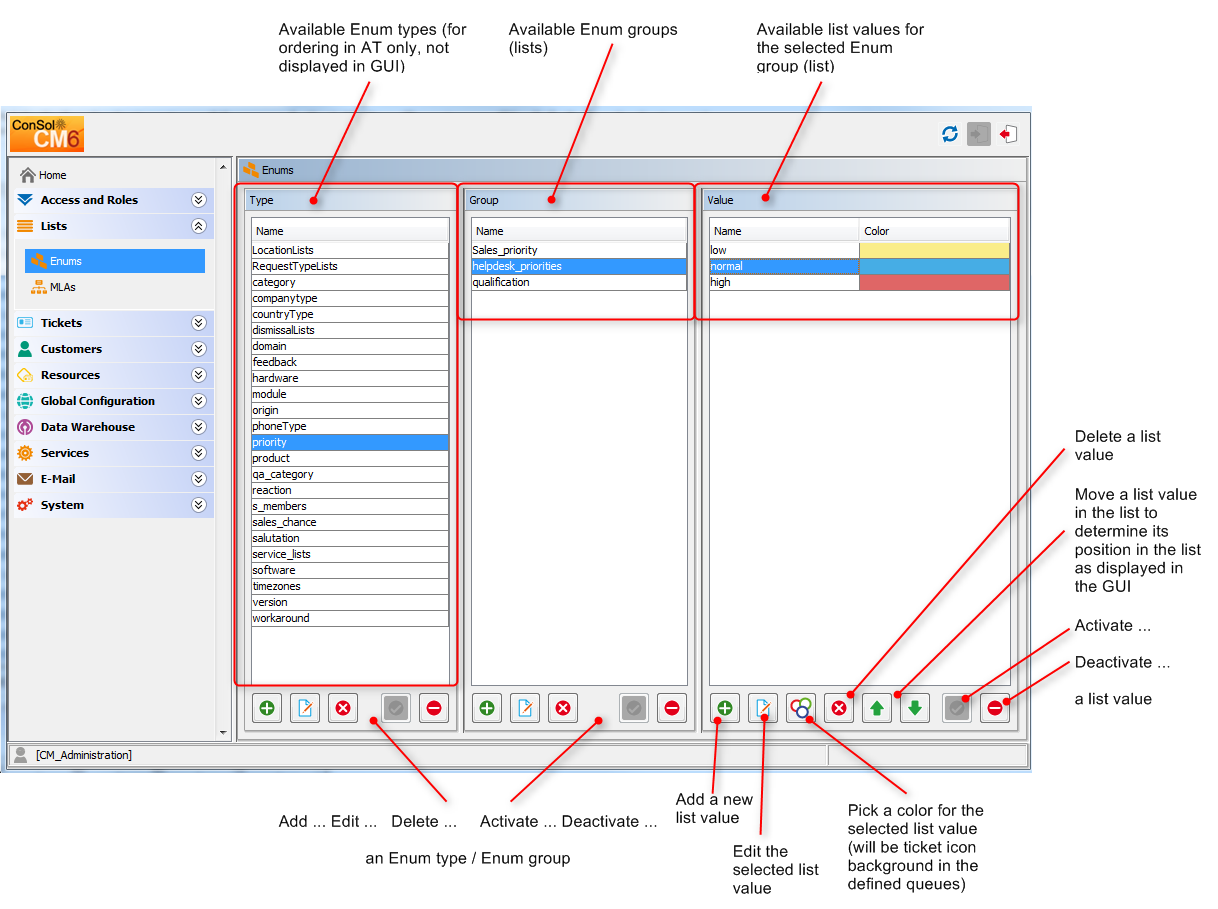
Figure 17: ConSol CM Admin Tool - Enum administration
To create a new enum type just click the Add buttonbelow the list in the Type area on the left of the window. The following pop-up window appears.
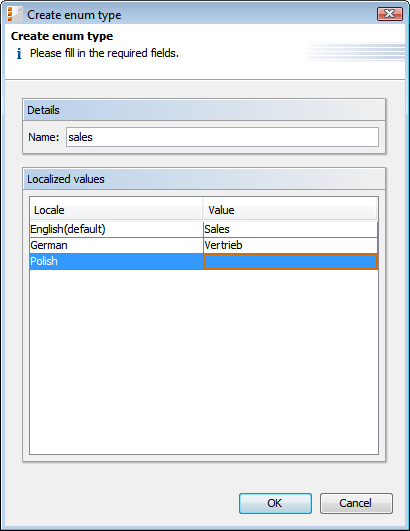
Figure 18: ConSol CM Admin Tool - Enum administration: Create an enum type
Click OK to create the enum type and to close the window.
If you want to edit an enum type, select it in the list and click the Edit button. The same window as described above for creating an enum type will appear. You can modify all fields and save your changes by clicking OK.
An enum type can only be deleted if there are no enum groups for it anymore. Either you have to delete all groups belonging to this type first or you have to assign them to another type. In order to delete an enum type, select it in the list and click the Delete button. If you confirm the following dialog with Yes, the type will be removed from the list and the system.
If you do not want to delete an enum type because you might need it again, you can disable it. To do so select the type and click the Deactivate button. The entry in the list is shown in italics afterwards. Just click the Activate button below the type list, if you want to enable the type again.
An enum group represents a list, i.e., the enum group is a collection of list (enum) values. All groups of an enum type (i.e., all lists which belong to this type) are created and managed in the middle part of the Enum Administration window. To create a new enum group select the desired type on the left, then click the Add button below the Group area. The following pop-up window appears:

Figure 19: ConSol CM Admin Tool - Enum administration: Create an enum group
Click OK to create the enum group and to close the window.
If you want to edit an enum group, select it in the list and click the Edit button. The same window as described above for creating an enum group will appear. You can modify all fields and save your changes by clicking OK.
An enum group can only be deleted if it is not used in a ticket or an MLA. In order to delete a group, select it in the list and click the Delete button. If you confirm the following dialog with Yes, the group will be removed from the list and the system.
An enum group cannot be disabled if it is still used in an MLA.
If you cannot delete an enum group or if you do not want to delete it, because you might need it again, you can disable it. To do so select the group and click the Deactivate button. The entry in the list is shown in italics afterwards. Just click the Activate button below the group list, if you want to enable the group again.
The individual values of an enum group (i.e., the list values) are created in the right part of the window. Select the desired group and click the Add button below the Value area. The following pop-up window appears.
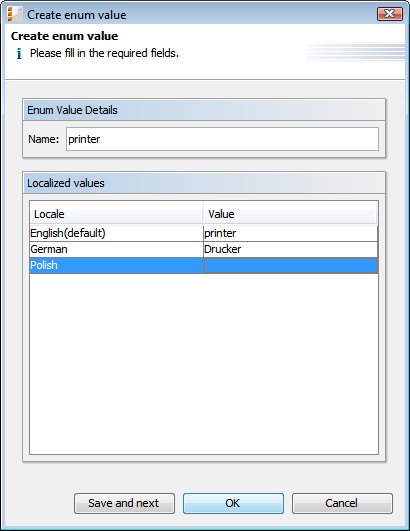
Figure 20: ConSol CM Admin Tool - Enum administration: Create an enum value
Click Save and next if you want to continue to create values for this enum group. To finish the creation of the list click OK.
If you want to edit an enum value, select it in the list and click the Edit button. A pop-up window will appear where you can modify the name and the localized values. Click OK to save your changes.
You can assign a color to a selected enum value by clicking the Color button. This can be used, for example, for priorities. The priority of a ticket in the Web Client can be recognized immediately by the background color of the ticket icon. This will be effective when the respective annotation is set, see the following info box.
Please note that only one enum can determine the color of the ticket icon for a queue. You have to assign the annotation enum field with ticket color to the respective Custom Field of type enum in the Custom Field Administration (Setting Up the Ticket Data Model). For example, you can use the Custom Field priority to determine the ticket icon color in the helpdesk queue and the Custom Field (enum) likelihood of closing a deal in the sales queue.
The pop-up window contains a range of colors from which you can choose the desired background color. Click the desired color to set it for the marked list value. You can check the selected color in the Preview area. Click OK to save your choice. Click Reset if you want to restore the last saved color.
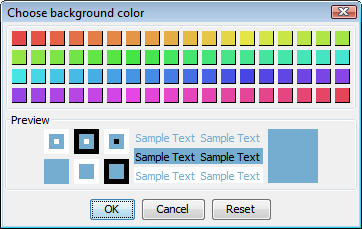
Figure 21: ConSol CM Admin Tool - Enum administration: Set a background color
An enum value can only be deleted if it is not used in an MLA. To delete a value, select it in the list and click the Delete button. If you confirm the following dialog with Yes, the value will be removed from the list and the system.
Before you delete an enum value, make sure there are no references to it in workflow scripts! This is not checked in the Admin Tool!
If you have chosen user-defined in the Order by field of an enum group, you can arrange the enum values by using the arrow icons below the list. Click the Move upwards button to move the selected value one line up resp. click the Move downwards button to move it one line down. If you change the value for Order by from user-defined to name, the enum values will automatically be ordered by name in alphabetical order.
An enum value cannot be disabled if it is still used in an MLA.
If you do not want to delete an enum value because you might need it again, you can disable it. To do so, select the value and click the Deactivate button. The entry in the list is shown in italics afterwards and the value is not available in the Web Client any longer. Just click the Activate button below the value list if you want to enable the value again.
Enums can be used in Custom Fields (i.e. for ticket data), Data Object Group Fields (i.e. for customer data) and Resource Fields (i.e. for resource data). The example below shows an enum for ticket data.
In order to place an enum in the ticket data model, i.e., to make it available in queues and visible in the Web Client, a Custom Field of type enum has to be defined. Please see section Custom Field Administration (Setting Up the Ticket Data Model) for a detailed explanation of the work with Custom Fields.
In order to place an enum in the customer data model, i.e., to make it available for company or contact data in the Web Client, a Data Object Group Field of type enum has to be defined. Please see section Data Object Group Field Management and GUI Design for Customer Data for a detailed explanation of the work with Data Object Group Fields.
In order to place an enum in the resource data model, i.e., to make it available in resources in the Web Client, a Resource Field of type enum has to be defined. Please see section CM.Resource Pool - Setting Up the Basic Resource Model for a detailed explanation of the work with Resource Fields.
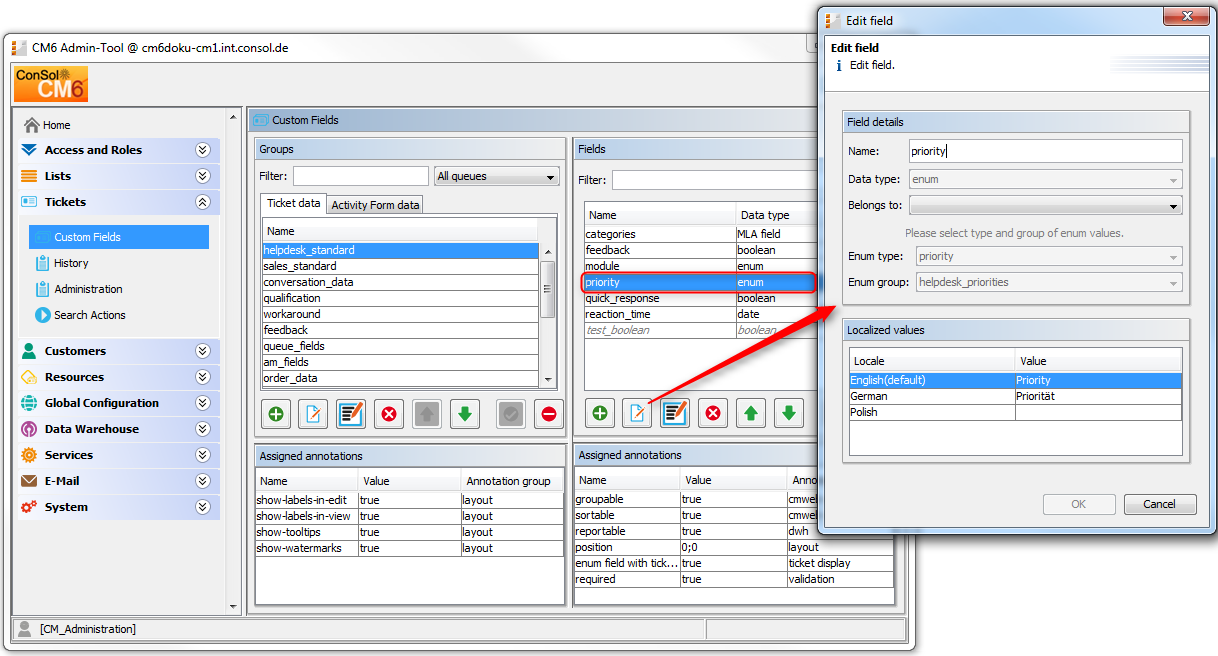
Figure 22: ConSol CM Admin Tool - Definition of a Custom Field of type enum