Ticket Fields (Setting Up the Ticket Data Model)
Introduction
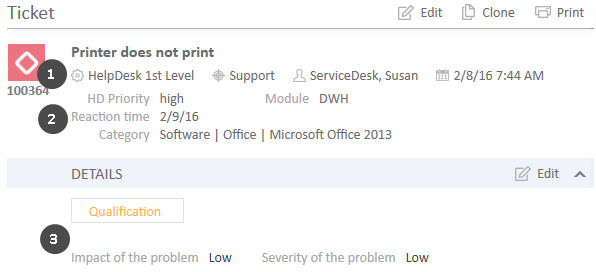
Ticket fields are defined for tickets. By default, all tickets contain information about the assigned engineer, the creation data, and the current queue and scope. These default fields are displayed in the upper part of the ticket next to the ticket icon (1). In addition to these fields, the CM administrator can define ticket fields adapted to the use case implemented in ConSol CM. Examples for ticket fields are priority, software module, reaction time, or sales potential. Ticket fields always belong to ticket field groups, which are then assigned to queues to make the ticket fields available. The ticket fields can be displayed in the ticket header (2) or in the Details section (3).
Figure 36: ConSol CM Web Client - Ticket fields
- can be assigned to a queue. For example, the ticket field group helpdesk_fields can be assigned to the queue HelpDesk.
- can be faded in and out in the Web Client GUI during the process. For example, you can fade in the ticket field group solution later in the process, so it is displayed at the point when the engineer found a solution to the issue reported by the customer. You cannot fade in or out single ticket fields.
- can be displayed below the default fields or as a tab in the Details section of a ticket. In the latter case, the title and mouse-over of the tab is the (localized) name of the ticket field group. If the ticket field group is displayed in the ticket header, the group name is not shown.
- is configured using group annotations. Annotations are set to define special parameters and characteristics of a ticket field group, e.g. the initial display mode on the user interface. Please see List of Group Annotations for further information about the available group annotations.
- is placed on the Web Client GUI based on its position in the list of ticket field groups, which defines the order of the ticket field groups in the ticket header and/or the order of the tabs.
- is always defined within a ticket field group.
- is assigned to a queue as a part of its ticket field group.
- can be made invisible using annotations, but cannot be faded in or out as single field during the process.
- is configured using field annotations. Annotations are set to define special parameters and characteristics of a ticket field, e.g. the position on the user interface. Please see List of Field Annotations for further information about the available field annotations.
- is placed on the Web Client GUI based on the value of its position annotation or based on its position in the list (the first ticket field in the list is displayed first on the GUI) if position is not set.
To define new ticket fields for a queue, you have to perform the following steps:
- Define a ticket field group and set the respective annotations.
- Define all sorted lists which you will need for the ticket fields (see Managing Sorted Lists: Enums). For example, if the ticket field priority should contain a list of priorities, you have to define this list first.
- Define all ticket fields within the new ticket field group.
- Assign the new ticket field group to the queue where its ticket fields are required.
- Test the results in the Web Client GUI. You do not need to log in again, it will be sufficient to refresh a page which shows a ticket in the respective queue.
All these steps are explained in detail in the following sections.
In case some data fields should be offered in a form during one or more processes, Activity Control Forms (ACFs) can be defined. This is explained in the section Tab Activity Form Data.
Ticket Field Administration Using the Admin Tool
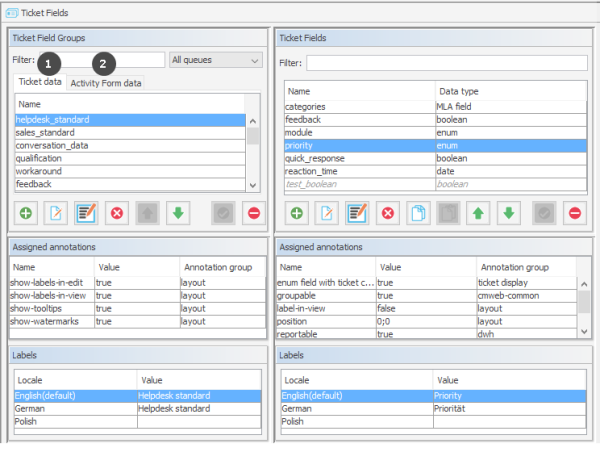
In the Admin Tool, ticket fields are managed using the navigation item Ticket fields in the navigation group Tickets.
Figure 37: ConSol CM Admin Tool - Tickets, Ticket Fields
The navigation item Ticket fields has two tabs:
- Tab Ticket Data (1): This tab is used to define ticket field groups and ticket fields.
- Tab Activity Form Data (2): This tab is used to define Activity Control Forms.
Both tabs are explained in detail in the following sections. You can switch between the tabs by clicking the tab header.

