Tab Ticket Data
On this tab, you can define groups and fields for ticket data.

Figure 38: ConSol CM Admin Tool - Tickets, Ticket Fields
The Ticket data tab consists of six sections:
- Ticket field groups (1)
- Annotations of the selected ticket field group (2)
- Labels, i.e., localized values, of the selected ticket field group (3)
- The ticket fields of the selected ticket field group (4)
- Annotations of the selected ticket field (5)
- Labels, i.e., localized values, of the selected ticket field (6)
Create a Ticket Field Group
To create a new ticket field group just click the Add button below the list on the left side of the page. The following pop-up window appears.

Figure 39: ConSol CM Admin Tool - Tickets, Ticket Fields: Creating a ticket field group
- Name (1)
Enter a name for the ticket field group. The name must be unique. The localized names for a ticket field group are set in the main Ticket Fields panel. For details, please refer to section Localization of Data Fields. - For all queues (2)
If this check box is activated, this group's ticket fields are automatically assigned to all queues. A ticket field group which is marked as for all queues will also be assigned automatically to each newly created queue. Usually ticket field groups for ticket data are only valid in specific queues (see Queues). - Available scripts, i.e., Dependent Enum Scripts (3)
Dependent enum scripts define the structure of dependent enums (hierarchical multi-level lists) used in ticket fields of this ticket field group. With dependent enums you can limit the choices in multi-level lists. You select an element in a list and, based on this selection, only matching results will be shown in the next lower hierarchy level of the list. The enums (single lists) for the ticket fields have to be created within the Managing Sorted Lists: Enums while the scripts that couple the lists to create the dependent enum are created using an Admin Tool script, see section Admin Tool Scripts.
To assign dependent enum scripts to a ticket field group select the desired script(s) in the list Available scripts and move them to the list Assigned scripts by clicking the Assign button.
Edit a Ticket Field Group
If you want to edit a ticket field group, select it in the list and click the Edit button. The same window as described above for creating a ticket field group will appear. You can modify all fields and save your changes by clicking OK.
Annotate a Ticket Field Group
Ticket field groups are annotated to define their characteristics, e.g., where a group is displayed in the Web Client, if a group is indexed, or if it should be visible. You can define, e.g., whether a group is visible in the Web Client (annotation group-visibility) or whether it is shown in the Details section of the Web Client (annotation show-in-group-section). To assign annotations select a group and click the Annotate button. The following pop-up window appears:

Figure 40: ConSol CM Admin Tool - Tickets, Ticket Fields: Assigning annotations to a ticket field group
The right part of the window contains the available annotations (2). Using the selection field above the list you can filter the display by annotation type, e.g., common or layout (3). Select the desired annotations and move them to the Assigned annotations list on the left (1) by clicking the Assign button (4). This list can also be filtered by annotation type. Click OK to assign the annotations to the ticket field group and to close the window. See Annotations, section Group Annotations for detailed information.
The annotations are now shown with a default value (if available, e.g., true or false) in the bottom left-hand corner of the administration page. The value can be modified by double-clicking into the corresponding Value field and typing the desired value. Press the Enter key afterwards.
Ticket field groups will appear in the Web Client as they are ordered in the list. Select a group and use the Move upwards and Move downwards buttons and if you want to change the position of this group in the list.
Delete a Ticket Field Group
A ticket field group can only be deleted if it is not assigned to a queue or a ticket. Otherwise you get a warning stating you can only disable this group (see below). In order to delete a ticket field group select it in the list and click the Delete button. If you confirm the following dialog with Yes, the group with its corresponding fields is removed from the list and the system.
Enable or Disable a Ticket Field Group
If you cannot delete a ticket field group, or if you do not want to delete it because you might need it again, you can disable it. To do so select the group and click the Deactivate button. The entry in the list is shown in italics afterwards. Disabled ticket field groups are not displayed in the Web Client. Just click the Activate button below the group list if you want to enable the group again.
Create a Ticket Field
Ticket fields contain the data for tickets, e.g., priority, service level, deadline, or hardware module. The fields of a ticket field group are created in the right part of the page. To create a new ticket field, select the desired group first on the left and then click the Add button below the Ticket Fields area on the right. The following pop-up window appears:

Figure 41: ConSol CM Admin Tool - Tickets, Ticket Fields: Creating a ticket field
Fill out the following information:
- Name (1):
Enter a name for the ticket field. The name must be unique within the ticket field group. The localized names for a ticket field are set in the main Ticket Fields panel. For details, please refer to section Localization of Data Fields. - Data type (2):
Choose one of the available data types for the new ticket field. Please see Types of Data Fields. - Description (3):
Enter the description for the ticket field. If provided, the description will be used as a tooltip in the Web Client. You can enter a localized description using the globe icon. For details, please refer to section Localization of Objects in General, Type 1. - Belongs to (4):
This field shows the available ticket fields of the data types list and struct used to create lists or tables. Choose in the drop-down box to which list or structure the ticket field belongs (if applicable).
Types of Data Fields
The following data types are available for ticket fields, customer fields and resource fields.
- autocomplete
A data field which contains a text autocomplete field. This is a dynamic list which is based on a script of type Text Autocomplete. A detailed explanation of text autocomplete fields is given - boolean
Values: true/false. Depending on the annotation boolean-type, the value is displayed as checkbox, radio buttons, or drop-down list.If a boolean field has not been touched, its value is NULL. If it is checked, its value is true, and if it is unchecked again, its value is false.
- date
Format and accuracy can be set by annotations. - enum
For sorted lists. The engineer can choose one of the enum values in the Web Client. Enums and values have to be created previously within the Managing Sorted Lists: Enums. Select the desired Enum type and Enum group in the fields below. - list
A data field of this data type is the first step to creating a list (one column) or a table (multiple columns) of input fields in the Web Client.- For a table the next step will be to create another field of type struct (see below) to contain the input of the individual list fields (which will become the columns of the table). So, if you want to create a table you have to define a field of the type struct first (see below) before you can add the fields for the table columns.
- For a simple list, the next step will be to create fields which belong to the list. No struct is required.
- struct
A data field of this type defines a data structure (line of a table) which groups one or multiple fields. It is the second step to building a table after you have created a field of the type list. Add the fields for the columns of the table in the next step. The dependencies have to be set for each field in the Belongs to field (see below), i.e., a struct always belongs to a list.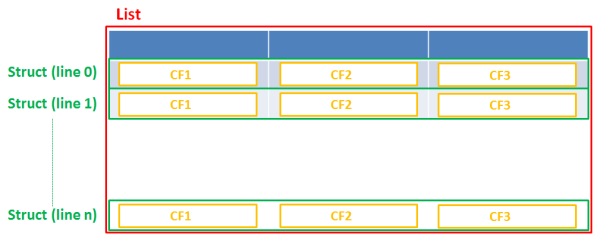
Figure 42: Scheme: List of structs
Technically spoken, the list is an array which contains a map (= key:value pairs) in each field.
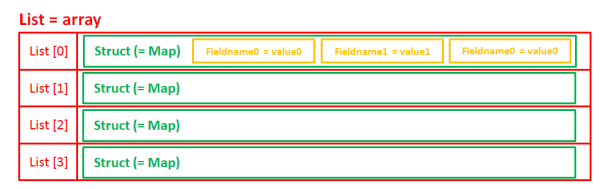
Figure 43: List of structs, technical principle
- number
For integer values. - fixed point number
For numbers with a fractional part, e.g., currencies. You have to enter the total number of digits (Precision) and the number of digits that fall to the right of the decimal point (Scale) in the respective fields below. - string
For up to 4000 alphanumeric characters.Restriction when using an Oracle database: at most 4000 bytes can be saved in UTF encoding. Starting with Oracle12c.
- long string
For large objects.For long strings the limit depends on the database system used for ConSol CM: MS SQL Server: 2 GByte; MySQL: 4 GByte; Oracle: 16 - 64 GByte (depending on page size of tablespace).
- short string
For up to 255 alphanumeric characters.For string fields, you can use specific annotations to fine-tune the field definition. For example, a string field can be defined to contain a URL which will automatically be displayed as hyperlink or can be the hook for an autocomplete list. Please read the following section.
- contact data reference
Special data type used internally for referencing the contacts associated with a ticket. This data type is not displayed but only used internally in the CM system. - MLA field
This data type is used for fields that contain hierarchical lists with a tree structure called MLA (Multi Level Attributes). The name of the field is the name of the new MLA that has to be defined within the MLAs. The group of the field has to be referenced when the MLA is created.


The data type you choose on creating a data field cannot be changed afterwards!
Using Annotations to Fine-Tune Data Fields
String fields are widely used for customer, ticket, and resource data and strings can be used to contain various content, for example, a text box with a comment, a simple input field with only 20 characters, a URL or a password. The fine-tuning of string fields is implemented using specific annotations which are all listed on the Annotations page. However, since work with these annotations is an every-day task of CM administrators, the most important and most commonly used annotations will be explained here as well.
How can I ...
... insert a text box instead of a single line?
Value for annotation text-type: textarea
The size of the text box can be adjusted, displayed as standard text box depending on web browser. Use the field-size annotation in case a specific size of the text box is required.
... hide the input of the fields for passwords?
Value for annotation text-type: password
Only dots will be displayed. This annotation does not define the field to contain a password! It only defines the display mode! Use the password annotation to define a string field to contain the CM/Track password.
... display a hyperlink, display the name instead of the link?
Value for annotation text-type: url
Input will be displayed as a hyperlink in view mode. String has to match a specific URL pattern:
- "^((?:mailto\:|(?:(?:ht|f)tps?)\://)1\S+)(?: (?:\| )?(.*))?$"
First part of the string is the link (url), second part is the name which should be displayed.
Example: "http://consol.de ConSol"
... display a file link?
Value for annotation text-type: file-url
Input will be displayed as a link to a file on the file system. The web browser has to allow/support those links!
Example: Enabling file:// URLs in a Firefox browser
Add the following lines to either the configuration file prefs.js or to user.js in the user profile. On a Windows system usually in a folder like C:\Users\<USERNAME>\AppData\Roaming\Mozilla\Firefox\Profiles\uvubg4fj.default
- user_pref("capability.policy.localfilelinks.checkloaduri.enabled", "allAccess");
- user_pref("capability.policy.localfilelinks.sites", "http://cm-server.domain.com:8080");
- user_pref("capability.policy.policynames", "localfilelinks");
Alternatively a Firefox browser add-on like Local Filesystem Links can be installed for better access to the referenced files and folders.
The link will also be displayed as tooltip.
The URL is correctly formed if the following conditions are met:
- It starts with file: followed by regular slashes:
- three slashes "///" for files on the same computer as the browser (alternatively "//localhost/") or
- two slashes followed by the server name followed by another slash for files on file servers accessible from the computer running the browser.
- These are followed by the full path to the file ending with the file name.
- The path on Microsoft Windows systems is also written with forward slashes instead of backslashes.
- The drive letter of a local path on Microsoft Windows systems is noted as usual, for example C:.
- Paths with spaces and special characters like "{, }, ^, #, ?" need to be percent encoded ("%20" for a space for example) for Microsoft Windows systems.
Example URLs:
- file://file-server/path/to/my/file.ext
- file:///linux/local/file.pdf
- file:///C:/Users/myuser/localfile.doc
See also the explanation about file-url in the section text-type
... define a label?
Value for annotation text-type: label
This will be a read-only field which is displayed in gray, use the label-group annotation to link label and input fields which belong together. Please take a look at the annotations for labels (show-label-in-edit, show-label-in-view) before implementing special label fields!
... define a field for the valid email addresses?
Value for annotation email: true
The field may only contain valid email addresses. Input will be validated according to standard email format <name>@<domain>.
... define a scripted autocomplete list?
Value for the annotation text-type = autocomplete
Optional: value for the annotation autocomplete-script = <name of the respective script>
A scripted autocomplete list is used to provide a drop-down menu which is filled dynamically using the input the engineer has provided so far. For example, when the user types "Mil", the possible values "Miller", "Milberg", and "Milhouse" are displayed as list and the engineer can select the one required for the field. You know this behavior from other autocomplete fields, e.g., the search for engineers for a ticket or the search for customers while creating a ticket. However, in these cases, CM generates the list automatically. The behavior cannot be influenced or customized. Scripted autocomplete lists, on the contrary, can be implemented by the CM administrator. The values are based on a result set which is dynamically created. The result set can contain strings, engineers, customers (Units), and resources.
A detailed description of scripted autocomplete lists is provided in section Scripts of Type Text Autocomplete.
... define a field containing personal data?
Value for annotation personal-data: true
This annotation can be assigned to ticket and contact fields. Contact fields with this annotation will be deleted when a contact is anonymized. Ticket fields with this annotation will be deleted when the main customer of the ticket is anonymized.
When defining a field to contain personal data, please take into account that the deletion of the field during the anonymization process is treated as a regular update. Therefore, business event triggers reacting on changes to ticket fields fire, and the contact update action script is executed.
This might lead to unwanted side-effects.
... define a rich text field?
Create a field of the type long string.
Value for the annotation string-content-type: html-inline (field content is directly displayed on the GUI in view mode) or html-link (field content is displayed in a pop-up window after clicking the Show content link in view mode)
A rich text field can contain images and formatted text. In the edit mode, it features a basic editor.
... define a tooltip for a data field?
Value of the annotation show-tooltip = true
When creating or editing a data field, you can enter a text in the Description field. This text is used as a tooltip in the Web Client. You can enter a localized description using the globe icon.
This does not apply to date fields and fields containing phone numbers and URLs, as they have special tooltips.
... optimize the data field layout?
Use three columns to display the data fields (two columns are also possible, but do not use the available space as efficiently). This is set in the system property cmweb-server-adaper, defaultNumberOfCustomFieldsColumns. In ACFs, you can determine the number of columns using the Column limit setting of the ACF.
Display data fields which most likely have a value on the left in order to avoid gaps.
Add the annotations position = 0;0 and colspan = 3 to all tables. Remove the colspan annotations from other types of data fields.
Show the labels for all data fields (annotation show-label-in-view should be true).
Copy a Ticket Field
You do not necessarily have to create every data field using the pop-up menu. You can also copy an existing data field. This might be a ticket field, customer field, or resource field. Select the respective data field in the data field group and click the Copy button. Then navigate to the data field group where the copied field should be placed. This might be a ticket field group, a customer field group, or a resource field group. You can copy a field from one object type (e.g. ticket) to another (e.g. customer). Click into the list of data fields of the target field group and click the Paste button.
Every type of field can be copied, from simple string fields over enums to entire lists of structs. To copy a list of structs or a list of fields, mark and copy only the list, the child objects (e.g., structs with fields) will be copied automatically.
These things will be copied:
- almost all annotations with their values
- all localized values
These things will not be copied:
- the following annotations
- ldapid: This annotation can be only once in a data model. Duplication would cause an invalid model.
- username: This annotation can be only once in a data model. Duplication would cause an invalid model.
- password: This annotation can be only once in a data model. Duplication would cause an invalid model.
- position: The value for this annotation must be unique, so the annotation is duplicated, but the value is removed from the copy.
- ticket-list-position: This annotation should be used very specifically and, thus, it should be present only for very few fields. Duplicating it would potentially multiply it although it should not be used for the majority of copies.
Naming of the copied field(s):
- Copy to other field group: field name is used
- Copy to same field group: <field name>_copy is used
Besides the Copy/Paste buttons you can also use the keyboard shortcuts:
- Copy: CTRL-C
- Paste: CTRL-V
Edit a Ticket Field
If you want to edit a ticket field, select it in the list and click the Edit button. The same window as described above for creating a ticket field will appear. Except for data type, enum type, and enum group you can modify all fields and save your changes by clicking OK.
Annotate a Ticket Field
Just like ticket field groups, ticket fields are annotated to define the properties of the field, e.g., is it read-only, should it be indexed, and where it should be displayed on the Web Client GUI (please see section Annotations for a list of all available annotations). Select a field and click the Annotate button below the list. The following pop-up window appears:

Figure 44: ConSol CM Admin Tool - Tickets, Ticket Fields: Assigning annotations for a ticket field
The right part of the window contains the available annotations (2). Using the selection field above the list you can filter the display according to annotation type (3). Select the desired annotations and move them to the Assigned annotations list on the left (1) by clicking the Assign button (4). This list can also be filtered according to annotation type. Click OK to assign the annotations to the ticket field and to close the window.
The annotations for the selected field are now shown with a default value (if available, e.g., true or false) in the bottom right-hand corner of the administration page. The value can be modified by double-clicking the corresponding Value field and typing the desired value. Press the Enter key afterwards.
Ticket fields will appear in the Web Client as they are ordered in the list unless you have assigned a layout via the position annotation. You can change the position of a field in the list by using the Move upwards and Move downwards buttons below.
Note on the layout of the ticket data:
You can define several columns of data fields on each line, e.g., the position annotation can end with 0, 1 or 2.
| 0;0 | 0;1 | 0;2 |
| 1;0 | 1;1 | 1;2 |
Delete a Ticket Field
A ticket field can only be deleted if it is not assigned to a queue or a ticket, otherwise you get a warning stating you can only disable this field (see below). In order to delete a ticket field, select it in the list and click the Delete button. If you confirm the following dialog with Yes, the ticket field will be removed from the list and the system.
Enable or Disable a Ticket Field
If you cannot delete a ticket field, or if you do not want to delete it because you might need it again, you can disable it. To do so select the field and click the Deactivate button. The entry in the list is shown in italics afterwards. A disabled ticket field is not displayed in the Web Client. Just click the Activate button below the ticket field list, if you want to enable the field again.
Visibility of Ticket Data in CM/Track
If CM/Track, a ConSol CM Add-on which provides a customer portal, is active in your CM system, you will have to configure ticket fields which are specific for CM/Track. Furthermore, the visibility of the ticket fields in the customer portal has to be configured. This is explained in detail in section CM/Track: Data Availability For Customers.
Using Scripted Field Visualization for Ticket Fields
Using Scripted field visualization, you can enhance the display of data in ticket fields. Please see section Scripts of Type Field Visualization for details.