GUI of the Web Admin Suite
This section describes the features of the GUI of the Web Admin Suite. It includes a short overview of the screen structure, a list of the used icons and some general hints about using the Web Admin Suite.
You can access the Web Admin Suite in your browser by appending /was to the system URL, e.g. https://mycmserver/was.
Structure of the screen
The GUI of the Web Admin Suite is divided into three parts: the header at the top, the menu bar on the left, and the main panel.
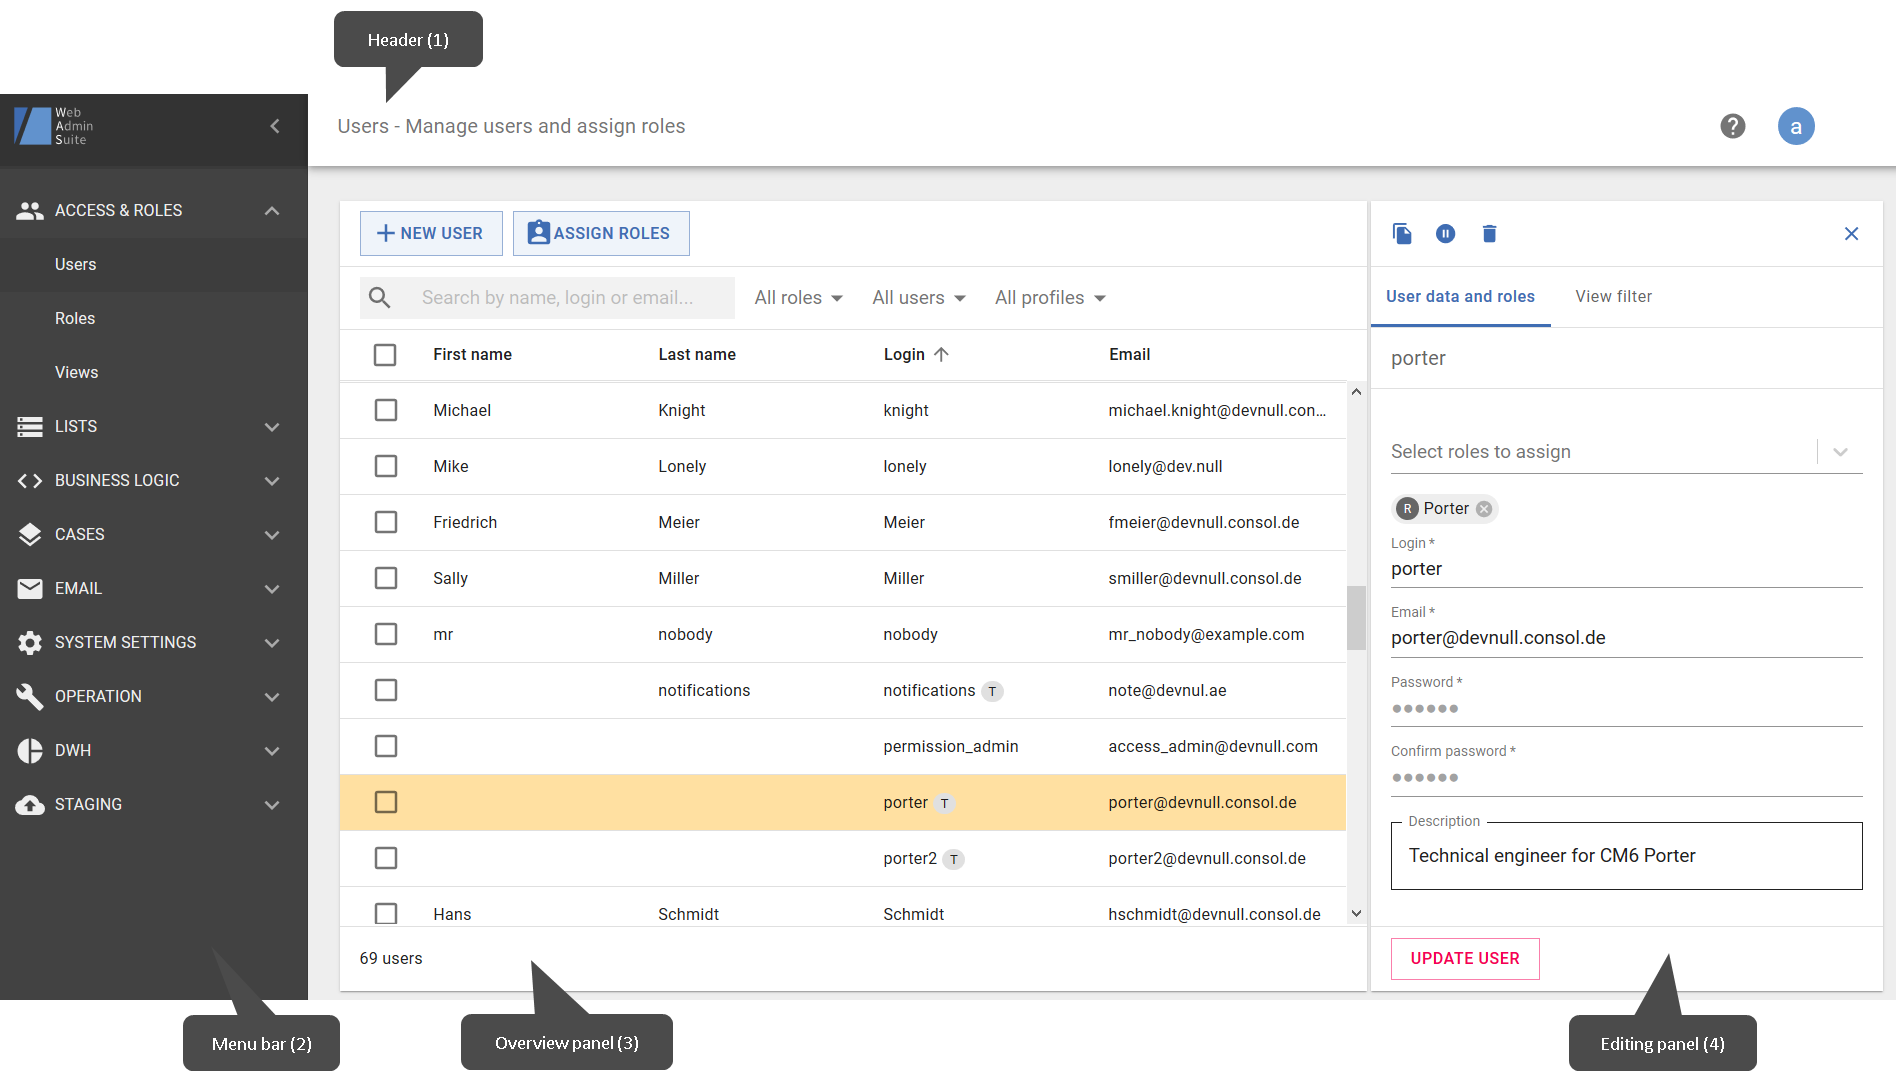
Figure 5: Page structure of the Web Admin Suite
The header (1) contains the following information:
- Name of the current screen
- Help icon (question mark) which provides a link to the online help page of the current screen
- Logout button (circle with the first letter of the name of the current user)
The menu bar (2) contains the links to the Web Admin Suite screens grouped by area. Currently, a dashboard and seven groups are available:
- Dashboard
View general system information and an overview of the system status. Start screen, also accessible using the Web Admin Suite icon in the header. - Access & roles
This group contains three sections: - Lists
This group contains two sections:- Enumerated lists
Manage lists to be used in data fields and hierarchical lists and edit list values, see Enumerated lists. - Hierarchical lists
Create and edit data fields with hierarchical lists for cases, contacts and resources, see Hierarchical lists.
- Enumerated lists
- Business logic
This group contains two sections:- Scripts
Create and edit the scripts to be used in the system, see Scripts. - Templates
Create and edit the templates to be used in the system, see Technical templates.
- Scripts
- Cases
This group contains one section:- Activity forms
Manage activity forms, see Activity forms
- Activity forms
- Email
This group contains one section:- Email backups
Manage email backups, see Email backups.
- Email backups
- System settings
This group contains two sections:- System properties
Manage system settings and configure components, see System properties. - Client configurations
Manage configurations for CM/Track, see Client configurations. - Labels
Manage the labels used in ConSol CM, see Labels.
- System properties
- Operation
This group contains three sections: - DWH
This group contains one section:- Cubes
Manage cubes (views) on the DWH database, see Cubes
- Cubes
- Staging
This group contains two sections:
You can collapse the menu bar by clicking the arrow icon in its header. To expand it again, click the icon with the three horizontal lines in the header. If you click the icon of a group, a menu where you can select one of the group’s pages opens.
You work in the main panel (3 and 4). Its content depends on the selected menu item and the current action. Usually, an overview panel (3) which spans the whole width of the main panel is displayed when you select a menu item. When you click an item to work on it, the main panel is split and an editing panel (4) is displayed on the right. You can close the editing panel by clicking the X icon in the upper right corner. If you want to edit another item, you can also select it directly in the overview panel. The content of the editing panel changes accordingly.
Icons
The Web Admin Suite uses icons for certain actions. You can hover over the icon to see a tooltip with a description.
The following icons exist:
|
Icon |
Meaning |
|---|---|
|
|
Edit an item |
|
|
Enable an item |
|
|
Disable an item |
|
|
Delete an item |
|
|
Duplicate an item |
|
|
Assign or unassign items |
|
|
Sort items in a list |
|
|
Add an item |
|
|
Remove an item |
|
|
Download an item |
|
|
Retry an item |
|
|
Sort table by column |
|
|
Choose the columns to be displayed in a table |
|
|
Expand the menu bar |
|
|
Open the online help |
|
|
Open integrated documentation |
Icons can appear in several situations:
- The icon is displayed as soon as the page is loaded.
-> The action is not related to a specific item. - When you hover over an item, the icon is displayed next to this item.
-> The action is applied to this item. - When you select one or several items using a checkbox, an icon bar appears on the top of the table.
-> The action is applied to all selected items.
Behavior of the Web Admin Suite
When do actions take effect?
There are three possible ways how actions take effect in the Web Admin Suite:
- There is a button to confirm the action. Usually, the button is inactive at first, when you have not made any changes yet. It becomes available as soon as you make changes.
-> Click the button to confirm your action. - The action takes effect immediately. This behavior applies to some settings where confirming each individual action would be cumbersome, e.g., sorting items in a list or assigning permissions.
-> You do not need to confirm your action, but you should remember that you cannot undo it. - A warning message is displayed to confirm the action. This is the default behavior for actions which delete items.
-> Confirm the warning message to perform the action.
Can several users work simultaneously?
Several users can work with the Web Admin Suite and the Admin Tool at the same time. If you work in an area where another user has made a change simultaneously, a red banner is displayed at the top of the page and you need to reload the page to receive the changes made by the other user.