Process Designer GUI
Introduction to the Process Designer GUI Elements
Overview: GUI Sections
The Process Designer GUI contains the following elements, please see the next figure and the list below.

Figure 15: ConSol CM Process Designer - GUI elements
Main Menu
The main menu contains the menu items as text entries and a menu icon list.
|
Menu main entry |
Menu sub entry |
Icon |
Note |
|---|---|---|---|
|
File |
New ... |
|
Create a new workflow. |
|
|
Load ... |
|
Load a workflow. Opens table with existing workflows, see section Loading a Workflow. |
|
|
Delete ... |
|
Delete a workflow. Opens table with existing workflows, see section Deleting a Workflow. |
|
|
Import ... |
|
Import a workflow from a (proprietary workflow format) file. |
|
|
Save ... |
|
Save workflow (existing version). |
|
|
Save as new version |
|
Save the workflow as a new version. |
|
|
Export ... |
|
Export the workflow to a file. Opens file browser of the operation system. The workflow is saved in a proprietary workflow format (.par). |
|
|
Deploy ... |
|
(Save as new version and) deploy the workflow, i.e. install the workflow in the system. The system might prompt you for a decision:
|
|
|
Export to image |
|
Creates an image from the entire workflow as .png file and opens a pop-up menu where you can select the path where to save this png file. Use this functionality for your process documentation. |
|
|
Log in |
|
Log in to the Process Designer. Usually the login window is displayed directly after the start of the Process Designer. As login an account with administrator permissions or with the permissions to manage workflows (see ConSol CM Administrator Manual, section Role Administration) is required. |
|
|
Log out |
|
Log out. Does not exit the Process Designer. |
|
|
Exit |
|
Exit/stop the Process Designer application. |
|
Edit |
Clear current tab |
|
Delete the entire workflow, all elements in the main editing panel. |
|
|
Undo |
|
Reverse the last action which has been done in the Process Designer. Can be disabled in the Local configuration. |
|
Options |
Local configuration |
|
Display pop-up window where you can select the display language of the Process Designer. All languages which have been configured for the system (see section Global Configuration in the ConSol CM Administrator Manual) are available. The labels in the workflow in the main editing panel will be displayed in the selected language. Using the checkbox Disable undo tracking, you can switch off the Undo functionality. |
|
View |
Normal zoom |
|
Display workflow in default zoom (like at start of Process Designer). |
|
|
Expand all scopes |
|
Display all scopes in the expanded version. See also Process Designer GUI section below. |
|
|
Collapse all scopes |
|
Display all scopes in the collapsed version. See also Process Designer GUI section below. |
|
|
Hide/Show palette |
|
Do (not) display palette in GUI. |
|
|
Hide/Show properties |
|
Do (not) display Properties Editor in GUI. |
|
|
Hide/Show explorer |
|
Do (not) display explorer (tree). |
|
|
Show ticket transfer history |
|
Opens a pop-up window where the parameters for the ticket transfer during the deployment of a new workflow are displayed:
|
|
|
IDE log |
|
Opens the Log File Editor in the lower half of the screen and displays the user-specific log file of the Process Designer: |
|
Help |
About |
|
Display version information about the Process Designer and about the Java virtual machine it uses in the current configuration (this is the JVM of the browser plug-in). |


Main Workflow Editing Panel
To design a workflow define the workflow elements using the graphical layout mode of the Process Designer and add the scripts to the elements where required.
A new element can be added to the workflow using drag-and-drop of the element from the palette.
A new element as successor of an existing element can also be created by using the context menu (right mouse click) of an existing element, e.g. for an activity (see the following figure). The new element and the connection to this element will be created.

Figure 16: ConSol CM Process Designer - Context menu for a workflow activity
A new connection between elements is established using the left mouse button while pressing the CTRL key and just drawing the line. If the connection goes from one scope to another, the scope entry and exit points are added automatically.

Figure 17: ConSol CM Process Designer - Adding new elements and connections
You might consider using a global scope for each workflow. Please refer to the Best Practices section for more information about how to design good workflows.
Loading a Workflow
When you have selected the icon or menu item Load, a table with all available workflows is displayed.

Figure 18: ConSol CM Process Designer - Load a workflow
The table can be sorted based on a column by clicking on the little triangle icon next to the column header.
The table contains the following columns:
- name
The name of the workflow as set in the name property of the workflow (click into the white space around the global scope to see it for a workflow). - version
The version of the workflow. This is assigned automatically by the ConSol CM system. When a scenario has been exported and is imported again, the numbering will start with 1.0 anew. - status
For older workflows this field is empty. The workflows which are deployed are described by currently deployed. - modification date
The date of the last modification (date when the workflow was saved) is indicated. - workflow description
The description which has been entered into the field workflow description (not description!).
To load a workflow, select it in the list and click Load. Only single selection is possible.
Deleting a Workflow
When you have selected the icon or menu item Delete, a table with all available workflows is displayed.

Figure 19: ConSol CM Process Designer - Delete a workflow
The table can be sorted based on a column by clicking on the little triangle icon next to the column header.
The table contains the following columns:
- name
The name of the workflow as set in the name property of the workflow (click into the white space around the global scope to see it for a workflow). - version
The version of the workflow. This is assigned automatically by the ConSol CM system. When a scenario has been exported and is imported again, the numbering will start with 1.0 anew. - status
For older workflows this field is empty. The workflows which are deployed are described by currently deployed. - modification date
The date of the last modification (date when the workflow was saved) is indicated. - workflow description
The description which has been entered into the field workflow description (not description!).
To delete one or more workflow(s), select it/them in the list and click Delete. For every workflow you are prompted to confirm the deletion, so when you have marked a great number of workflows to delete and then you realize that you would like to keep one of them this is possible without canceling the entire operation.
You might want to delete all or almost all older workflows before exporting a scenario, because a great number of workflows increases the size of the scenario considerably. For export and import of scenarios, please refer to the respective section in the ConSol CM Administrator Manual.
For an export of a scenario (using the Admin Tool), you might also use the option Only latest/installed versions for workflows. This can reduce the size of the exported scenario considerably, depending on the number of non-active workflows. Nevertheless, it might be a good idea to clean the CM system regarding workflows from time to time to reduce the old data and a potential data overhead.
Palette for Elements and Adornments
As a default setting the palette is displayed in the top right corner. You can hide (and re-display) the palette using the main menu entry Hide/Show palette under View.
The palette contains two types of workflow components:
- elements
- adornments
Elements
Elements are basic components which form the workflow and represent the process logic.
| Icon | Element | Note | Section |
|---|---|---|---|

|
Start node | Is set automatically, no other start node than the default start node can be added. | Workflow Components: START Node |

|
End node | A workflow can contain one or more end nodes. | Workflow Components: END Nodes |

|
Activity | The actions in the workflow, manual or automatic. | Workflow Components: Activities |

|
Scope | The highest hierarchy level in workflows | Workflow Components: Scopes |

|
Decision |
Decision node which has a true and a false exit point. |
Workflow Components: Decision Nodes |

|
Jump-in | Entry point for tickets from other workflows/queues. | Jump-out and Jump-in Nodes |

|
Jump-out | Exit point for tickets. A target queue has to be defined. A target node can be defined but is optional. | Jump-out and Jump-in Nodes |
Adornments
Adornments are objects which are assigned to a workflow activity or to a scope. Please see indicated sections for detailed explanations.
| Icon | Adornment | Note | Section |
|---|---|---|---|

|
Time trigger | Can measure time intervals. Fires when the end of the interval has been reached. Can optionally use a business calendar. | Time Triggers |

|
Mail trigger | Fires when an email for the ticket has come in. | Mail Triggers |

|
Business event trigger | Fires when an event has occurred. The type of event can be specified (e.g. change of engineer, change of priority). | Business Event Triggers |

|
ACF (Activity Control Form) | Defines the ACF which should be displayed when the activity is executed. ACFs are defined in the Admin Tool. | Activity Control Forms (ACFs) |
Activity Types
Activities can have additional icons to indicate if the activity is manual or there are conditions. Please see indicated sections for detailed explanations.
|
Icon |
Name |
Description |
Section |
|---|---|---|---|
|
|
Manual |
Indicates that the activity is a manual activity, i.e. the engineer has to click it in the Web Client. |
|
|
|
Scope activity |
Indicates that the activity is a scope activity, i.e. that the activity is not bound to a certain chain of activities but is available in the entire scope |
|
|
|
Precondition |
Indicates that the activity has a condition script attached. The condition script is executed when the previous activity has been performed. The activity with the precondition icon is only displayed if the condition script returns true. |


The Properties Editor (Example: Activity)
The Properties Editor is opened for the element which has been selected in the main editing panel and contains component-specific parameters. Some general parameters are present for all components, some are present only for a certain type of component.

Figure 20: ConSol CM Process Designer - Selected activity in workflow

Figure 21: ConSol CM Process Designer - Properties editor
Properties:
- name
Mandatory. This is the technical object name. When an object is newly created, you can edit the label and the object name will be generated automatically from the label (umlauts are omitted). Afterwards, the object name is never changed automatically but can be edited manually. Allowed characters for names are:- letters (small or capital), but no umlauts
- underscores
- numbers
- label
The localized name of the element. All languages which have been configured for the system are available and can be filled. In the Web Client of the engineer the description will be displayed according to the browser locale. If it is not available, the label will be displayed using the default locale.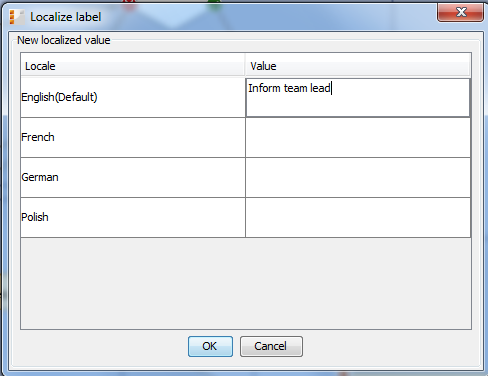
Figure 22: ConSol CM Process Designer - Localization for labels
- description
Optional. A localized text can be entered which will be displayed as mouse-over in the Web Client. This might help the engineer to understand what will happen when the respective workflow activity is executed.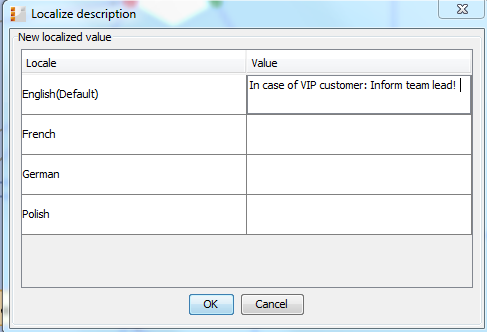
Figure 23: ConSol CM Process Designer - Localized description of an activity
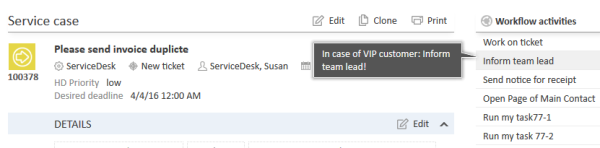
Figure 24: ConSol CM Web Client - Localized description of an activity as mouse-over
- sort index
Defines:- For activities:
The order of the activities in the list of Workflow activities in the Web Client. The higher the number the more at the bottom of the list the activity is offered in the Web Client. - For scopes:
The order of the tickets in the ticket list (Web Client) in views. The higher the scope index the more at the bottom of the list the tickets are displayed.
- For activities:
- overlay
Optional, for activities. Click into the orange space to define a standard ConSol CM overlay or one that has already been uploaded. Click on the file explorer (...) button to open the file explorer of the operation system for an upload of a new icon. When the ticket passes through an activity the overlay is added to the ticket icon in the Web Client. As a maximum, three overlays can be attached to a ticket icon. This mechanism can be used for several purposes, some examples are:- An escalation:
The ticket has been created without any engineer taking care of it. - An email:
The ticket has received an email. - A note for the engineer:
E.g. another engineer has added a comment to my ticket.

Figure 25: ConSol CM Process Designer - Properties editor: Standard overlays and one customer-defined overlay
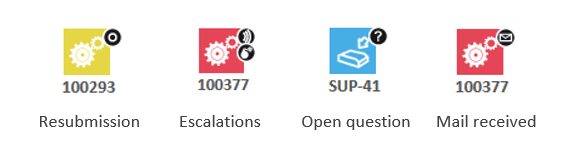
Figure 26: ConSol CM Web Client - Ticket icons with overlays
- An escalation:
- overlay range
Only displayed when an overlay has been set.- activity
The overlay is attached only as long as the ticket stands behind the activity or - if present - behind the last automatic activity which can be passed without manual interaction. As soon as the next manual activity is executed, the overlay is deleted from the ticket icon. - scope
The overlay is deleted when the ticket leaves the scope. - process
Once the overlay has been attached to the ticket icon, it stays there for the rest of the process. - next overlay
The overlay is attached to the ticket icon as long as no new overlay appears. In that case, only the new one is attached, the old one is deleted.
In case you have to cover a use case where it is not sufficient to set or remove an overlay using the overlay range, you can use a workflow script. Please see section Working With Overlays for details.
- activity
- precondition
Optional, for activities. A script can be entered using the Script Editor (see section The Script Editor) which has to return true or false. The script is executed when the previous activity has been performed, i.e. when it becomes possible to display the activity with the precondition. In case true is returned, the activity is displayed, in case false is returned, the activity is not displayed. An activity which has a precondition is marked by the icon exclamation mark/precondition.Return value is true.
The activity is displayed. If it is a manual activity it can be selected/performed by the engineer in the Web Client GUI.Return value is false.
The activity is not displayed in the Web Client GUI
Important note about customer fields
When you work with customer fields, i.e. with data fields that contain customer data, please keep in mind that it might be required to consider the data models of different customer groups in case a workflow is used for queues which have been assigned to more than one customer group! - script
Optional, for activities. A script can be entered using the Script Editor (see section The Script Editor) which is executed when the ticket enters the activity. - activity type
-
automatic
The activity is performed automatically by the system. The action is transparent for the engineer. -
manual
The activity is marked with the red hand/manual icon in the Process Designer GUI. The activity is available as workflow activity in the Web Client and is performed when the engineer has clicked on this activity. It is only available in a certain, strictly defined position of the ticket within the process. -
scope
The activity is marked with the blue hand/manual icon in the Process Designer GUI. The activity is available like a workflow activity in the Web Client and is performed when the engineer has clicked on this activity. The scope activity is available as long as the ticket is located within the scope where the activity is placed or in one of the subordinate scopes.
For a detailed explanation of the ConSol CM process logic, please see section Process Logic.
-
- history visibility
Mandatory, but default value has been set (default). The value defines the display levels of the Web Client GUI where the action (that the activity has been performed) should be displayed:- 2nd level and 3rd level
- only 3rd level
- on every level
- default
This refers to the value defined in the Admin Tool under Ticket History for the activity configuration. Depending on the type of activity, one of the following parameters is used:- Manual activity or activity with overlay executed
- Activity executed after escalation
- Automatic activity executed
- hidden on all levels
If this is set, the execution of the activity is never displayed in the Web Client.
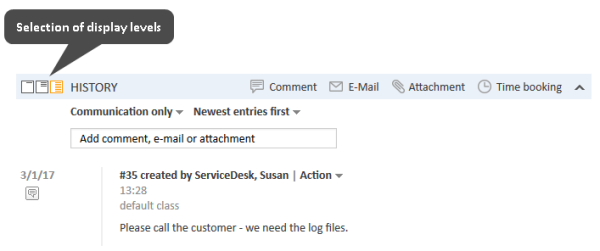
Figure 27: ConSol CM Web Client - Display levels in ticket history
- disable auto update
Defines ticket behavior of the ticket when an event has been fired or executed. Usually, after an event, a ticket update operation is performed automatically. In case a chain of events is used you should avoid triggering a ticket update operation after every single event. To avoid this, set disable auto update to true in all events except for the last one. Then, only after the last event, the ticket is updated. -
expose to customers
Boolean. Available for manual activities only. If checked (i.e. if set to true), the activity will be offered as workflow activity in the ConSol CM portal, CM/Track. The activity will be offered in CM/Track if no condition is set or if the condition script returns true. If an ACF (Activity Control Form) is set for the activity, it will be offered as well. An example of an ACF in CM/Track is shown in section ACFs in CM/Track.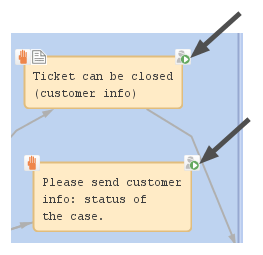
Figure 28: ConSol CM Process Designer - Two activities which should be displayed for CM/Track customers ("exposed to customers")
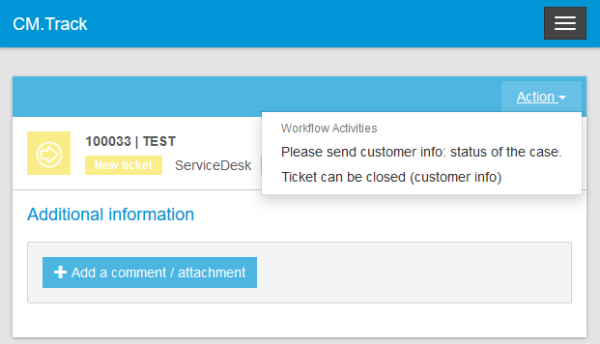
Figure 29: CM/Track (i.e. customer perspective) - Two activities which are displayed in CM/Track for customers ("exposed to customers")


The Script Editor
You use the Script Editor in the Process Designer to write Groovy scripts (i.e. pure Groovy and Java code is accepted). For explanations, recommendations, and examples concerning workflow programming using scripts, please see section Introduction to Workflow Programming.

Figure 30: ConSol CM Process Designer - Script editor
The Script Editor provides the following features:
- Syntax highlighting
Groovy code is highlighted according to key words. - Code completion
When you have entered the name of an object and the dot, the possible methods are suggested. Press CTRL + SPACE to activate code completion. - Code check
The entered code is controlled according to the correct use of general syntax and methods. The error code is displayed in the Compilation result panel.
GUI Tips and Tricks
Make sure you save the workflow on a regular basis while you work on it. Currently, there is no UNDO button. In case you have accidentally removed elements which you still need, please load one of the predecessors of the current workflows and continue work with it.
| To ... | do the following ... |
|---|---|
| expand a single collapsed scope | double-click in the scope |
| collapse a single expanded scope | double-click in the scope |
| resize a scope | move the handler of the scope (bottom right of the scope) |
| add a new email trigger to a scope | grab the email trigger symbol in the palette with the mouse and drop the newly created email trigger into the respective scope |
| add a time trigger to a scope | grab the time trigger symbol in the palette with the mouse and drop the newly created time trigger into the respective scope |
| add a time trigger to an activity | grab the time trigger symbol in the palette with the mouse and drop the newly created time trigger into the respective activity (used e.g., for resubmissions) |
| delete a connection between two activities | mark the connection (not the scope or other surrounding elements!) and press DELETE |
| insert a new edge into a connection between two activities | click on the connection: a small square indicates the new edge which can then be moved around |