Display of Resources in the Web Client
Resources are displayed on several pages. The resource dashboard provides an overview of all resources, the resource type page shows all resources of a given type, e.g., all printers of type HP 4711, and the resource page contains the details of a specific resource, e.g., of one specific printer of the type HP 4711.
The Resource Dashboard
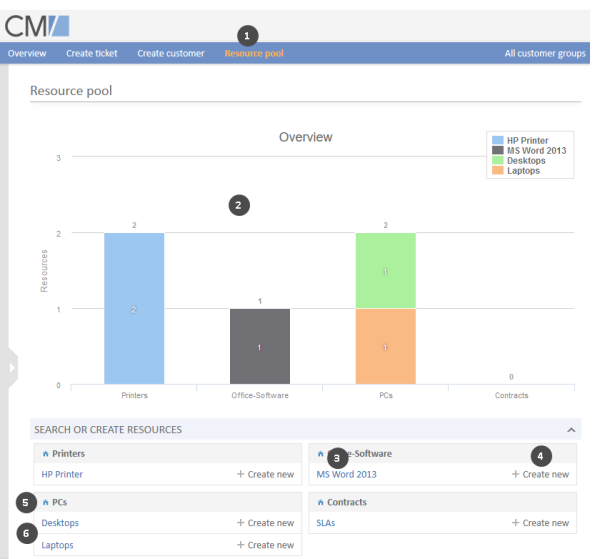
The resource dashboard is displayed when you click the menu item Resource pool (1). In the upper part of the screen, it shows a graphical summary of the resources which are present in the system (2). The lower part of the screens contains links to access existing resources (3) and create new ones (4). The resource types (6) are listed below their resource category (5).
Figure 105: The resource dashboard
The Resource Type Page
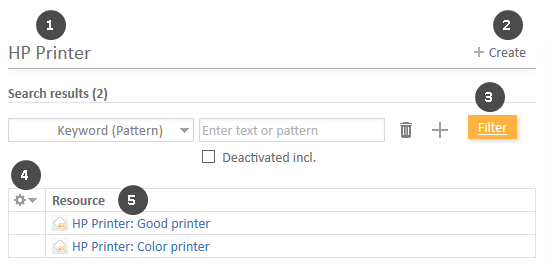
The resource type page is opened when you click a resource type on the resource dashboard. It contains a table listing all the resources of the resource type (1). The following actions are possible on this page:
- Create a new resource (2)
Click the Create button in the upper right corner of the screen to create a new resource of this resource type. - Filter the list (3)
Enter search criteria in the Search results section to filter the list, see Detailed Search. - Configure the table columns (4)
Open the context menu next to the wheel icon to configure the table columns. The default column Resource cannot be removed but you can add additional columns by entering the column name and selecting one of the suggestions from the Autocomplete Search. You can remove additional columns by clicking the cross next to their name. - Open a resource page (5)
Click the desired resource to open its resource page.
You can display deactivated resources by checking the option Deactivated incl.
Figure 106: Resource type page
The Resource Page
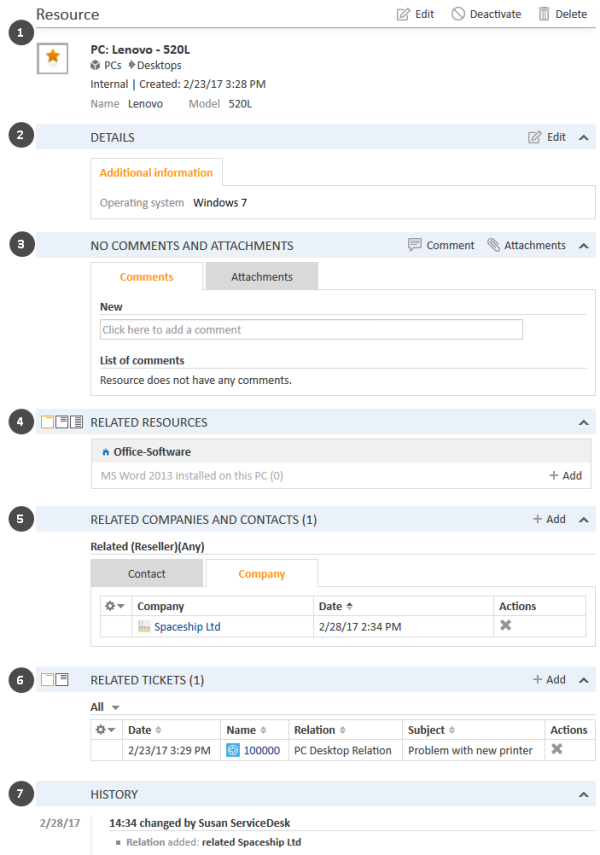
The resource page contains resource data and additional information about the resource. It can have up to seven sections. Next to resource page, the available resource activities are displayed.
Figure 107: Resource page
Header Section (1)
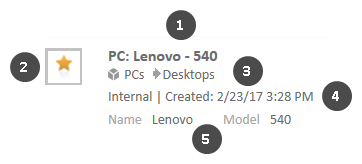
The default headline of the section is Resource, but it may vary depending on how resources are called in you CM system. It contains the basic resource data. The resource name is displayed in bold font (1). On its left, the resource icon (2) is displayed. Depending on the individual configuration of your CM system, there can be several icons for different resource types. Below the resource name, you see its resource category and resource type (3), followed by the resource mode and the creation data (4). The resource fields are displayed below (5).
Figure 108: Resource data
In the upper right corner, you find several links which allow you to edit, deactivate, and delete the resource, see Accessing Existing Resources.
Note on the resource modes
This manual describes how to work with internal resources. There are three other resource modes:
- on-the-fly
The resources are not saved in ConSol CM but dynamically retrieved from an external location. You cannot create or edit them in the Web Client. They are only visible in resource relations, where you can add them using their external ID. - cached
The resources are not saved in ConSol CM initially. Instead, single resources are imported when they are used in resource relations (by providing their external ID). You cannot create or edit these resources in the Web Client, and you can only view the resources which have been imported already. - imported
The resources are imported from an external system. You can use them in the same way as internal resources but you cannot create new ones. Also, your edits to these resources may get lost when a new resource import takes place.
Details Section (2)
The section headline is usually Details. This section contains additional data fields with resource data. Each group has its own tab allowing you to access the data. Click the tab heading to switch to the group. To edit the group data, click the Edit link on the right (see Editing Resource Data).
Comments and Attachments Section(3)
The section headline is Comments and Attachments. This section has two tabs showing the comments and attachments added to the resource. The number in the headline refers to the sum of both comments and attachments. You can only see this section if you have the required permissions. Please see Editing the Comments and Attachments for further information about working with comments and attachments.
Section for Related Resources (4)
The default headline of the section is Related Resources, but it may vary depending on how resources are called in you CM system. This section shows the resources linked to the resource. You can set the visibility level to determine how much information you want to see about each related resource. Please see Resource-Resource Relations for further information about working with resource relations.
Section for Related Customers (5)
The section heading is usually Related Companies and Contacts or something similar. It contains the relations existing between this resource and customers (companies and contacts). This kind of relations can be used for example to indicate that a contact uses a resource. The relations are arranged below the different relation types (red font). Next to the name of the relation, the customer group and the type of customer (company or contact) are displayed. The available relations depend on the individual configuration of your CM system.
Please see Resource-Customer Relations for further information about working with related customers. You can change the table columns and navigate between the pages. Please see Adjusting Tables for further information.
Section for Related Tickets (6)
The section heading is usually Related Tickets. It contains the relations existing between this resource and tickets. This kind of relations can be used for example to link a ticket to the resource it concerns. The relations are arranged below the different relation types (red font). You can select whether all tickets, only open tickets or only closed tickets should be displayed by selecting the desired option from the context menu. The available relations depend on the individual configuration of your CM system.
Please see Resource-Ticket Relations for further information about working with relations to tickets. You can change the table columns and navigate between the pages. Please see Adjusting Tables for further information. In addition, you can set the visibility level to determine how much information you want to see about each related ticket.
History Section (7)
The section headline is History. This section contains the resource history which shows all changes which were carried out for this resource. This includes changes to data fields, and the addition or removal of comments, attachments and relations. The History section contains the date and time of the change, and the name of the engineer who carried out the change. The latter can also be a technical name in case of automatic changes.


