Accessing Existing Resources
In order to update a resource, you need to open its resource page. There are several ways to access the resource page of an existing resource:
- Opening a resource on the resource type page.
- Searching for a resource using the Quick Search or the Detailed Search.
- Opening a resource using the Jump to resource link in the context menu of a resource in the Section for Related Resources of a customer page or a ticket.
Editing Resource Data
If you have the required permissions, you can edit resource data in the Header Section and in the Details Section.
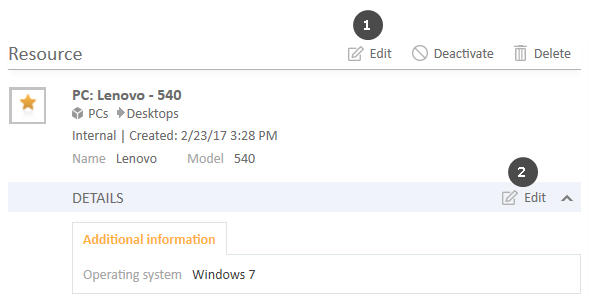
Figure 114: Editing resource data
- (1) Click the Edit link in the upper right corner of the Header Section
- (2) Click the Edit link in the upper right corner of the Details Section.
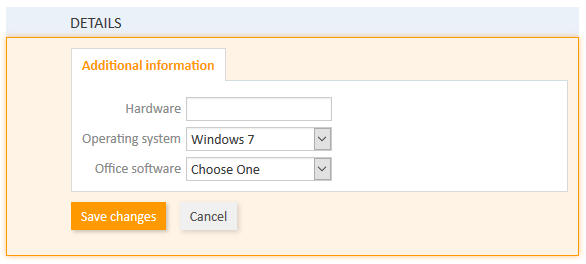
The section's background turns yellow to indicate that it is in edit mode. Edit the customer data as required (see The Different Data Fields for details about the different types of data fields). Click Save changes to save the new data. The section background turns gray again (view mode).
Figure 115: Details Section in edit mode
Editing the Comments and Attachments
The Comments and Attachments Section of the resource page allows you to add comments and attachments to the resource. The respective permissions are granted independently from the permissions to read and write resource data, so it is possible that you cannot view or edit this section.
You can use the Comments and Attachments Section to collect information about the resource, e.g., adding the release notes to a resource representing a software product, or writing a comment about how to change the ink cartridges of a certain printer.
Adding Attachments
To add an attachment, click the Attachment link in the header of the section. The section background turns yellow to indicate that it is in edit mode. If the section is already in edit mode, you can also add an attachment by clicking the Attachment tab.
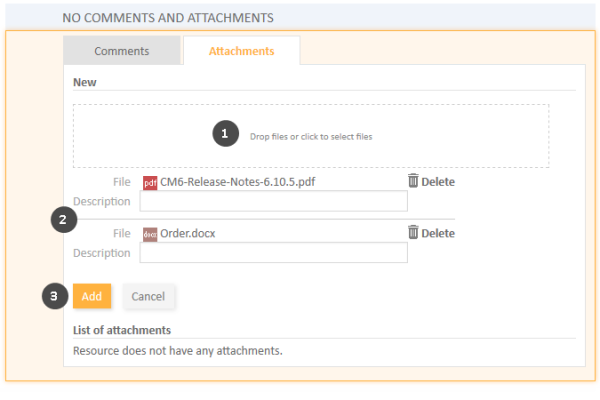
Figure 116: Adding an attachment
Please proceed as follows to add an attachment:
- Specify the files to be uploaded by either:
- Dragging and dropping them into the white area.
- Clicking into the white area to open a file browser dialogue and selecting the files.
- The selected files are displayed in a list below the white area. Optionally, you can add a description in the Description field. Click the Delete link to remove a file from the list.
- Click the Add button to upload the files to the resource page.
The attachments are then displayed in the list of attachments below (still empty in the above figure).
The list of attachments provides the following information. You can filter the list using the drop-down boxes and text fields in the header:
- File type
Indicates the file type of the attachment. - Name
Indicates the file name of the attachment. Click the file name to download the attachment. - Description
Indicates the description provided when the attachment was added, if any. - Date
Indicates the date when the attachment was added. - Added by
Indicates who added the attachment. This can be either an engineer (who uploaded the file) or a technical user (in case the file was automatically uploaded by the system). - Action
Provides links to the available actions. These are:- Apply filters
Filters the list according to your selections in the header. - Clear filters
Removes the filter, i.e., displays all entries.
- Apply filters
You can delete an attachment by clicking the red cross on the right. The attachment is now displayed in italics. At this point you can still undo the removal by clicking Undo remove. As soon as you execute any other action, the attachment is removed permanently.
The possible file formats, maximum file size, and whether attachments are searchable depend on the individual configuration of your CM system.
Adding Comments
To add a comment, click the Comment link in the header of the section. The section background turns yellow to indicate that it is in edit mode. If the section is already in edit mode, you can also add a comment by clicking the Comment tab. Enter the comment and click Add. The comment is then displayed in the list of comment below.
The list of comments provides the following information. You can filter the list using the drop-down boxes and text fields in the header:
- Date
Indicates the date when the comment was added. - Added by
Indicates who added the comment. This can be either an engineer (who entered the comment) or a technical user (in case the comment was automatically created by the system). - Comment
Shows the comment. - Action
Provides links to the available actions. These are:- Apply filters
Filters the list according to your selections in the header. - Clear filters
Removes the filter, i.e., displays all entries.
- Apply filters
You can delete a comment by clicking the red cross on the right. The comment is now displayed in italics. At this point you can still undo the removal by clicking Undo remove. As soon as you execute any other action, the comment is removed for good.
Performing Resource Activities
Resource activities allow you to perform certain actions for the current resource. You can find them in the Activities box next to the open resource page. Click the desired activity to perform the corresponding action.
Figure 117: Resource activities
Examples for resource activities are:
- Create a new ticket for the resource.
- Create a new customer who is related to the resource.
- Update some resource data.
The available resource activities depend on the resource type and the individual configuration of your CM system. You can only perform resource activities if you have the required permissions to perform activities for this resource type.
Making Resources Unavailable
If a resource should not be used in the CM system anymore, you have two options to handle this situation:
Deactivating Resources
To deactivate a resource, click the Deactivate link in the upper right corner of the resource page. The resource is then displayed in italics both on its resource page and on the pages of related objects (customers, tickets, other resources). The deactivation of a resource has the following effects:
| Actions still possible | Actions not possible anymore |
|---|---|
|
|
Deleting Resources
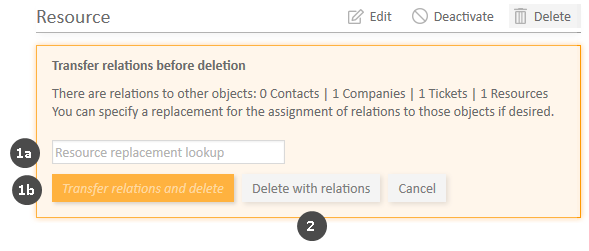
To delete a resource, click the Delete link in the upper right corner of the resource page. If the resource has relations, you have to decide what should happen to the relations before you can delete the resource. There are two options:
- Transfer the relations (1)
You can select another resource of the same resource type to transfer the relations of the current resource to the selected resource. To do so, perform the following steps:- Select the target resource using the Autocomplete Search in the field Resource detail replacement lookup.
- Click the Transfer relations and delete button. The selected resource replaces the current resource in all relations and the current resource is deleted.
- Delete the relations (2)
You can simply delete the relations of the resource together with the resource itself. To do so, click the Delete with relations button.
Figure 118: Deleting a resource
A transfer of relations is only possible if it does not generate any conflicts, e.g., you cannot transfer relations to a resource which is already related to the same customer. In this case, an error message will be displayed and you have to delete the relations.
Making Deactivated Resources Available Again
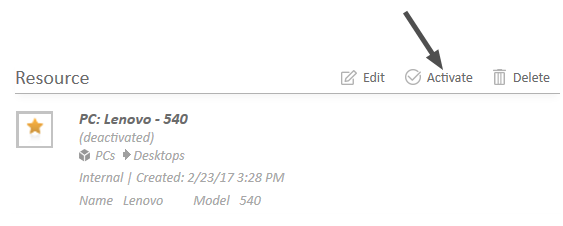
You can make a deactivated resource, which is displayed in italics, available again by reactivating it. To do so, click the Activate link in the upper right corner of the resource page.
The following figure shows a deactivated resource (in italics) and the link to reactivate it.
Figure 119: Reactivating a resource
