Working with Customers within Tickets
This chapter explains the concept of customers in ConSol CM and provides information about the customer-related tasks which you can perform within tickets.
Customers in ConSol CM
Customers represent the external side of the CM system. The customer is the person or object that is the reason for creating the ticket and is usually informed once work on the ticket has been completed. This can be, for example, clients who purchased your company's products or colleagues who receive IT support from your team.
There are two kinds of customers in ConSol CM:
- Main customer
The customer who gives the reason for creating a ticket. A ticket must have exactly one main customer. The main customer is mandatory; you cannot create a ticket without a main customer. - Additional customers
Any customer who is interested in the ticket. An additional customer can have a customer role which describes why the customer was added to the ticket. Additional customers are optional. A ticket can have any number of additional customers.
Both the main customer and the additional customers can be contacts and/or companies. It depends on your system configuration which kinds of customers are available. Please see Explanation of Terms for a detailed explanation of the usage of contacts and companies in ConSol CM.
There are two main actions related to customers which can be carried out in tickets:
- Adding customers to the ticket
You have to specify one main customer for the ticket. This is done when the ticket is created. You can then add any number of additional customers. This action can only be done within the ticket. - Working with customer data
You can edit the data of the main customer and additional customers assigned to the ticket and you can deactivate customers within the ticket. These actions can either be done within the ticket or on the respective customer page. Please see Managing Customers for detailed information about these actions.Please bear in mind that all changes done to customer data are global changes, i.e., the new data will be automatically used in all places within ConSol CM (customer pages, other tickets).
All actions involving customers are carried out in the Customers Section of the ticket.
Main Customer
The main customer is the customer who gave the reason for creating the ticket. A ticket always has to have exactly one main customer. It depends on the customer group if you can add a contact, a company, or a contact or company as the main customer.
- One-level customer data models
The data model contains either only contacts or only companies. Therefore, you can either add a contact or a company as the main customer. - Two-level customer data models
The data model contains both contacts and companies. Depending on your system configuration, you can either add only a contact, a company, or a contact or a company as the main customer.
Specifying the Main Customer During the Creation of the Ticket
When you create a new ticket, you can select an existing customer as the ticket's main customer or create a new customer for this purpose.
You can only create a new customer if you have the required permissions.
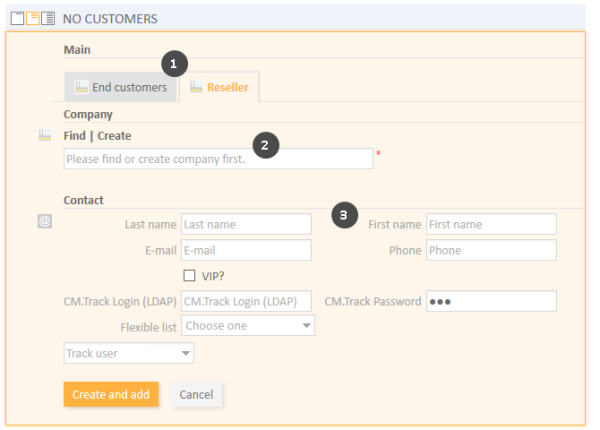
Figure 56: Customer Section in a new ticket: Adding an existing customer during ticket creation
Please proceed as follows to create a new customer:
- If more than one customer group is available, select the tab with the desired customer group.
- Specify the company
You can either select an existing company or create a new one:- To select an existing company, start typing the company name and select the desired company from the suggestions provided by the Autocomplete Search.
-
To create a new company, click the Create link above the entry field and fill in the provided data fields. Click Create and select to confirm your entry.
If you work with a two-level customer model which allows adding a company as a customer, you can click the Select button to add this company as the main customer. In this case, you don't have to specify a contact.
- Specify the contact
You can either select an existing contact or create a new one:- To select an existing contact, start typing into one of the data fields to see the suggestions provided by the Autocomplete Search. Please note that it depends on your system configuration which fields can be used for the Autocomplete Search. Click Select to confirm your entry and to add this contact as the main customer.
- To create a new contact, fill in the provided data fields. Click Create and select to confirm your entry and to add this contact as the main customer.
If you work with a one-level customer model, you skip the second step.
Changing the Main Customer of an Existing Ticket
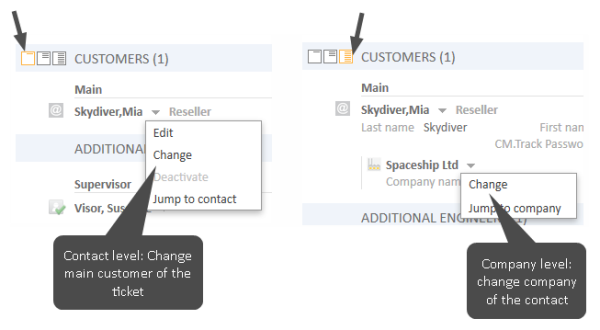
You can change the main customer of an existing ticket by clicking the Change link in the context menu (little arrow icon next to the customer's name). The main customer is removed from the ticket and you can select a new one as described in Specifying the Main Customer During the Creation of the Ticket.
Figure 57: Changing the main customer
Depending on the visibility level, you might see two context menus, where the Change link has a different effect:
- Contact level
This context menu is displayed with all visibility settings. Click the Change link on the contact level to change the main customer of the ticket. - Company level
This context menu is only displayed with the visibility setting Detail. Click the Change link on the company level to change the company of the contact. The contact will remain the main customer of the ticket, but you can choose a new company which the contact should belong to.This is a global change which takes effect in all tickets and on the respective contact and company pages. Use this option only if you want to remove the contact from its old company and link it to a new company. If you want to change the main customer of the ticket, use the context menu of the contact.
Additional Customers
Additional customers are customers who are interested in the ticket. They are optional and usually have a role indicating the reason why they were added. You can add as many additional customers as you want. It depends on the customer group if you can add a contact, a company, or a contact or company as an additional customer. The effects of adding an additional customer depend on the individual configuration of your CM system, e.g., additional customers could for example receive a copy of the emails sent to the main customer.
Viewing the Additional Customers of a Ticket
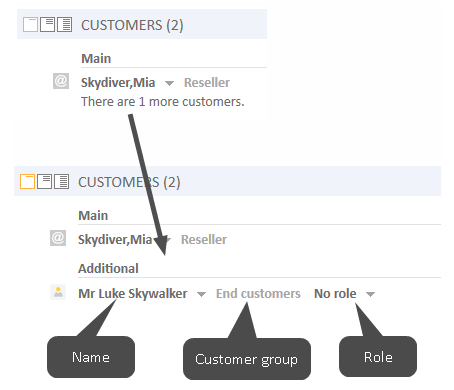
Click the There are more customers link to display the additional customers of a ticket.
Figure 58: Viewing additional customers
Adding an Additional Customer to a Ticket
To add a new additional customer, click the Add link in the upper right corner of the Customers Section. You can either select an existing customer or create a new one. Selecting and creating additional customers works in the same way as selecting and creating main customers, see Specifying the Main Customer During the Creation of the Ticket.
Working with Additional Customers
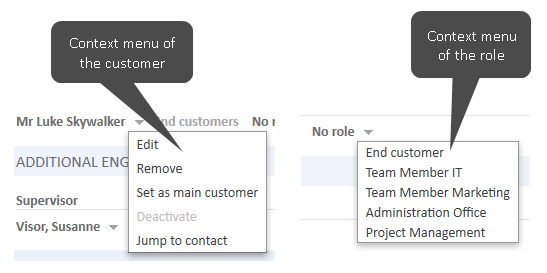
There are several actions which you can carry out for an additional customer. Depending on the type of action, they are either located in the context menu of the additional customer or in the context menu of the role.
Figure 59: Context menus of additional customers
Removing an Additional Customer
To remove an additional customer, open the context menu by clicking the little arrow next to the customer's name and click Remove. The entry is displayed in italics. You can still undo your action by clicking the Undo link in the context menu. As soon as you perform any other action, the additional customer is irrevocably removed from the ticket.
Setting an Additional Customer as Main Customer
To set an additional customer as main customer of the ticket, open the context menu by clicking the little arrow next to the customer's name and click Set as main customer. The additional customer becomes the new main customer and the previous main customer becomes an additional customer.
Indicating a Role for an Additional Customer
The customer role states the purpose or reason for adding an additional customer to this particular ticket. This way, you can, for example, add the customer's project manager as an additional customer to the ticket and give him the corresponding role. Assigning a customer role to an additional customer is optional. The available customer roles and their effects depend on the individual configuration of your CM system.
To indicate a customer role, open the context menu of the role by clicking the little arrow next to the role and select the desired role. If the additional customer already has a role and you want to remove it, select No role.
Working with Main and Additional Customers
The following actions are available for both the main customer and additional customers:
Editing Customer Data
You can edit the customer data of both the main customer and any additional customers from within the ticket.
Editing customer data is a global change. It does not matter where you change the customer data (on the customer page, in the ticket), the data is always changed in the whole CM system, i.e., the changes are visible in every ticket the customer is added to and on the customer page.
To edit the data of the main customer or an additional customer, click the Edit link in the respective context menu. The background of the Customers Section turns yellow to indicate that it is in edit mode. Make the required changes and click Save changes. You can find detailed information about editing customer data in Editing Customer Data.
You can only edit customer data within tickets if you have the permission to edit customers of the respective customer group, and if your system is configured to allow editing customer data within tickets.
Viewing the Customer Page
You can open the customer page of the main customer or an additional customer by opening the context menu of the customer and clicking the Jump to link. Depending on whether the customer is a contact or a company, the link is either called Jump to contact or Jump to company.
Deactivating Customers
You can deactivate a customer if this customer should not be used anymore. This can be done either within closed tickets, tickets where the customer is added as an additional customer or on the customer page.
Customers can only be deactivated if they are not the main customer of any open tickets. In case of a company in a two-level model, the contacts of the company are considered as well. Nevertheless, you can deactivate customers who are additional customers of open tickets.
You can only deactivate a customer if you have the corresponding permissions.
Deactivating a customer has the following effects:
- The customer cannot be added to tickets anymore, i.e., you can neither create new tickets for the customer nor add it to existing tickets.
- The customer is not found in the Quick Search or the Autocomplete Search.
- The customer's history remains available, i.e., you are still able to find the customer's closed tickets using the Detailed Search with the option Deactivated incl., and you can open the customer page. It is also possible to activate a customer again.
To deactivate the customer (contact or company), open the context menu of the customer and click Deactivate.
Deactivating a customer is a global change. It does not matter where you do it, the customer is always deactivated in the whole CM system.
Please see Deactivating a Customer for further information.


